

🤖 AI Trading Agent with Real-Time Social Sentiment Analysis
Transform social media buzz into actionable trading signals using AI-powered analysis
🎯 What This Does
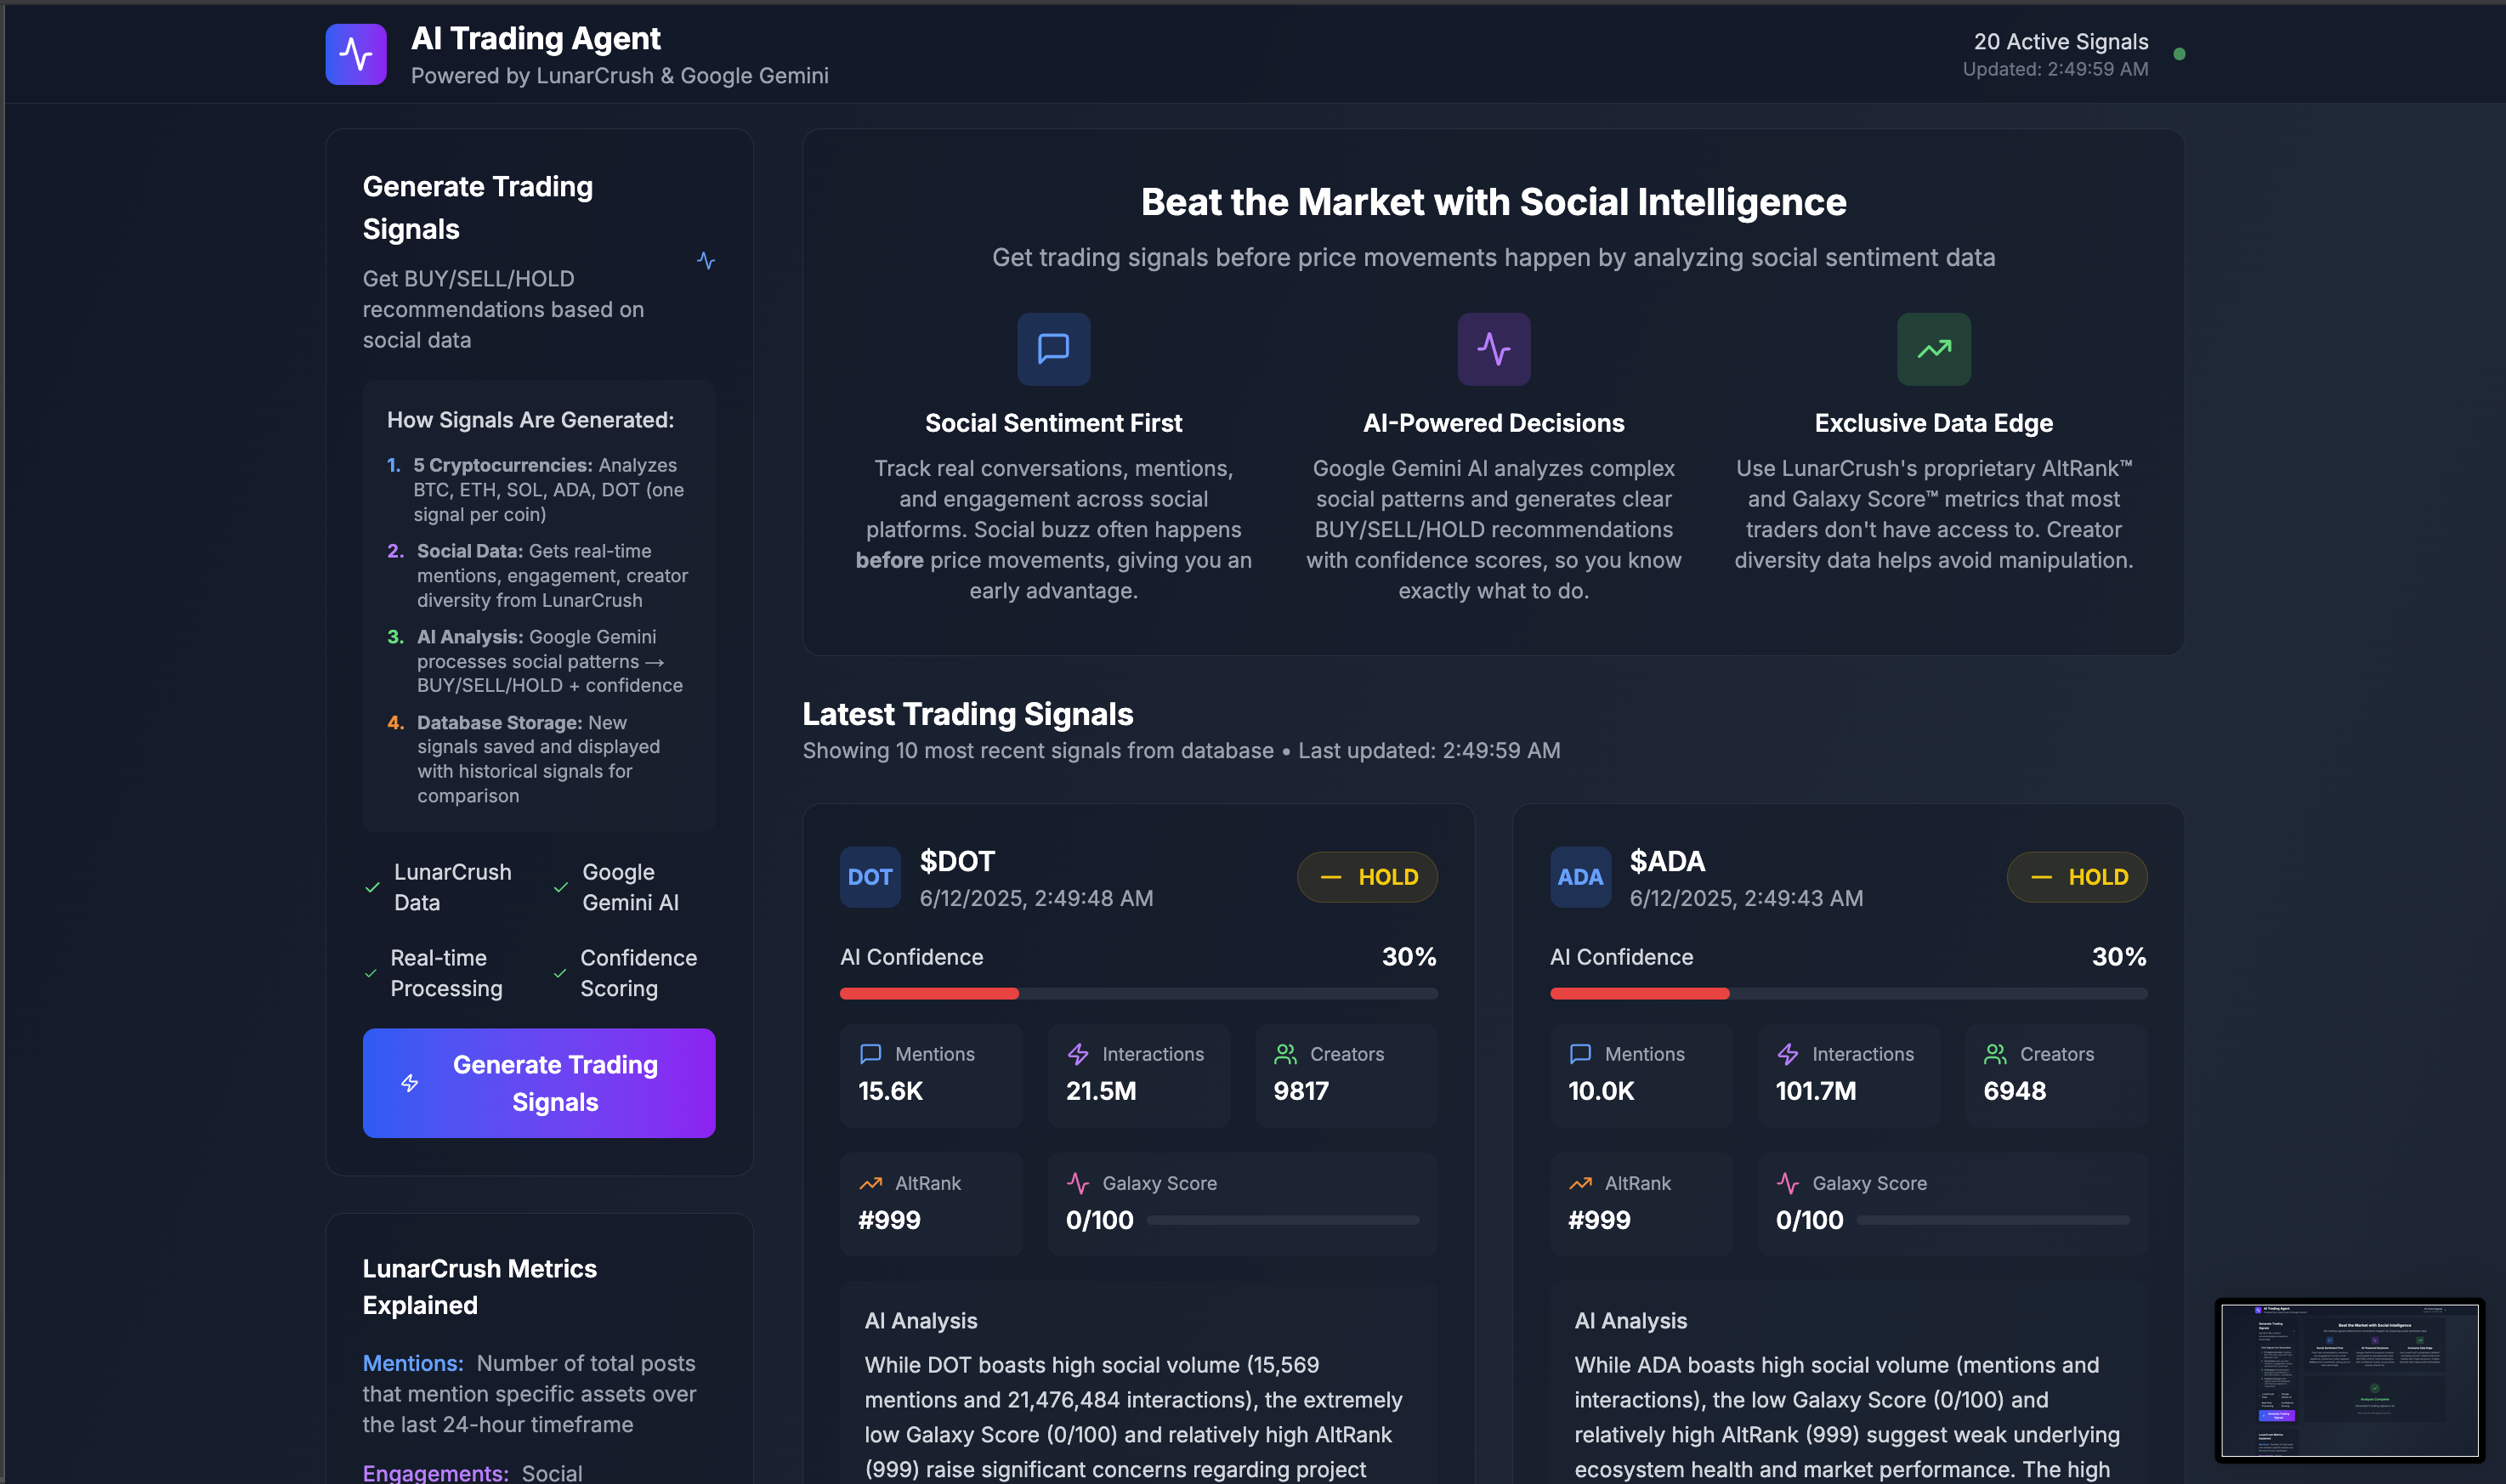
This AI Trading Agent analyzes real-time social media sentiment from LunarCrush's API and generates intelligent trading signals using Google's Gemini AI. Watch as it processes social data through a 7-step background workflow with live progress tracking.
⚡ Live Demo: See It Live
🔥 Key Features
- 🚀 Real-time Progress Tracking - Watch AI analysis happen step-by-step with live updates
- 🧠 AI-Powered Signals - Google Gemini generates BUY/SELL/HOLD recommendations with confidence scores
- 📊 Social Sentiment Analysis - LunarCrush social data drives trading decisions using unique metrics
- ⚡ Background Processing - Inngest handles complex workflows without blocking the UI
- 💾 Real-time Database - Supabase with live subscriptions for instant progress updates
- 🎨 Beautiful Dashboard - Professional UI with loading states and animations
- 🔔 Discord Alerts - Optional notifications for new trading signals
🚀 Quick Start (5 Minutes)
For experienced developers who want to get running fast:
# 1. Clone and install
git clone https://github.com/danilobatson/ai-trading-agent-gemini.git
cd ai-trading-agent-gemini
npm install

# 2. Copy environment template
cp .env.example .env.local

# 3. Add your API keys (see detailed setup below)
# Edit .env.local with your 5 required API keys

# 4. Set up database tables
# Copy SQL schema below → paste in Supabase SQL Editor

# 5. Start development
npm run dev          # Next.js app (localhost:3000)
npm run inngest:dev  # Inngest dev server (localhost:8288)
🎯 Need the detailed setup? Continue reading for step-by-step instructions with account creation guides. Review our guide on dev.to if you need more assistance
📋 Prerequisites
You'll Need:
- Node.js 18+ installed
- Basic knowledge of React/TypeScript
- A code editor (VS Code recommended)
- 20 minutes for complete setup
5 API Keys Required:
- 🌙 LunarCrush API Subscription required
- 🤖 Google Gemini API (AI analysis) - Free tier available
- 🗄️ Supabase (database & real-time) - Free tier available
- ⚡ Inngest (background jobs) - Free tier available
🔧 Detailed Setup Guide
Step 1: Project Installation
# Clone the repository
git clone https://github.com/danilobatson/ai-trading-agent-gemini.git
cd ai-trading-agent-gemini

# Install dependencies
npm install

# Create environment file
cp .env.example .env.local
Step 2: LunarCrush API Setup 🌙
LunarCrush provides real-time social sentiment data for cryptocurrencies with unique metrics like AltRank™ and Galaxy Score™.
- Sign up: Visit lunarcrush.com/signup
- Choose a plan:
- Individual - Perfect for this project
- Builder - For production apps
- Generate API key
- Add to .env.local:
LUNARCRUSH_API_KEY=your_api_key_here💡 Why LunarCrush? Powers the social sentiment analysis with unique metrics unavailable elsewhere:
- Mentions: Social post volume (24h)
- Interactions: Total social engagement
- Creators: Unique content creators (diversity indicator)
- AltRank™: Proprietary market + social ranking
- Galaxy Score™: Asset health indicator (0-100)
Step 3: Google Gemini AI Setup 🤖
Google's Gemini AI generates intelligent trading recommendations based on social patterns.
- Get API key: Visit aistudio.google.com
- Create new project or use existing one
- Generate API key: API Keys → Create API Key
- Add to .env.local:
GOOGLE_GEMINI_API_KEY=your_gemini_api_key_here💡 Why Gemini? Excellent reasoning capabilities for financial analysis and trading signal generation with structured outputs.
Step 4: Supabase Database Setup 🗄️
Supabase provides PostgreSQL database with real-time subscriptions for live progress tracking.
- Create account: Visit supabase.com → "Start your project"
- Create new project:
- Project name:
ai-trading-agent - Database password: (save this securely)
- Region: Choose closest to you
- Project name:
- Get credentials: Click Project Overview
- Copy Project URL and anon public key
- Add to .env.local:
NEXT_PUBLIC_SUPABASE_URL=https://your-project.supabase.co
NEXT_PUBLIC_SUPABASE_ANON_KEY=your_supabase_anon_key_here
💡 Why Supabase? Real-time database updates power our live progress tracking without polling.
Step 5: Database Schema Creation 📊
In your Supabase dashboard:
- Go to SQL Editor
- Click "New query"
- Copy and paste this entire script:
-- AI Trading Agent Database Schema
-- Copy and paste this entire script into your Supabase SQL Editor

-- Table: trading_signals
-- Stores AI-generated trading signals with confidence scores and reasoning
CREATE TABLE trading_signals (
  id TEXT PRIMARY KEY,
  symbol TEXT NOT NULL,
  signal TEXT NOT NULL CHECK (signal IN ('BUY', 'SELL', 'HOLD')),
  confidence INTEGER NOT NULL CHECK (confidence >= 0 AND confidence <= 100),
  reasoning TEXT NOT NULL,
  metrics JSONB NOT NULL,
  created_at TIMESTAMP WITH TIME ZONE DEFAULT NOW()
);

-- Indexes for trading_signals table (for performance)
CREATE INDEX idx_trading_signals_symbol ON trading_signals (symbol);
CREATE INDEX idx_trading_signals_created_at ON trading_signals (created_at DESC);
CREATE INDEX idx_trading_signals_signal ON trading_signals (signal);

-- Table: analysis_jobs
-- Tracks background job progress and status for real-time UI updates
CREATE TABLE analysis_jobs (
  id TEXT PRIMARY KEY,
  status TEXT NOT NULL DEFAULT 'started',
  current_step TEXT DEFAULT 'Initializing...',
  step_message TEXT DEFAULT 'Starting analysis...',
  progress_percentage INTEGER DEFAULT 0,
  event_data JSONB,
  signals_generated INTEGER DEFAULT 0,
  alerts_generated INTEGER DEFAULT 0,
  duration_ms INTEGER,
  started_at TIMESTAMP WITH TIME ZONE DEFAULT NOW(),
  completed_at TIMESTAMP WITH TIME ZONE,
  updated_at TIMESTAMP WITH TIME ZONE DEFAULT NOW()
);

-- Indexes for analysis_jobs table (for performance)
CREATE INDEX idx_analysis_jobs_status ON analysis_jobs (status);
CREATE INDEX analysis_jobs_progress_idx ON analysis_jobs (status, started_at DESC, progress_percentage);- Click "Run" to execute the script
- Verify tables: Go to Table Editor → you should see
trading_signalsandanalysis_jobstables
Step 6: Inngest Background Jobs Setup ⚡
Inngest handles our AI analysis pipeline with real-time progress tracking.
- Create account: Visit inngest.com → "Sign up"
- Create new app:
- App name:
ai-trading-agent
- App name:
- Get keys: Settings → Keys
- Copy Event Key (starts with
inngest_) - Copy Signing Key (starts with
signkey_)
- Copy Event Key (starts with
- Add to .env.local:
INNGEST_EVENT_KEY=inngest_your_event_key_here
INNGEST_SIGNING_KEY=signkey_your_signing_key_here
💡 Why Inngest? Enables complex multi-step AI workflows with real-time progress tracking without blocking the user interface.
Step 7: Final Environment Check ✅
Your .env.local should look like this:
# LunarCrush API (Required)
LUNARCRUSH_API_KEY=lc_your_key_here

# Google Gemini AI (Required)
GOOGLE_GEMINI_API_KEY=your_gemini_key_here

# Supabase Database (Required)
NEXT_PUBLIC_SUPABASE_URL=https://your-project.supabase.co
NEXT_PUBLIC_SUPABASE_ANON_KEY=your_supabase_anon_key_here

# Inngest Background Jobs (Required)
INNGEST_EVENT_KEY=inngest_your_event_key_here
INNGEST_SIGNING_KEY=signkey_your_signing_key_here
🚀 Running the Application
Development Mode
Terminal 1 - Next.js App:
npm run dev→ Visit http://localhost:3000
Terminal 2 - Inngest Dev Server:
npm run inngest:dev→ Visit http://localhost:8288 for job monitoring
Testing the Complete Pipeline
- Open the app: http://localhost:3000
- Click "Generate Trading Signals"
- Watch real-time progress: 7-step analysis with live progress tracking
- Monitor Inngest: Check localhost:8288 for detailed job execution
- View results: Trading signals appear automatically when complete
Expected Flow:
Initialize Analysis (14%) →
Prepare Symbol List (28%) →
Fetch Social Data (42%) →
AI Signal Generation (57%) →
Save to Database (71%) →
Generate Summary (85%) →
Complete Analysis (100%)
🏗️ Architecture Overview
Technology Stack
| Component | Technology | Purpose |
|---|---|---|
| Frontend | Next.js 15 + React 19 + TypeScript | Modern web application with server components |
| Styling | Tailwind CSS v4 | Responsive, professional UI |
| Background Jobs | Inngest | Multi-step AI workflow processing |
| Database | Supabase (PostgreSQL) | Real-time data storage with subscriptions |
| AI Analysis | Google Gemini | Trading signal generation |
| Social Data | LunarCrush API | Crypto sentiment analysis with unique metrics |
Data Flow Architecture
    A[User Triggers Analysis] --> B[Inngest Background Job]
    B --> C[LunarCrush API]
    C --> D[Social Metrics]
    D --> E[Google Gemini AI]
    E --> F[Trading Signals]
    F --> G[Supabase Database]
    G --> H[Real-time UI Updates]
Real-Time Progress System
// Real-time progress tracking flow
1. User clicks "Generate Trading Signals"
2. Frontend calls /api/trigger → generates jobId
3. Inngest workflow starts → uses consistent jobId
4. Each step updates database → analysis_jobs table
5. Frontend subscribes → Supabase real-time events
6. Progress bar advances → 14% → 28% → ... → 100%
7. Signals appear → when job status = 'completed'
Key Files Structure
src/
├── app/
│   ├── api/
│   │   ├── signals/route.ts      # Fetch trading signals & jobs
│   │   ├── trigger/route.ts      # Start analysis pipeline
│   │   ├── job-status/route.ts   # Check job progress
│   │   └── inngest/route.ts      # Inngest webhook endpoint
│   ├── layout.tsx                # App layout with metadata
│   └── page.tsx                  # Main dashboard with real-time UI
├── functions/
│   └── signal-analysis.ts        # 7-step Inngest workflow
├── hooks/
│   └── useJobProgress.ts        # Progress supabase subscription
├── lib/
│   ├── lunarcrush.ts            # LunarCrush API client
│   ├── gemini.ts                # Google AI integration
│   ├── supabase.ts              # Database operations
│   ├── inngest.ts               # Background job client
│   └── signal-generator.ts      # Signal generation logic
├── types/
│   └── trading.ts               # TypeScript interfaces
└── package.json                 # Dependencies & scripts
🧪 Testing & Debugging
Development Tools
Inngest Dev Server (localhost:8288) provides:
- ✅ Job execution status - See each step complete in real-time
- 📊 Step-by-step progress - Monitor the 7-step workflow
- 🐛 Error logs and debugging - Detailed error messages
- ⏱️ Performance metrics - Track job duration and bottlenecks
Supabase Dashboard provides:
- 🔍 Real-time table data - View signals and jobs as they're created
- 📈 Query performance - Monitor database response times
- 🔄 Subscription monitoring - Track real-time connections
- 📊 API usage metrics - Monitor database load
Testing the Pipeline
# Test individual components
curl http://localhost:3000/api/signals           # Check signal retrieval
curl -X POST http://localhost:3000/api/trigger   # Trigger analysis

# Full integration test
1. Trigger analysis from UI
2. Watch progress in real-time
3. Check Inngest dashboard for detailed logs
4. Verify signals saved in Supabase
🚨 Troubleshooting
Common Issues & Solutions
| Issue | Symptoms | Solution |
|---|---|---|
| Inngest Functions Not Triggering | Progress stuck at 0%, no job creation | Verify INNGEST_EVENT_KEY and INNGEST_SIGNING_KEY, ensure npm run inngest:dev is running |
| Database Connection Errors | "Database connection failed" | Check Supabase URL/key in .env.local, verify tables exist, check network connectivity |
| LunarCrush 401 Unauthorized | "Invalid API key" error | Verify API key format (lc_...) and active subscription at lunarcrush.com |
| Gemini AI Errors | "AI analysis failed" | Check Google AI API key, verify quota limits at aistudio.google.com |
| Real-time Updates Not Working | Progress doesn't update, signals don't appear | Ensure Supabase anon key has correct permissions, check browser console for subscription errors |
| Rate Limiting (429 Errors) | Analysis fails mid-process | LunarCrush Individual plan: 10 req/min limit. Add delays or upgrade to Builder plan |
Debug Workflow
If the app isn't working:
- ✅ Check environment variables: All 5 required keys in
.env.local - ✅ Verify database tables: Run the SQL schema in Supabase SQL Editor
- ✅ Confirm API subscriptions: LunarCrush plan active, Gemini quota available
- ✅ Test Inngest connection: Ensure dev server running on localhost:8288
- ✅ Check browser console: Look for JavaScript errors or network failures
- ✅ Monitor database activity: Watch Supabase logs for real-time events
- ✅ Restart development servers: Stop and restart both
npm run devandnpm run inngest:dev
API Rate Limits
LunarCrush API Limits:
- Individual Plan: 10 requests/minute, 2,000/day
- Builder Plan: 100 requests/minute, 20,000/day
Google Gemini Limits:
- Free Tier: 15 requests/minute, 1,500/day
- Paid Tier: 1,000 requests/minute
If you hit limits:
- Analysis will fail gracefully with error messages
- Upgrade your plan for higher limits
- The system includes rate limiting delays to prevent most issues
🚀 Deployment
Deploy to Vercel (Recommended)
One-Click Deploy:
Manual Deployment:
# Install Vercel CLI
npm i -g vercel

# Deploy to production
vercel --prod

# Configure environment variables in Vercel dashboard
# Add all 5 API keys from your .env.local
Environment Variables in Vercel:
- Go to your project dashboard → Settings → Environment Variables
- Add each variable from your
.env.local:LUNARCRUSH_API_KEYGOOGLE_GEMINI_API_KEYNEXT_PUBLIC_SUPABASE_URLNEXT_PUBLIC_SUPABASE_ANON_KEYINNGEST_EVENT_KEYINNGEST_SIGNING_KEY
Production Configuration
Inngest Production Setup:
- Create production app in Inngest dashboard
- Add production URL:
https://your-app.vercel.app/api/inngest - Update environment variables with production keys
Supabase Production:
- Database automatically scales
- Consider enabling Row Level Security (RLS) for enhanced security
- Monitor usage in Supabase dashboard
Alternative Deployment Platforms
- Netlify:
npm run build && netlify deploy --prod - Railway: Connect GitHub repo and configure environment variables
- AWS/GCP: Use your preferred containerization strategy
📈 Performance & Scaling
Current Performance
- Initial load: ~500ms (optimized Next.js with static generation)
- Real-time updates: <100ms latency via Supabase subscriptions
- AI processing: ~30-45 seconds for complete 5-symbol analysis
- Background jobs: Handled efficiently via Inngest with automatic retries
Scaling Considerations
For high-volume usage:
- LunarCrush API: Upgrade to Builder plan (100 req/min vs 10 req/min)
- Database: Implement connection pooling and read replicas
- AI processing: Batch requests and implement response caching
- Background jobs: Inngest scales automatically with usage tiers
Performance Optimizations Included:
- Rate limiting: Built-in delays prevent API quota exhaustion
- Database indexing: Optimized queries for fast signal retrieval
- Real-time subscriptions: No polling overhead
- Efficient caching: Next.js static generation where possible
🤝 Contributing
Want to contribute? Here's how:
- 🍴 Fork the repository
- 🌿 Create feature branch:
git checkout -b feature/amazing-feature - 💾 Commit changes:
git commit -m 'Add amazing feature' - 📤 Push to branch:
git push origin feature/amazing-feature - 🎯 Open Pull Request
Contribution Ideas:
- 🤖 Support for other AI providers (Claude, OpenAI)
- 📈 More sophisticated trading strategies and signals
- 🧪 Comprehensive test suite with integration tests
- 📱 Mobile app version using React Native
Development Guidelines:
- Follow TypeScript strict mode
- Add tests for new features
- Update documentation
- Maintain performance standards
📄 License
This project is licensed under the MIT License - see the LICENSE file for details.
🙏 Acknowledgments
Built with amazing open-source technologies:
- 🌙 LunarCrush - Real-time social sentiment data with unique metrics
- 🤖 Google AI - Gemini AI for intelligent trading analysis
- ⚡ Inngest - Background job processing and workflow orchestration
- 🗄️ Supabase - Real-time database with subscriptions
- ⚛️ Next.js - React framework with server components
- 🎨 Tailwind CSS - Utility-first styling framework
📞 Connect & Support
Built by Danilo Batson
⭐ Star this repo if it helped you learn something new!
Questions? Open an issue - I respond to every one!
🚀 Ready to Get Started?
"Transform social buzz into trading intelligence with AI-powered analysis" 🤖📈
Built for developers who want to:
- ✅ Learn modern AI integration patterns
- ✅ Build production-ready trading applications
- ✅ Understand real-time data processing
- ✅ Create impressive portfolio projects
- ✅ Interview at top tech companies
Start building your AI trading agent today! 🚀