

chitra

What is chitra?
chitra (चित्र) is a multi-functional library for full-stack Deep Learning. It simplifies Model Building, API development, and Model Deployment.
Components

Load Image from Internet url, filepath or numpy array and plot Bounding Boxes on the images easily.
Model Training and Explainable AI.
Easily create UI for Machine Learning models or Rest API backend that can be deployed for serving ML Models in Production.
📌 Highlights:
- [New] Auto Dockerization of Models 🐳
- [New] Framework Agnostic Model Serving & Interactive UI prototype app ✨🌟
- [New] Data Visualization, Bounding Box Visualization 🐶🎨
- Model interpretation using GradCAM/GradCAM++ with no extra code 🔥
- Faster data loading without any boilerplate 🤺
- Progressive resizing of images 🎨
- Rapid experiments with different models using
chitra.trainermodule 🚀
🚘 Implementation Roadmap
- One click deployment to
serverlessplatform.
If you have more use case please raise an issue/PR with the feature you want. If you want to contribute, feel free to raise a PR. It doesn't need to be perfect. We will help you get there.
📀 Installation

Using pip (recommended)
-
Minimum installation
pip install -U chitra -
Full Installation
pip install -U 'chitra[all]' -
Install for Training
pip install -U 'chitra[nn]' -
Install for Serving
pip install -U 'chitra[serve]'
From source
pip install git+https://github.com/aniketmaurya/chitra@masterOr,
git clone https://github.com/aniketmaurya/chitra.git
cd chitra
pip install .🧑💻 Usage
Loading data for image classification
Chitra dataloader and datagenerator modules for loading data. dataloader is a minimal dataloader that
returns tf.data.Dataset object. datagenerator provides flexibility to users on how they want to load and manipulate
the data.
import numpy as np
import chitra
from chitra.dataloader import Clf
import matplotlib.pyplot as plt


clf_dl = Clf()
data = clf_dl.from_folder(cat_dog_path, target_shape=(224, 224))
clf_dl.show_batch(8, figsize=(8, 8))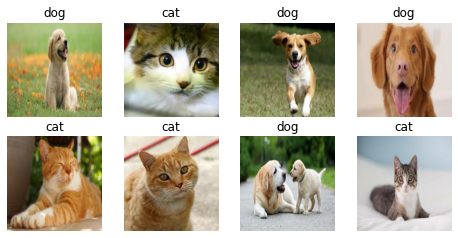
Image datagenerator
Dataset class provides the flexibility to load image dataset by updating components of the class.
Components of Dataset class are:
- image file generator
- resizer
- label generator
- image loader
These components can be updated with custom function by the user according to their dataset structure. For example the Tiny Imagenet dataset is organized as-
train_folder/
.....folder1/
    .....file.txt
    .....folder2/
           .....image1.jpg
           .....image2.jpg
                     .
                     .
                     .
           ......imageN.jpg
The inbuilt file generator search for images on the folder1, now we can just update the image file generator and
rest of the functionality will remain same.
Dataset also support progressive resizing of images.
Updating component
from chitra.datagenerator import Dataset

ds = Dataset(data_path)
# it will load the folders and NOT images
ds.filenames[:3]
Output
No item present in the image size list

['/Users/aniket/Pictures/data/tiny-imagenet-200/train/n02795169/n02795169_boxes.txt',
 '/Users/aniket/Pictures/data/tiny-imagenet-200/train/n02795169/images',
 '/Users/aniket/Pictures/data/tiny-imagenet-200/train/n02769748/images']
def load_files(path):
return glob(f'{path}/*/images/*')
def get_label(path):
return path.split('/')[-3]
ds.update_component('get_filenames', load_files)
ds.filenames[:3]Output
get_filenames updated with <function load_files at 0x7fad6916d0e0>
No item present in the image size list

['/Users/aniket/Pictures/data/tiny-imagenet-200/train/n02795169/images/n02795169_369.JPEG',
 '/Users/aniket/Pictures/data/tiny-imagenet-200/train/n02795169/images/n02795169_386.JPEG',
 '/Users/aniket/Pictures/data/tiny-imagenet-200/train/n02795169/images/n02795169_105.JPEG']
Progressive resizing
It is the technique to sequentially resize all the images while training the CNNs on smaller to bigger image sizes. Progressive Resizing is described briefly in his terrific fastai course, “Practical Deep Learning for Coders”. A great way to use this technique is to train a model with smaller image size say 64x64, then use the weights of this model to train another model on images of size 128x128 and so on. Each larger-scale model incorporates the previous smaller-scale model layers and weights in its architecture. ~KDnuggets
image_sz_list = [(28, 28), (32, 32), (64, 64)]

ds = Dataset(data_path, image_size=image_sz_list)
ds.update_component('get_filenames', load_files)
ds.update_component('get_label', get_label)

# first call to generator
for img, label in ds.generator():
    print('first call to generator:', img.shape)
    break

# seconds call to generator
for img, label in ds.generator():
    print('seconds call to generator:', img.shape)
    break

# third call to generator
for img, label in ds.generator():
    print('third call to generator:', img.shape)
    break
Output
get_filenames updated with <function load_files at 0x7fad6916d0e0>
get_label updated with <function get_label at 0x7fad6916d8c0>

first call to generator: (28, 28, 3)
seconds call to generator: (32, 32, 3)
third call to generator: (64, 64, 3)
tf.data support
Creating a tf.data dataloader was never as easy as this one liner. It converts the Python generator
into tf.data.Dataset for a faster data loading, prefetching, caching and everything provided by tf.data.
image_sz_list = [(28, 28), (32, 32), (64, 64)]

ds = Dataset(data_path, image_size=image_sz_list)
ds.update_component('get_filenames', load_files)
ds.update_component('get_label', get_label)

dl = ds.get_tf_dataset()

for e in dl.take(1):
    print(e[0].shape)

for e in dl.take(1):
    print(e[0].shape)

for e in dl.take(1):
    print(e[0].shape)
Output
get_filenames updated with <function load_files at 0x7fad6916d0e0>
get_label updated with <detn get_label at 0x7fad6916d8c0>
(28, 28, 3)
(32, 32, 3)
(64, 64, 3)
Trainer
The Trainer class inherits from tf.keras.Model, it contains everything that is required for training. It exposes
trainer.cyclic_fit method which trains the model using Cyclic Learning rate discovered
by Leslie Smith.
from chitra.trainer import Trainer, create_cnn
from chitra.datagenerator import Dataset


ds = Dataset(cat_dog_path, image_size=(224, 224))
model = create_cnn('mobilenetv2', num_classes=2, name='Cat_Dog_Model')
trainer = Trainer(ds, model)
# trainer.summary()
trainer.compile2(batch_size=8,
optimizer=tf.keras.optimizers.SGD(1e-3, momentum=0.9, nesterov=True),
lr_range=(1e-6, 1e-3),
loss='binary_crossentropy',
metrics=['binary_accuracy'])
trainer.cyclic_fit(epochs=5,
batch_size=8,
lr_range=(0.00001, 0.0001),
)Training Loop...
cyclic learning rate already set!Epoch 1/5
1/1 [==============================] - 0s 14ms/step - loss: 6.4702 - binary_accuracy: 0.2500
Epoch 2/5
Returning the last set size which is: (224, 224)
1/1 [==============================] - 0s 965us/step - loss: 5.9033 - binary_accuracy: 0.5000
Epoch 3/5
Returning the last set size which is: (224, 224)
1/1 [==============================] - 0s 977us/step - loss: 5.9233 - binary_accuracy: 0.5000
Epoch 4/5
Returning the last set size which is: (224, 224)
1/1 [==============================] - 0s 979us/step - loss: 2.1408 - binary_accuracy: 0.7500
Epoch 5/5
Returning the last set size which is: (224, 224)
1/1 [==============================] - 0s 982us/step - loss: 1.9062 - binary_accuracy: 0.8750
<tensorflow.python.keras.callbacks.History at 0x7f8b1c3f2410>✨ Model Interpretability
It is important to understand what is going inside the model. Techniques like GradCam and Saliency Maps can visualize
what the Network is learning. trainer module has InterpretModel class which creates GradCam and GradCam++
visualization with almost no additional code.
from chitra.trainer import InterpretModel

trainer = Trainer(ds, create_cnn('mobilenetv2', num_classes=1000, keras_applications=False))
model_interpret = InterpretModel(True, trainer)

image = ds[1][0].numpy().astype('uint8')
image = Image.fromarray(image)
model_interpret(image)
print(IMAGENET_LABELS[285])
Returning the last set size which is: (224, 224)
index: 282
Egyptian Mau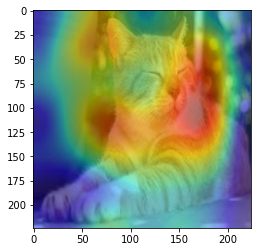
🎨 Data Visualization
Image annotation
Bounding Box creation is based on top of imgaug library.
from chitra.image import Chitra
import matplotlib.pyplot as plt

bbox = [70, 25, 190, 210]
label = 'Dog'

image = Chitra(image_path, bboxes=bbox, labels=label)
plt.imshow(image.draw_boxes())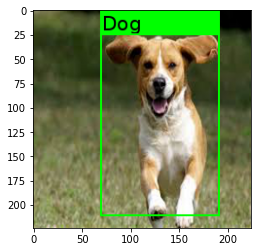
See Play with Images for detailed example!
🚀 Model Serving (Framework Agnostic)
Chitra can Create Rest API or Interactive UI app for Any Learning Model -
ML, DL, Image Classification, NLP, Tensorflow, PyTorch or SKLearn.
It provides chitra.serve.GradioApp for building Interactive UI app for ML/DL models
and chitra.serve.API for building Rest API endpoint.
from chitra.serve import create_api
from chitra.trainer import create_cnn

model = create_cnn('mobilenetv2', num_classes=2)
create_api(model, run=True, api_type='image-classification')
API Docs Preview
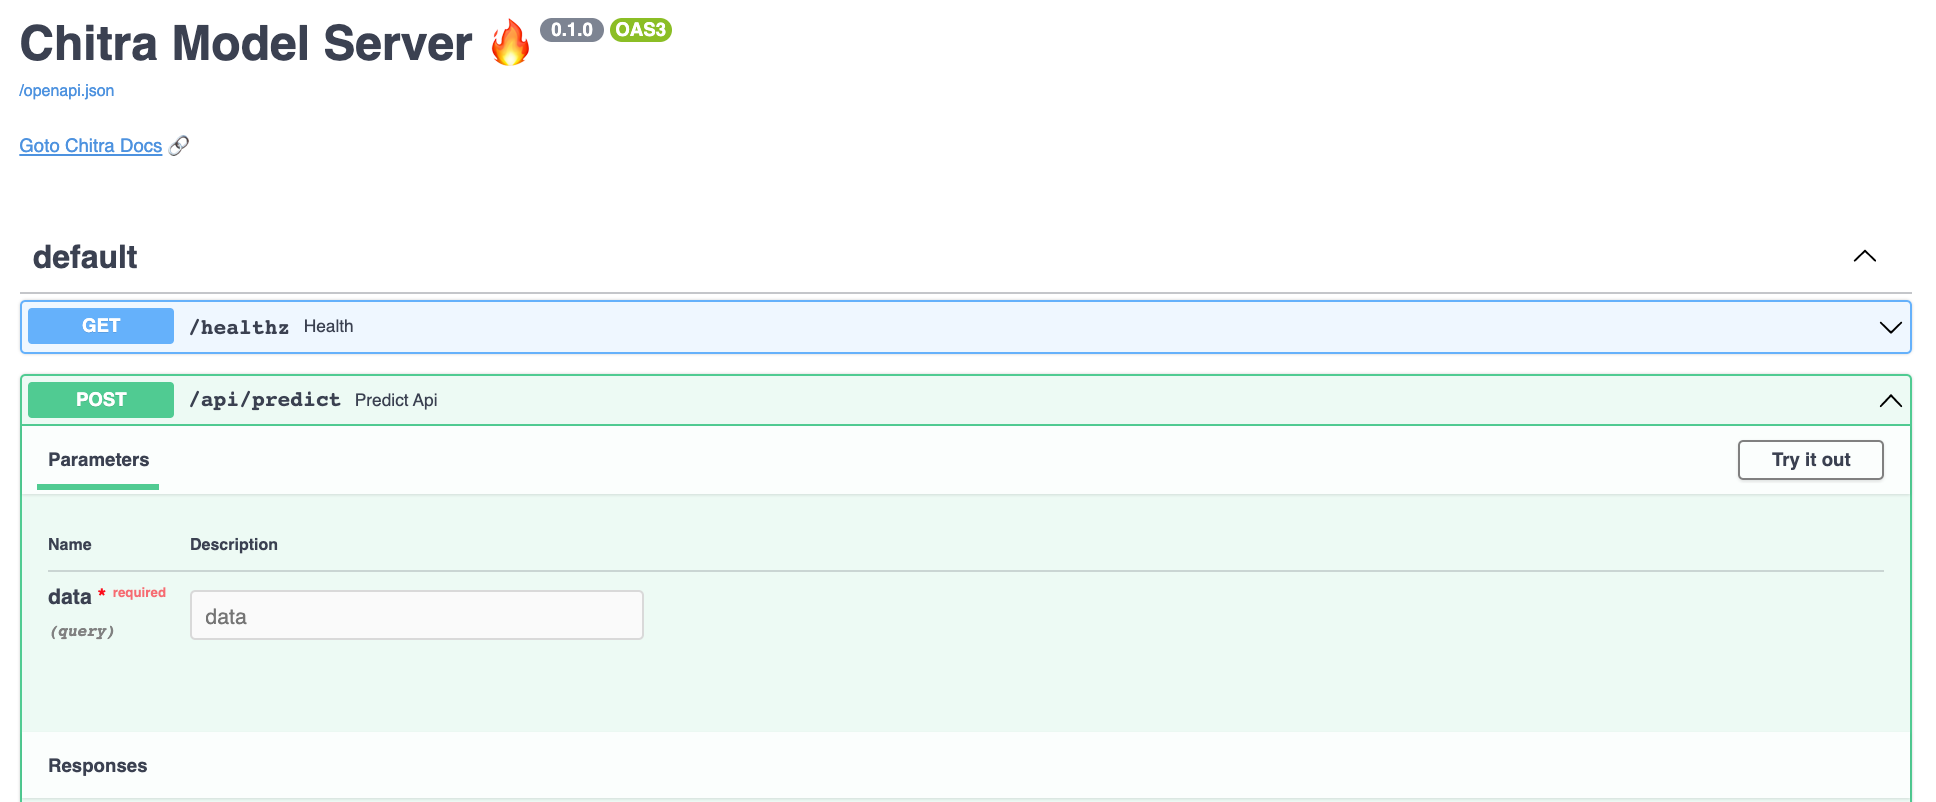
See Example Section for detailed explanation!
🛠 Utility
Limit GPU memory or enable dynamic GPU memory growth for Tensorflow.
from chitra.utility.tf_utils import limit_gpu, gpu_dynamic_mem_growth

# limit the amount of GPU required for your training
limit_gpu(gpu_id=0, memory_limit=1024 * 2)
No GPU:0 found in your system!gpu_dynamic_mem_growth()No GPU found on the machine!🤗 Contribute
Contributions of any kind are welcome. Please check the Contributing Guidelines before contributing.
Code Of Conduct
We pledge to act and interact in ways that contribute to an open, welcoming, diverse, inclusive, and healthy community.
Read full Contributor Covenant Code of Conduct
Acknowledgement
chitra is built with help of awesome libraries like Tensorflow 2.x, imgaug, FastAPI and Gradio.