

SnapFlow
![]()
Capture what you need
Understand what you see
Keep the work moving
SnapFlow is an AI-powered screenshot tool built with Qt.
It turns screenshots into the starting point of a workflow rather than the end, making capture an entry point for analysis, editing, extraction, and translation.
Most screenshot tools stop after grabbing pixels from the screen.
SnapFlow focuses on what happens after the capture and how you keep moving with the content you just selected.
The project is currently developed and validated mainly on macOS, while keeping a Qt-based foundation for future cross-platform support.
Why SnapFlow
SnapFlow is not trying to be just another screenshot app with a nicer UI. It is designed as a lightweight entry point for working directly with what is on your screen:
- Capture a region immediately
- Understand the selected content in context
- Continue with editing, extraction, or follow-up actions
One-line summary:
SnapFlow = Screenshot + Flow + AI
Core Features
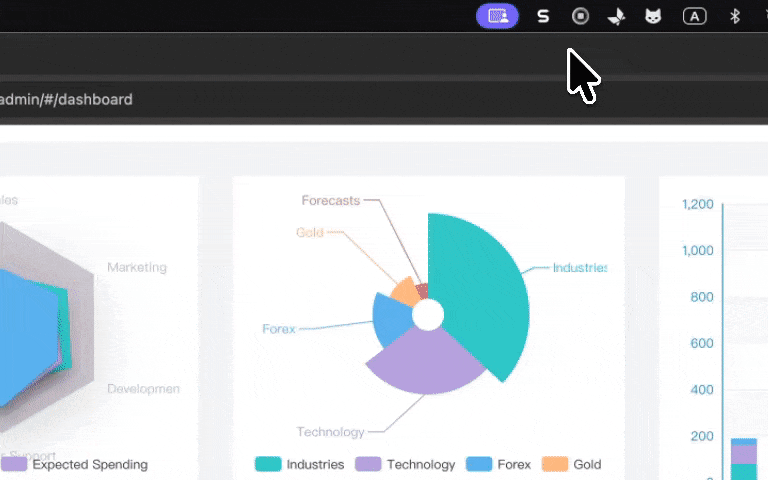
1. AI Image Analysis
Ask AI to analyze the captured region directly, instead of uploading an image first and manually describing the context.
Whether it is a data dashboard, chart, admin panel, or dense UI section, SnapFlow lets AI work from what you are already looking at.
2. AI Image Editing
SnapFlow is not limited to understanding an image. It is also designed to support follow-up image operations on the selected region.
Think of it as more than explaining a screenshot: after capturing it, you can keep acting on it.
3. OCR + Translation
When you see text in another language, you should not have to copy it, paste it elsewhere, and switch to a separate translation tool.
SnapFlow aims to compress the flow of capture -> recognize -> translate into a much shorter path.
Good Fit For
- Capturing a dashboard and asking AI to explain the data
- Capturing a UI section and asking AI to analyze what is on screen
- Removing an element from a screenshot or masking sensitive information
- Translating error messages, settings pages, or documentation snippets
- Reducing context switches between capture, understanding, and editing
Current Progress
- Implemented: region capture, basic annotation, OCR, translation overlay, AI Q&A, and image analysis
- Working end-to-end: tray entry, hotkey trigger, macOS build, and packaging flow
- Still being polished: interaction details, stability, distribution, and richer post-capture workflows
Quick Start
1. Install Dependencies
This guide currently targets macOS. You will need:
- Qt 6
- CMake 3.16+
- Homebrew packages
tesseract,leptonica, andpkg-config
brew install tesseract leptonica pkg-config2. Configure Environment Variables
Copy .env.example to .env and provide at least your QWEN_API_KEY:
cp .env.example .env3. Build
cmake -S . -B build-mac-release -DCMAKE_BUILD_TYPE=Release -DCMAKE_PREFIX_PATH="$HOME/Qt/6.10.2/macos"
cmake --build build-mac-release -j2
4. Run
open build-mac-release/snapflow.appIf you want to inspect logs from the terminal, run:
./build-mac-release/snapflow.app/Contents/MacOS/snapflowOn first launch, macOS may ask you to grant Screen Recording permission before capture can work.
Packaging (Optional)
If you are only packaging for local verification, ad-hoc signing is the simplest option:
CODESIGN_IDENTITY="-" ./scripts/package-macos.shIf your Qt installation is not in the default location, specify it explicitly:
CODESIGN_IDENTITY="-" QT_PREFIX_PATH="$HOME/Qt/6.10.2/macos" ./scripts/package-macos.shIf you already have a local signing identity configured in Keychain Access, you can run the default packaging script:
./scripts/package-macos.shLicense
This project is released under the MIT License.