

Taskosaur
Open Source Project Management with Conversational AI Task Execution
📹 Watch Taskosaur in Action
Click to watch: See how Conversational AI Task Execution works in Taskosaur
Taskosaur is an open source project management platform with conversational AI for task execution in-app. The AI assistant handles project management tasks through natural conversation, from creating tasks to managing workflows directly within the application.
![]()
![]()
![]()
![]()
![]()
![]()
![]()
Taskosaur combines traditional project management features with Conversational AI Task Execution, allowing you to manage projects through natural conversation. Instead of navigating menus and forms, you can create tasks, assign work, and manage workflows by simply describing what you need.
Key Features
- 🤖 Conversational AI for Task Execution - Execute project tasks through natural conversation directly in-app
- 💬 Natural Language Commands - "Create sprint with high-priority bugs from last week" executes automatically
- 🏠 Self-Hosted - Your data stays on your infrastructure
- 💰 Bring Your Own LLM - Use your own API key with OpenAI, Anthropic, OpenRouter, or local models
- 🔧 In-App Browser Automation - AI navigates the interface and performs actions directly within the application
- 📊 Full Project Management - Kanban boards, sprints, task dependencies, time tracking
- 🌐 Open Source - Available under Business Source License (BSL)
Table of Contents
- Key Features
- Quick Start
- Development
- Project Structure
- Deployment
- API Documentation
- Contributing
- License
- Support
Quick Start
Prerequisites
- Node.js 22+ and npm 10+
- PostgreSQL 16+ (or Docker)
- Redis 7+ (or Docker)
[!NOTE] Default Ports: Both
docker compose -f docker-compose.dev.yml upandnpm run devwill automatically start the Backend on port 3000 and the Frontend on port 3001 by default. Please ensure these ports are available on your system before proceeding.
Docker Setup (Recommended)
The fastest way to get started with Taskosaur is using Docker Compose:
-
Clone the repository
git clone https://github.com/Taskosaur/Taskosaur.git taskosaur cd taskosaur -
Set up environment variables
cp .env.example .envThis creates the .env file used for the app, you may customize the values, if you need.
-
Start with Docker Compose
docker compose -f docker-compose.dev.yml upThis automatically:
- ✅ Starts PostgreSQL and Redis
- ✅ Installs all dependencies
- ✅ Generates Prisma client
- ✅ Runs database migrations
- ✅ Seeds the database with sample data
- ✅ Starts both backend and frontend (on default ports 3000 and 3001 respectively)
-
Access the application
- Frontend: http://localhost:3001
- Backend API: http://localhost:3000
- API Documentation: http://localhost:3000/api/docs
See DOCKER_DEV_SETUP.md for detailed Docker documentation.
Manual Setup
If you prefer to run services locally:
-
Clone the repository
git clone https://github.com/Taskosaur/Taskosaur.git taskosaur cd taskosaur -
Install dependencies
npm install -
Environment Setup
Create a
.envfile in the root directory:# Database Configuration DATABASE_URL="postgresql://taskosaur:taskosaur@localhost:5432/taskosaur" # Application NODE_ENV=development # Authentication & Security JWT_SECRET="your-jwt-secret-key-change-this" JWT_REFRESH_SECRET="your-refresh-secret-key-change-this-too" JWT_EXPIRES_IN="15m" JWT_REFRESH_EXPIRES_IN="7d" # Encryption for sensitive data ENCRYPTION_KEY="your-64-character-hex-encryption-key-change-this-to-random-value" # Redis Configuration (for Bull Queue) REDIS_HOST=localhost REDIS_PORT=6379 REDIS_PASSWORD= # Email Configuration (optional, for notifications) SMTP_HOST=smtp.example.com SMTP_PORT=587 [email protected] SMTP_PASS=your-app-password [email protected] EMAIL_DOMAIN="taskosaur.com" # Frontend URL (for email links and CORS) FRONTEND_URL=http://localhost:3001 CORS_ORIGIN="http://localhost:3001" # Backend API URL (for frontend to connect to backend) NEXT_PUBLIC_API_BASE_URL=http://localhost:3000/api # File Upload UPLOAD_DEST="./uploads" MAX_FILE_SIZE=10485760 # Queue Configuration MAX_CONCURRENT_JOBS=5 JOB_RETRY_ATTEMPTS=3 -
Setup Database
# Run database migrations npm run db:migrate # Seed the database (idempotent - safe to run multiple times) npm run db:seed # Or seed with admin user only npm run db:seed:admin -
Start the Application
# Development mode (runs both frontend and backend) npm run dev # Or start individually npm run dev:frontend # Start frontend only (port 3001) npm run dev:backend # Start backend only (port 3000) -
Access the Application
- Frontend: http://localhost:3001
- Backend API: http://localhost:3000
- API Documentation: http://localhost:3000/api/docs
Development
Available Commands
All commands are run from the root directory:
Development
npm run dev              # Start both frontend and backend concurrently
npm run dev:frontend     # Start frontend only (Next.js on port 3001)
npm run dev:backend      # Start backend only (NestJS on port 3000)
Build
npm run build            # Build all workspaces (frontend + backend)
npm run build:frontend   # Build frontend for production
npm run build:backend    # Build backend for production
npm run build:dist       # Build complete distribution package
Database Operations
All seed commands are idempotent and safe to run multiple times:
npm run db:migrate         # Run database migrations
npm run db:migrate:deploy  # Deploy migrations (production)
npm run db:reset           # Reset database (deletes all data!)
npm run db:seed            # Seed database with sample data
npm run db:seed:admin      # Seed database with admin user only
npm run db:generate        # Generate Prisma client
npm run db:studio          # Open Prisma Studio (database GUI)
npm run prisma             # Run Prisma CLI commands directly
Testing
npm run test               # Run all tests
npm run test:frontend      # Run frontend tests
npm run test:backend       # Run backend unit tests
npm run test:watch         # Run backend tests in watch mode
npm run test:cov           # Run backend tests with coverage
npm run test:e2e           # Run backend end-to-end tests
Code Quality
npm run lint               # Lint all workspaces
npm run lint:frontend      # Lint frontend code
npm run lint:backend       # Lint backend code
npm run format             # Format backend code with Prettier
Cleanup
npm run clean              # Clean all build artifacts
npm run clean:frontend     # Clean frontend build artifacts
npm run clean:backend      # Clean backend build artifacts
Git Hooks
Automatic code quality checks with Husky:
- Pre-commit: Runs linters on all workspaces before each commit
- Ensures code quality and consistency
- Bypass with
--no-verify(emergencies only)
git commit -m "feat: add feature" # Runs checks automaticallyProject Structure
taskosaur/
├── backend/                # NestJS Backend (Port 3000)
│   ├── src/
│   │   ├── modules/       # Feature modules
│   │   ├── common/        # Shared utilities
│   │   ├── config/        # Configuration
│   │   └── gateway/       # WebSocket gateway
│   ├── prisma/            # Database schema and migrations
│   ├── public/            # Static files
│   └── uploads/           # File uploads
├── frontend/              # Next.js Frontend (Port 3001)
│   ├── src/
│   │   ├── app/          # App Router pages
│   │   ├── components/   # React components
│   │   ├── contexts/     # React contexts
│   │   ├── hooks/        # Custom hooks
│   │   ├── lib/          # Utilities
│   │   └── types/        # TypeScript types
│   └── public/           # Static assets
├── docker/               # Docker configuration
│   └── entrypoint-dev.sh # Development entrypoint script
├── scripts/              # Build and utility scripts
├── .env.example          # Environment variables template
├── docker-compose.dev.yml # Docker Compose for development
└── package.json          # Root package configuration
Conversational AI Task Execution Setup
Enable Conversational AI Task Execution in 3 Steps:
-
Open AI Assistant Settings
User menu (top-right avatar) → Profile → AI Settings button → AI Assistant Settings -
Add Your LLM API Key
- Toggle "Enable AI Chat" to ON
- Add your API key from any compatible provider:
- OpenRouter (100+ models, free options):
https://openrouter.ai/api/v1 - OpenAI (GPT models):
https://api.openai.com/v1 - Anthropic (Claude models):
https://api.anthropic.com/v1 - Local AI (Ollama, etc.): Your local endpoint
- OpenRouter (100+ models, free options):
-
Start Managing with AI
- Open the AI chat panel (sparkles icon)
- Type: "Create a new project called Website Redesign with 5 tasks"
- The AI executes the workflow automatically
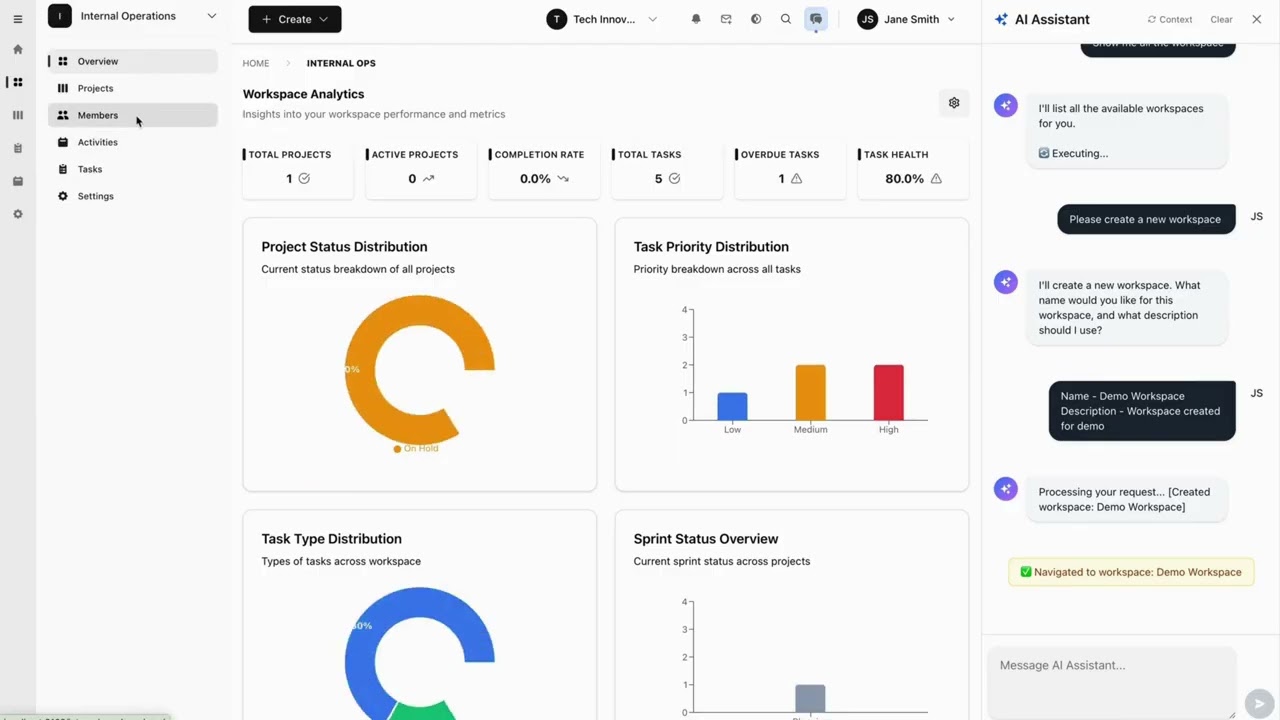
How Conversational AI Task Execution Works
Taskosaur's Conversational AI Task Execution features conversational AI for task execution in-app, performing actions directly instead of just providing suggestions:
- In-App Conversational Execution - Chat naturally with AI to execute tasks directly within the application
- Direct Browser Automation - AI navigates your interface and clicks buttons in real-time
- Complex Workflow Execution - Multi-step operations handled seamlessly through conversation
- Context-Aware Actions - Understands your current project/workspace context
- Natural Language Interface - No commands to memorize, just speak naturally
Example Conversational AI Task Execution Commands:
"Set up a new marketing workspace with Q1 campaign project"
"Move all high-priority bugs to in-progress and assign to John"
"Create a sprint with tasks from last week's backlog"
"Generate a report of Sarah's completed tasks this month"
"Set up automated workflow: when task is marked done, create review subtask"
Features
Taskosaur is actively under development. The following features represent our planned capabilities, with many already implemented and others in progress.
🤖 Conversational AI Task Execution Capabilities
🎯 Conversational Task Execution In-App
- In-App Chat Interface: Converse with AI directly within Taskosaur to execute tasks
- Browser-Based Task Execution: AI navigates the interface, fills forms, and completes tasks in real-time
- Multi-Step Workflow Processing: Execute complex workflows with a single conversational command
- Context Understanding: AI recognizes your current workspace, project, and team context
- Proactive Suggestions: AI identifies bottlenecks and suggests improvements through conversation
🧠 Natural Language Processing
- Understands complex project management requests
- Extracts actions, parameters, and context from conversational inputs
- Infers missing details from current context
⚡ Action Execution
- Live browser automation in real-time
- Bulk operations on multiple tasks at once
- Works within your existing workflows
🚀 Project Workflow Support
- Sprint planning with task analysis
- Task assignment based on team capacity
- Project timeline forecasting
Conversational AI Task Execution Examples:
- "Set up Q1 marketing campaign: create workspace, add team, set up 3 projects with standard templates"
- "Analyze all overdue tasks and reschedule based on team capacity and priorities"
- "Create automated workflow: high-priority bugs → assign to senior dev → notify team lead"
- "Generate sprint retrospective with team velocity analysis and improvement suggestions"
- "Migrate all design tasks from old project to new workspace with updated assignments"
Organization Management
- Multi-tenant Architecture: Planned support for multiple organizations with isolated data
- Workspace Organization: Group projects within workspaces for better organization
- Role-based Access Control: Implementing granular permissions (Admin, Manager, Member, Viewer)
- Team Management: Invite and manage team members across organizations
Project Management
- Flexible Project Structure: Create and manage projects with custom workflows
- Sprint Planning: Planned agile sprint management with planning and tracking
- Task Dependencies: Working on relationships between tasks with various dependency types
- Custom Workflows: Implementing custom status workflows for different project needs
Task Management
- Rich Task Types: Support for Tasks, Bugs, Epics, Stories, and Subtasks
- Priority Management: Set task priorities from Lowest to Highest
- Custom Fields: Add custom fields to capture project-specific data
- Labels & Tags: Organize tasks with customizable labels
- Time Tracking: Track time spent on tasks with detailed logging
- File Attachments: Attach files and documents to tasks
- Comments & Mentions: Collaborate through task comments with @mentions
- Task Watchers: Subscribe to task updates and notifications
Multiple Views
- Kanban Board: Visual task management with drag-and-drop
- Calendar View: Planned schedule and timeline visualization
- Gantt Charts: Planned project timeline and dependency visualization
- List View: Traditional table-based task listing
- Analytics Dashboard: Working toward project metrics, burndown charts, and team velocity
Automation & Integrations
- Automation Rules: Planned custom automation workflows
- Email Notifications: Automated email alerts for task updates
- Real-time Updates: Live updates using WebSocket connections
- Activity Logging: Comprehensive audit trail of all changes
- Search Functionality: Working toward global search across projects and tasks
Analytics & Reporting
- Sprint Burndown Charts: Planned sprint progress tracking
- Team Velocity: Planned team performance monitoring over time
- Task Distribution: Working toward task allocation and workload analysis
- Custom Reports: Planned project-specific report generation
Quick Start
Prerequisites
- Node.js 22+ and npm
- PostgreSQL 13+
- Redis 6+ (for background jobs)
Installation
-
Clone the repository
git clone https://github.com/Taskosaur/Taskosaur.git taskosaur cd taskosaur -
Install dependencies
npm installThis will automatically:
- Install all workspace dependencies (frontend and backend)
- Set up Husky git hooks for code quality
-
Environment Setup
Create a
.envfile in the root directory with the following configuration:# Database Configuration DATABASE_URL="postgresql://your-db-username:your-db-password@localhost:5432/taskosaur" # Authentication JWT_SECRET="your-jwt-secret-key-change-this" JWT_REFRESH_SECRET="your-refresh-secret-key-change-this-too" JWT_EXPIRES_IN="15m" JWT_REFRESH_EXPIRES_IN="7d" # Redis Configuration (for Bull Queue) REDIS_HOST=localhost REDIS_PORT=6379 REDIS_PASSWORD= # Email Configuration (for notifications) SMTP_HOST=smtp.gmail.com SMTP_PORT=587 [email protected] SMTP_PASS=your-app-password [email protected] # Frontend URL (for email links) FRONTEND_URL=http://localhost:3000 # File Upload UPLOAD_DEST="./uploads" MAX_FILE_SIZE=10485760 # Queue Configuration MAX_CONCURRENT_JOBS=5 JOB_RETRY_ATTEMPTS=3 # Frontend Configuration NEXT_PUBLIC_API_BASE_URL=http://localhost:3001/api -
Setup Database
# Run database migrations npm run db:migrate # Seed the database with core data npm run db:seed -
Start the Application
# Development mode (with hot reload for both frontend and backend) npm run dev # Or start individually npm run dev:frontend # Start frontend only npm run dev:backend # Start backend only -
Access the Application
- Frontend: http://localhost:3000
- Backend API: http://localhost:3001/api
- API Documentation: http://localhost:3001/api/docs
Development
Available Commands
All commands are run from the root directory. Environment variables are automatically loaded from the root .env file.
Development
# Start both frontend and backend
npm run dev

# Start individually
npm run dev:frontend       # Start frontend dev server
npm run dev:backend        # Start backend dev server with hot reload
Build
# Build all workspaces
npm run build

# Build individually
npm run build:frontend     # Build frontend for production
npm run build:backend      # Build backend for production
npm run build:dist         # Build complete distribution package
Database Operations
npm run db:migrate         # Run database migrations
npm run db:migrate:deploy  # Deploy migrations (production)
npm run db:reset           # Reset database (deletes all data!)
npm run db:seed            # Seed database with core data
npm run db:seed:admin      # Seed database with admin user
npm run db:generate        # Generate Prisma client
npm run db:studio          # Open Prisma Studio
npm run prisma             # Run Prisma CLI commands
Testing
npm run test               # Run all tests
npm run test:frontend      # Run frontend tests
npm run test:backend       # Run backend unit tests
npm run test:watch         # Run backend tests in watch mode
npm run test:cov           # Run backend tests with coverage
npm run test:e2e           # Run backend end-to-end tests
Code Quality
npm run lint               # Lint all workspaces
npm run lint:frontend      # Lint frontend code
npm run lint:backend       # Lint backend code
npm run format             # Format backend code with Prettier
Cleanup
npm run clean              # Clean all workspaces and root
npm run clean:frontend     # Clean frontend build artifacts
npm run clean:backend      # Clean backend build artifacts
Code Quality & Git Hooks
Automatic code formatting and linting with Prettier, ESLint, and Husky.
# Lint all workspaces
npm run lint                # Lint all workspaces

# Lint individually
npm run lint:frontend       # Frontend only
npm run lint:backend        # Backend only

# Format backend code
npm run format              # Format backend code with Prettier
Pre-commit Hook: Automatically formats, lints, and validates code on every commit via Husky.
# Commits run checks automatically
git commit -m "feat: add feature"

# Bypass checks in emergencies only
git commit -m "fix: urgent hotfix" --no-verify
Project Structure
taskosaur/
├── backend/                 # NestJS Backend
│   ├── src/
│   │   ├── modules/        # Feature modules
│   │   ├── config/         # Configuration files
│   │   ├── gateway/        # WebSocket gateway
│   │   └── prisma/         # Database service
│   ├── prisma/             # Database schema and migrations
│   └── uploads/            # File uploads
├── frontend/               # Next.js Frontend
│   ├── src/
│   │   ├── app/           # App Router pages
│   │   ├── components/    # React components
│   │   ├── contexts/      # React contexts
│   │   ├── hooks/         # Custom hooks
│   │   ├── styles/        # CSS styles
│   │   ├── types/         # TypeScript types
│   │   └── utils/         # Utility functions
│   └── public/            # Static assets
└── README.md
Deployment
Production Deployment
Using Docker (Recommended)
# Clone the repository
git clone https://github.com/Taskosaur/Taskosaur.git taskosaur
cd taskosaur

# Setup environment variables
cp .env.example .env
⚠️ IMPORTANT: Edit .env and update with secure production values:
- Generate strong unique secrets for
JWT_SECRET,JWT_REFRESH_SECRET,ENCRYPTION_KEY - Set secure database credentials
- Configure your domain URLs (
FRONTEND_URL,CORS_ORIGIN,NEXT_PUBLIC_API_BASE_URL) - Configure SMTP settings for email notifications
- Never use the example/default values in production
# Build and run with Docker Compose
docker-compose -f docker-compose.prod.yml up -d
Manual Deployment
Prerequisites for Production:
- Node.js 22+ LTS
- PostgreSQL 13+
- Redis 6+
- Reverse proxy (Nginx recommended)
Deployment Steps:
# From root directory
npm install

# Run database migrations
npm run db:migrate:deploy

# Generate Prisma client
npm run db:generate

# Build distribution package
npm run build:dist

# Start the application
# Backend: dist/main.js
# Frontend: dist/public/
# Serve with your preferred Node.js process manager (PM2, systemd, etc.)
Environment Variables for Production
Update your .env file for production:
NODE_ENV=production

# Database Configuration
DATABASE_URL="postgresql://username:password@your-db-host:5432/taskosaur"

# Authentication
JWT_SECRET="your-secure-production-jwt-secret"
JWT_REFRESH_SECRET="your-secure-production-refresh-secret"

# Redis Configuration
REDIS_HOST="your-redis-host"
REDIS_PORT=6379
REDIS_PASSWORD="your-redis-password"

# CORS Configuration
CORS_ORIGIN="https://your-domain.com"

# Frontend Configuration
NEXT_PUBLIC_API_BASE_URL=https://api.your-domain.com/api
FRONTEND_URL=https://your-domain.com
Hosting Platforms
Recommended platforms:
- Backend: Railway, Render, DigitalOcean App Platform
- Frontend: Vercel, Netlify, Railway
- Database: Railway PostgreSQL, Supabase, AWS RDS
- Redis: Railway Redis, Redis Cloud, AWS ElastiCache
API Documentation
The API documentation is automatically generated using Swagger:
- Development: http://localhost:3000/api/docs
- Production:
https://api.your-domain.com/api/docs
Contributing
We welcome contributions! Please see our Contributing Guidelines for details.
- Fork the repository
- Create a feature branch (
git checkout -b feature/amazing-feature) - Commit your changes (
git commit -m 'feat: add amazing feature') - Push to the branch (
git push origin feature/amazing-feature) - Open a Pull Request
Development Guidelines
- Code Style: Follow the existing code style, linters run automatically on commit
- TypeScript: Use strict TypeScript with proper type annotations
- Testing: Write tests for new features and bug fixes
- Documentation: Update documentation for any API changes
- Commit Messages: Use conventional commit messages (feat, fix, docs, etc.)
License
This project is licensed under the Business Source License - see the LICENSE file for details.
Acknowledgments
- NestJS - Backend framework
- Next.js - Frontend framework
- Prisma - Database ORM
- Tailwind CSS - CSS framework
Support
- Email: [email protected]
- Discord: Join our community
- Issues: GitHub Issues
- Discussions: GitHub Discussions
Built with love by the Taskosaur team