Home
Softono
a

alvarobartt

Professional software vendor delivering innovative solutions on the Softono platform. Specialized in both open-source and proprietary software development.

Total Products
2

Software by alvarobartt

serving-pytorch-models
Open Source

serving-pytorch-models

# Serving PyTorch models with TorchServe :fire: ![PyTorch Logo](https://miro.medium.com/max/1024/1*KKADWARPMxHb-WMxCgW_xA.png) __TorchServe is the ML model serving framework developed by PyTorch__. Along this repository, the procedure so as to train and deploy a transfer learning CNN model using [ResNet](https://arxiv.org/abs/1512.03385) as backbone, which classifies images retrieved from a slice of a well known food dataset, named [Food101](https://www.tensorflow.org/datasets/catalog/food101). __WARNING__: TorchServe is experimental and subject to change. __Note that this is the English version, for the Spanish version please read [README-es.md](README-es.md).__ ![sanity-checks](https://github.com/alvarobartt/serving-pytorch-models/workflows/sanity-checks/badge.svg?branch=master) [![](https://img.shields.io/static/v1?label=Read%20it%20on&message=Medium&color=informational&logo=Medium)](https://towardsdatascience.com/serving-pytorch-models-with-torchserve-6b8e8cbdb632) --- ## :closed_book: Table of Contents - [:hammer_and_wrench: Requirements](#hammer_and_wrench-requirements) - [:open_file_folder: Dataset](#open_file_folder-dataset) - [:robot: Modelling](#robot-modelling) - [:rocket: Deployment](#rocket-deployment) - [:whale2: Docker](#whale2-docker) - [:mage_man: Usage](#mage_man-usage) - [:computer: Credits](#computer-credits) --- ## :hammer_and_wrench: Requirements First of all you will need to make sure that you have Java JDK 11 installed, as it is required by `torchserve` while deploying the model since it is exposing the APIs using Java. ```bash sudo apt install --no-install-recommends -y openjdk-11-jre-headless ``` Then you can proceed with the installation of the PyTorch Python packages required for both training and serving the model. ```bash pip install torch==1.7.0 torchvision==0.8.1 -f https://download.pytorch.org/whl/torch_stable.html pip install torchserve==0.2.0 torch-model-archiver==0.2.0 ``` Or you can also install them from the `requirements.txt` file as it follows: ```bash pip install -r requirements.txt ``` If you have any problems regarding the PyTorch installation, visit [PyTorch - Get Started Locally](https://pytorch.org/get-started/locally/) --- ## :open_file_folder: Dataset The dataset that is going to be used to train the image classification model is [Food101](https://www.tensorflow.org/datasets/catalog/food101), but not the complete version of it, just a slice of 10 classes, which is more or less the 10% of the dataset. This dataset consists of 101 food categories, with 101'000 images. For each class, 250 manually reviewed test images are provided as well as 750 training images. On purpose, the training images were not cleaned, and thus still contain some amount of noise. This comes mostly in the form of intense colors and sometimes wrong labels. All images were resized to have a maximum side length of 512 pixels. ![](https://raw.githubusercontent.com/alvarobartt/serving-pytorch-models/master/images/data.jpg) --- ## 
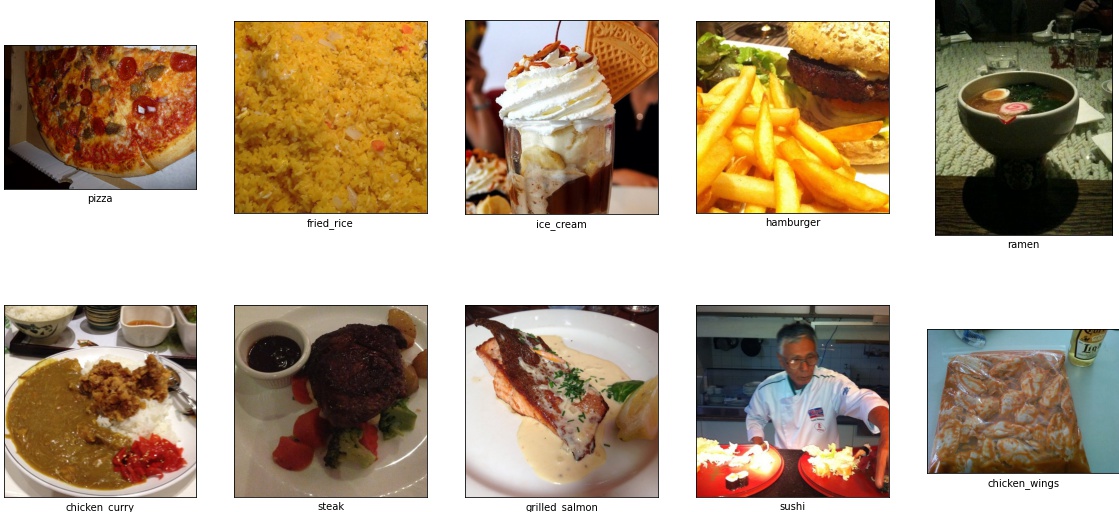
:robot: Modelling We will proceed with a transfer learning approach using [ResNet](https://arxiv.org/abs/1512.03385) as its backbone with a pre-trained set of weights trained on [ImageNet](http://www.image-net.org/), as it is the SOTA when it comes to image classification. In this case, as we want to serve a PyTorch model, we will be using [PyTorch's implementation of ResNet](https://pytorch.org/hub/pytorch_vision_resnet/) and more concretely, ResNet18, where the 18 stands for the number of layers that it contains. As we are going to use transfer learning from a pre-trained PyTorch model, we will load the ResNet18 model and freeze it's weights using the following piece of code: ```python from torchvision import models model = models.resnet18(pretrained=True) model.eval() for param in model.parameters(): param.requires_grad = False ``` Once loaded, we need to update the `fc` layer, which stands for fully connected and it's the last layer of the model, and over the one that the weights will be calculated to optimize the network for our dataset. In this concrete case we included the following sequential layer: ```python import torch.nn as nn sequential_layer = nn.Sequential( nn.Linear(model.fc.in_features, 128), nn.ReLU(), nn.Dropout(.2), nn.Linear(128, 10), nn.LogSoftmax(dim=1) ) model.fc = sequential_layer ``` Then we will train the model with the TRAIN dataset which contains 750 images and that has been split as 80%-20% for training and validation, respectively. And tested over the TEST dataset which contains 2500 images. __Note__: for more details regarding the model training process, feel free to check it at [notebooks/transfer-learning.ipynb](notebooks/transfer-learning.ipynb) After training the model you just need to dump the state_dict into a `.pth` file, which contains the pre-trained set of weights, with the following piece of code: ```python torch.save(model.state_dict(), '../model/foodnet_resnet18.pth') ``` Once the state_dict has been generated from the pre-trained model, you need to make sure that it can be loaded properly. But before checking that, you need to define the model's architecture as a Python class, so that the pre-trained set of weights is being loaded into that architecture, which means that the keys should match between the model and the weights. As we used transfer learning from a pre-trained model and we just modified the last fully connected layer (fc), we need to modify the original ResNet18 class. You can find the original class for this model at [torchvision/models/segmentation](https://github.com/pytorch/vision/blob/master/torchvision/models/resnet.py#L268-L277) and for the rest of the PyTorch pre-trained models at [torchvision/models](https://github.com/pytorch/vision/tree/master/torchvision/models). The code for the ResNet18 model looks like: ```python def resnet18(pretrained: bool = False, progress: bool = True, **kwargs: Any) -> ResNet: r"""ResNet-18 model from `"Deep Residual Learning for Image Recognition" <https://arxiv.org/pdf/1512.03385.pdf>`_ Args: pretrained (bool): If True, returns a model pre-trained on ImageNet progress (bool): If True, displays a progress bar of the download to stderr """ return _resnet('resnet18', BasicBlock, [2, 2, 2, 2], pretrained, progress, **kwargs) ``` Which translated to our model file it should look like: ```python import torch.nn as nn from torchvision.models.resnet import ResNet, BasicBlock class ImageClassifier(ResNet): def __init__(self): super(ImageClassifier, self).__init__(BasicBlock, [2,2,2,2], num_classes=10) self.fc = nn.Sequential( nn.Linear(512 * BasicBlock.expansion, 128), nn.ReLU(), nn.Dropout(.2), nn.Linear(128, 10), nn.LogSoftmax(dim=1) ) ``` As you can see we are creating a new class named `ImageClassifier` which inherits from the base `ResNet` class defined in that file. We then need to initialize that class with our architecture, which in this case is the same one as the ResNet18, including the `BasicBlock`, specifying the ResNet18 layers `[2,2,2,2]` and then we modify the number of classes, which for our case is 10 as we previously mentioned. Finally, so as to make the state_dict match with the model class, we need to override the `self.fc` layer, which is the last layer of the network. As we use that sequential layer while training the model, the final weights have been optimized for our dataset over that layer, so just overriding it we will get the model's architecture with our modifications. Then in order to check that the model can be loaded into the `ImageClassifier` class, you should just need to define the class and load the weights using the following piece of code: ```python model = ImageClassifier() model.load_state_dict(torch.load("../model/foodnet_resnet18.pth")) ``` Whose expected output should be `<All keys matched successfully>`. You can find more Image Classification pre-trained PyTorch models at [PyTorch Image Classification Models](https://pytorch.org/docs/stable/torchvision/models.html#classification). __Note__: the model has been trained on a NVIDIA GeForce GTX 1070 8GB GPU using CUDA 11. If you want to get you GPU specs, just use the `nvidia-smi` command on your console, but make sure that you have your NVIDIA drivers properly installed. So as to check whether PyTorch is using the GPU you can just use the following piece of code which will tell you whether there's a GPU (or more) available or not and, if so, which is the name of that device depending on its ID if there's more than one GPU. ```python import torch device = torch.device('cuda' if torch.cuda.is_available() else 'cpu') torch.cuda.get_device_name(0) ``` --- ## :rocket: Deployment In order to deploy the model you will need to reproduce the following steps once you installed all the requirements as described in the section above. ### 1. Generate MAR file First of all you will need to generate the MAR file, which is the "ready to serve" archive of the model generated with `torch-model-archiver`. So on, in order to do so, you will need to use the following command: ```bash torch-model-archiver --model-name foodnet_resnet18 \ --version 1.0 \ --model-file model/model.py \ --serialized-file model/foodnet_resnet18.pth \ --handler model/handler.py \ --extra-files model/index_to_name.json ``` So __torch-model-archiver__'s used flags stand for: - `--model-name`: name that the generated MAR "ready to serve" file will have. - `--version`: it's optional even though it's a nice practice to include the version of the models so as to keep a proper tracking over them. - `--model-file`: file where the model architecture is defined. - `--serialized-file`: the dumped state_dict of the trained model weights. - `--handler`: the Python file which defines the data preprocessing, inference and postprocessing. - `--extra-files`: as this is a classification problem you can include the dictionary/json containing the relationships between the IDs (model's target) and the labels/names and/or also additional files required by the model-file to format the output data in a cleaner way. __Note__: you can define custom handlers, but you don't need to as there are already some default handlers per every possible problem defined by TorchServe and accessible through a simple string. The current possible default handlers are: "image_classifier", "image_segmenter", "object_detector" and "text_classifier". You can find more information at [TorchServe Default Handlers](https://pytorch.org/serve/default_handlers.html) Once generated you will need to place the MAR file into the `deployment/model-store` directory as it follows: ```bash mv foodnet_resnet18.mar deployment/model-store/ ``` More information regarding `torch-model-archiver` available at [Torch Model Archiver for TorchServe](https://github.com/pytorch/serve/blob/master/model-archiver/README.md). ### 2. Deploy TorchServe Once you create the MAR \ model, you just need to serve it. The serving process of a pre-trained PyTorch model as a MAR file, starts with the deployment of the TorchServe REST APIs, which are the Inference API, Management API and Metrics API, deployed by default on `localhost` (of if you prefer `127.0.0.1`) in the ports 8080, 8081 and 8082, respectively. While deploying TorchServe, you can also specify the directory where the MAR files are stored, so that they are deployed within the API at startup. So on, the command to deploy the current MAR model stored under `deployment/model-store/` is the following: ```bash torchserve --start \ --ncs \ --ts-config deployment/config.properties \ --model-store deployment/model-store \ --models foodnet=foodnet_resnet18.mar ``` So __torchserve__'s used flags stand for: - `--start`: means that you want to start the TorchServe service (deploy the APIs). - `--ncs`: means that you want to disable the snapshot feature (optional). - `--ts-config`: to include the configuration file which is something optional too. - `--model-store`: is the directory where the MAR files are stored. - `--models`: is(are) the name(s) of the model(s) that will be served on the startup, including both an alias which will be the API endpoint of that concrete model and the filename of that model, with format `endpoint=model_name.mar`. __Note__: another procedure can be deploying TorchServe first (without defining the models), then registering the model using the Management API and then scaling the number of workers (if needed). ```bash torchserve --start --ncs --ts-config deployment/config.properties --model-store deployment/model-store curl -X POST "http://localhost:8081/models?initial_workers=1&synchronous=true&url=foodnet_resnet18.mar" curl -X PUT "http://localhost:8081/models/foodnet?min_worker=3" ``` More information regarding `torchserve` available at [TorchServe CLI](https://pytorch.org/serve/server.html#command-line-interface). ### 3. Check its status In order to check the availability of the deployed TorchServe API, you can just send a HTTP GET request to the Inference API deployed by default in the `8080` port, but you should check the `config.properties` file, which specifies `inference_address` including the port. ```bash curl http://localhost:8080/ping ``` If everything goes as expected, it should output the following response: ```json { "status": "Healthy" } ``` __Note__: If the status of the health-check request was `"Unhealthy"`, you should check the logs either from the console from where you did run the TorchServe deployment or from the `logs/` directory that is created automatically while deploying TorchServe from the same directory where you deployed it. ### 4. Stop TorchServe Once you are done and you no longer need TorchServe, you can gracefully shut it down with the following command: ```bash torchserve --stop ``` Then the next time you deploy TorchServe, it will take less time than the first one if the models to be server were already registered/loaded, as TorchServe keeps them cached under a `/tmp` directory so it won't need to load them again if neither the name nor the version changed. On the other hand, if you register a new model, TorchServe will have to load it and it may take a little bit more of time depending on your machine specs. --- ## :whale2: Docker In order to reproduce the TorchServe deployment in an Ubuntu Docker image, you should just use the following set of commands: ```bash docker build -t ubuntu-torchserve:latest deployment/ docker run --rm --name torchserve_docker \ -p8080:8080 -p8081:8081 -p8082:8082 \ ubuntu-torchserve:latest \ torchserve --model-store /home/model-server/model-store/ --models foodnet=foodnet_resnet18.mar ``` For more information regarding the Docker deployment, you should check TorchServe's explanation and notes available at [pytorch/serve/docker](https://github.com/pytorch/serve/tree/master/docker), as it also explains how to use their Docker image (instead of a clear Ubuntu one) and some tips regarding the production deployment of the models using TorchServe. --- ## :mage_man: Usage Once you completed all the steps above, you can send a sample request to the deployed model so as to see its performance and make the inference. In this case, as the problem we are facing is an image classification problem, we will use a sample image as the one provided below and then send it as a file on the HTTP request's body as it follows: ```bash wget https://raw.githubusercontent.com/alvarobartt/pytorch-model-serving/master/images/sample.jpg curl -X POST http://localhost:8080/predictions/foodnet -T sample.jpg ``` Which should output something similar to: ```json { "hamburger": 0.6911126375198364, "grilled_salmon": 0.11039528995752335, "pizza": 0.039219316095113754, "steak": 0.03642556071281433, "chicken_curry": 0.03306535258889198, "sushi": 0.028345594182610512, "chicken_wings": 0.027532529085874557, "fried_rice": 0.01296720840036869, "ice_cream": 0.012180349789559841, "ramen": 0.008756187744438648 } ``` __Remember__: that the original inference's output is the dict with the identifier of each class, not the class names, in this case as we included `index_to_name.json` as an extra-file while creating the MAR, TorchServe is automatically assigning the identifiers with the class names so that the prediction is clearer. --- The commands above translated into Python code looks like: ```python # Download a sample image from the available samples at alvarobartt/pytorch-model-serving/images import urllib url, filename = ("https://raw.githubusercontent.com/alvarobartt/pytorch-model-serving/master/images/sample.jpg", "sample.jpg") try: urllib.URLopener().retrieve(url, filename) except: urllib.request.urlretrieve(url, filename) # Transform the input image into a bytes object import cv2 from PIL import Image from io import BytesIO image = Image.fromarray(cv2.imread(filename)) image2bytes = BytesIO() image.save(image2bytes, format="PNG") image2bytes.seek(0) image_as_bytes = image2bytes.read() # Send the HTTP POST request to TorchServe import requests req = requests.post("http://localhost:8080/predictions/foodnet", data=image_as_bytes) if req.status_code == 200: res = req.json() ``` __Note__: that to execute the sample piece of code above you will need more requirements than the ones specified in the [Requirements section](#hammer_and_wrench-requirements) so just run the following command so as to install them: ```bash pip install opencv-python pillow requests --upgrade ``` --- ## :computer: Credits Credits for the dataset slice go to [@mrdbourke](https://github.com/mrdbourke), as he nicely provided me the information via Twitter DM. Credits for the tips on how to serve a PyTorch transfer learning model using TorchServe go to [@prashantsail](https://github.com/prashantsail) as he properly explained in [this comment](https://github.com/pytorch/serve/issues/620#issuecomment-674971664).

AI & Machine Learning ML Frameworks
102 Github Stars
serving-tensorflow-models
Open Source

serving-tensorflow-models

# Serving TensorFlow models with TensorFlow Serving :orange_book: ![TensorFlow Logo](https://inletlabs.com/assets/images/logo_stack/tensorflow-logo.png) __TensorFlow Serving is a flexible, high-performance serving system for machine learning models, designed for production environments. TensorFlow Serving makes it easy to deploy new algorithms and experiments, while keeping the same server architecture and APIs. TensorFlow Serving provides out-of-the-box integration with TensorFlow models, but can be easily extended to serve other types of models and data.__ This repository is a guide on how to train, save, deploy and interact with TensorFlow ML models in production environments for TensorFlow models. Along with this repository, we will prepare and train a custom CNN model for image classification over [The Simpsons Characters Dataset](https://www.kaggle.com/alexattia/the-simpsons-characters-dataset), that will be later deployed using [TensorFlow Serving](https://www.tensorflow.org/tfx/guide/serving). ![sanity-checks](https://github.com/alvarobartt/serving-tensorflow-models/workflows/sanity-checks/badge.svg?branch=master) [![](https://img.shields.io/static/v1?label=Read%20it%20on&message=Medium&color=informational&logo=Medium)](https://towardsdatascience.com/serving-tensorflow-models-with-tensorflow-serving-9f1058ac7140) --- __:sparkles: :framed_picture: STREAMLIT UI AVAILABLE AT [tensorflow-serving-streamlit](https://github.com/alvarobartt/tensorflow-serving-streamlit)!__ ![](https://raw.githubusercontent.com/alvarobartt/serving-tensorflow-models/master/images/ui-demo.gif) --- ## :hammer_and_wrench: Requirements First of all, you need to make sure that you have all the requirements installed, but before proceeding you should keep in mind that TF-Serving is not available for Windows or macOS, which means that if you don't have an Ubuntu VM you will need to proceed with the Docker deployment, that requires you to have Docker installed. __:warning: Warning!__ In case you don't have Ubuntu, but still want to deploy TF-Serving via Docker, you don't need to install TF-Serving with APT-GET, just run the Dockerfile (go to the section [Docker](#whale2-docker)). That said, if you didn't jump to the Docker section, now you need to install `tensorflow-model-server`, which requires you to add the TF-Serving distribution URI as a package source as it follows: ``` echo "deb [arch=amd64] http://storage.googleapis.com/tensorflow-serving-apt stable tensorflow-model-server tensorflow-model-server-universal" | sudo tee /etc/apt/sources.list.d/tensorflow-serving.list && \ curl https://storage.googleapis.com/tensorflow-serving-apt/tensorflow-serving.release.pub.gpg | sudo apt-key add - ``` So that then you can install `tensorflow-model-server` using APT-GET as it follows: ``` apt-get update && apt-get install tensorflow-model-server ``` Finally, for the client side of the deployment you need install the Python package `tensorflow-serving-api`, in case you want to use the gRPC API, which is faster than the REST API regarding the latency and inference time. ``` pip install tensorflow-serving-api==2.5.2 ``` You will also need to install the `tensorflow`'s matching version with the `tensorflow-serving-api` (we will be using the latest version on the date that this repository is being published) with the following command: ``` pip install tensorflow==2.5.1 ``` :pushpin: __Update__: in this concrete case the versions do not match according to the comments in https://github.com/tensorflow/serving/releases/tag/2.5.2, but the usual scenario should be matching versions between both `tensorflow` and `tensorflow-serving-api`. Also the versions have been updated in this repository due to a Dependabot Alert as it can be seen at https://github.com/advisories/GHSA-cmgw-8vpc-rc59. Or you can also avoid the manual installation of each requirement and just install them all at once with the following command, that will install all the requirements specified in the `requirements/requirements.txt` file: ``` pip install -r requirements/requirements.txt ``` If you have any problems regarding the TensorFlow installation, visit [Installation | TensorFlow](https://www.tensorflow.org/install?hl=es-419). --- ## :open_file_folder: Dataset The dataset that is going to be used to train the image classification model is "[The Simpsons Characters Data](https://www.kaggle.com/alexattia/the-simpsons-characters-dataset)", which is a big Kaggle dataset that contains RGB images of some of the main The Simpsons characters including Homer, Marge, Bart, Lisa, Barney, and much more. The original dataset contains 42 classes of The Simpsons characters, with an unbalanced number of samples per class, and a total of 20,935 training images and 990 test images in JPG format, and the images in different sizes, but as all of them are small, we will be resizing them to 64x64px when training the model. Anyway, we will create a custom slice of the original dataset keeping just the training set, and using a random 80/20 train-test split and removing the classes with less than 50 images. So on, we will be have 32 classes, with 13,210 training images, 3,286 validation images, and 4,142 testing images. Find all the information about the dataset in [dataset/README.md](https://github.com/alvarobartt/serving-tensorflow-models/tree/master/dataset). ![](https://raw.githubusercontent.com/alvarobartt/serving-tensorflow-models/master/images/data.jpg) --- ## :robot: Modelling Once the data has been explored, we are going to proceed with the definition of the ML model, which in this case will be a __CNN (Convolutional Neural Network)__ as we are facing an image classification problem. The created model architecture consists of an initial `Conv2D` layer (that also indicates the input_shape of the net), which is a 2D convolutional layer that produces 16 filters as the output of windows of 3x3 convolutions, followed by a `MaxPooling2D` to downsample the Tensor resulting from the previous convolutional layer. Usually, you will find this layer after two consecutive convolutions, but for the sake of simplicity, here we will be downsampling the data after each convolution, as this is a simple CNN with a relatively small dataset (less than 20k images). Then we will include another combination of `Conv2D` and `MaxPooling2D` layers as increasing the number of convolutional filters means that we will provide more data to the CNN as it is capturing more combinations of pixel values from the input image Tensor. After applying the convolutional operations, we will include a `Flatten` layer to transform the image Tensor into a 1D Tensor which prepares the data that goes through the CNN to include a few fully connected layers after it. Finally, we will include some `Dense` fully connected layers to assign the final weights of the net, and some Dropout layers to avoid overfitting during the training phase. You also need to take into consideration that the latest `Dense` layer contains as many units as the total labels to predict, which in this case is the number of The Simpsons characters available in the training set. The trained model has been named __SimpsonsNet__ (this name will be used later while serving the model as its identifier) and its architecture looks like this: ```python import tensorflow as tf model = tf.keras.models.Sequential([ tf.keras.layers.Conv2D(16, (3,3), activation='relu', input_shape=(224, 224, 3)), tf.keras.layers.MaxPooling2D(2,2), tf.keras.layers.Conv2D(32, (3,3), activation='relu'), tf.keras.layers.MaxPooling2D(2,2), tf.keras.layers.Flatten(), tf.keras.layers.Dense(units=512, activation='relu'), tf.keras.layers.Dropout(.2), tf.keras.layers.Dense(units=256, activation='relu'), tf.keras.layers.Dropout(.1), tf.keras.layers.Dense(len(MAP_CHARACTERS), activation='softmax') ]) ``` Finally, once trained we will need to dump the model (not the weights) in `SavedModel` format, which is the universal serialization format for the TensorFlow models. This format provides a language-neutral format to save ML models that is recoverable and hermetic. It enables higher-level systems and tools to produce, consume and transform TensorFlow models. ```python import tensorflow as tf import os save_path = os.path.join("/home/saved_models/saved_model/1/") tf.saved_model.save(trained_model, save_path) ``` The resulting `SavedModel`'s directory should look like the following: ``` assets/ assets.extra/ variables/ variables.data-?????-of-????? variables.index saved_model.pb ``` More information regarding the `SavedModel` format at [TensorFlow SavedModel](https://github.com/tensorflow/tensorflow/blob/master/tensorflow/python/saved_model/README.md). __Note__: the model has been trained on an NVIDIA GeForce GTX 1070 8GB GPU using CUDA 11. If you want to get your GPU specs, just use the `nvidia-smi` command on your console, but make sure that you have your NVIDIA drivers properly installed. You also need to check that both CUDA and the cuDNN SDK get the GPU training working with TensorFlow. The code provided below explains how to make sure that the TensorFlow build is detecting and using your GPU. ```python import tensorflow as tf tf.config.list_physical_devices('GPU') tf.test.is_built_with_cuda() ``` More information available at [TensorFlow GPU Install](https://www.tensorflow.org/install/gpu). --- Finally, as a personal recommendation you should check/keep an eye on the following courses: - :fire: [Laurence Moroney](https://github.com/lmoroney)'s TensorFlow Proffesional Certificate (previously Specialization) at Coursera for learning the basics of TensorFlow as you playaround with some common Deep Learning scenarios like CNNs, Time Series and NLP. So feel free to check it at [Coursera | TensorFlow in Practice](https://www.coursera.org/professional-certificates/tensorflow-in-practice), and the course's resources at [lmoroney/dlaicourse](https://github.com/lmoroney/dlaicourse). - :star: [Daniel Bourke](https://github.com/mrdbourke)'s TensorFlow Zero to Mastery course he is currently developing and it will be completely free including a lot of resources. So feel free to check it at [mrdbourke/tensorflow-deep-learning](https://github.com/mrdbourke/tensorflow-deep-learning). - :sparkles: [Andrew Ng](https://twitter.com/andrewyng)'s CNN course/explanation freely available on YouTube at [Convolutional Neural Networks - Course 4 of the Deep Learning Specialization](https://www.youtube.com/watch?v=ArPaAX_PhIs&list=PLkDaE6sCZn6Gl29AoE31iwdVwSG-KnDzF) that contains clear explanations on how the convolutional operations work, to help you get introduced to the Computer Vision field. __If you have some TensorFlow free learning material made by you that you want to share, feel free to create a PR including it in this list, and I'll be glad to feature your work!__ --- ## :rocket: Deployment Once the model has been saved using `SavedModel` format, it is pretty straightforward to get TF-Serving working, if the installation succeeded. Unlike [TorchServe](https://pytorch.org/serve/), serving ML models in TF-Serving is simpler as you just need to have `tensorflow-model-server` installed and a model in the specified format. But regarding the TF-Serving documentation (at least from my point of view) is not that clear, so the deployment process may be tedious and then the usage too. Anyway, the following command is the one you need to use to deploy any TensorFlow's ML model into TF-Serving: ``` tensorflow_model_server --port=8500 --rest_api_port=8501 \ --model_name=simpsonsnet \ --model_base_path=/home/saved_models/simpsonsnet ``` Now, even though the command is clear and self-explanatory, a more detailed explanation of the flags used is presented: - `--port`: this is the port to listen on for the gRPC API, the default value is 8500, but it's a common practice to still define this flag's value to always know the configuration of the deployed TF-Serving Server. - `--rest_api_port`: this is the REST API port, which is set to zero by default, which means that the REST API will not be deployed/exposed unless you manually set a port. There's no default value, it just needs to be different than the gRPC port, so we will set it to 8501. - `--model_name`: this is the name of the ML model to serve, which is the one that will be exposed in the endpoint. - `--model_base_path`: this is the base path where the ML model that is going to be served is placed in. Note that it's an absolute path, do not use relative paths. More information about the TF-Serving CLI available at [Train and serve a TensorFlow model with TensorFlow Serving](https://www.tensorflow.org/tfx/tutorials/serving/rest_simple#start_running_tensorflow_serving). Even though the official documenation is not that helpful, you can also check `tensorflow_model_server --help`. Once TF-Serving has been successfully deployed, you can send a sample HTTP GET request to the REST API available at http://localhost:8501/v1/models/simpsonsnet; to do so use the following command, which sends this request to the _Model Status API_ that returns the served ML model basic information: ``` curl http://localhost:8501/v1/models/simpsonsnet ``` That should output something similar to the following if everything is OK: ```json { "model_version_status": [ { "version": "1", "state": "AVAILABLE", "status": { "error_code": "OK", "error_message": "" } } ] } ``` There is no way to gracefully stop the server, check [this issue](https://github.com/tensorflow/serving/issues/356) for updates, so you will need to either `CTRL+C` in the terminal where you launched `tensorflow_model_server`, kill the running process from the terminal or just stop the running container. To look for the PID of the running `tensorflow_model_server` process and then kill it, you can use the following set of commands: ``` ps aux | grep -i "tensorflow_model_server" kill -9 PID ``` To look for the running Docker Container ID and then stop it, you can just use the following set of commands: ``` docker ps # Retrieve the CONTAINER_ID docker kill CONTAINER_ID ``` --- ## :whale2: Docker In order to reproduce the TF-Serving deployment in an Ubuntu Docker image, you can use the following set of commands: ```bash docker build -t ubuntu-tfserving:latest deployment/ docker run --rm --name tfserving_docker -p8500:8500 -p8501:8501 -d ubuntu-tfserving:latest ``` __Note__: make sure that you use the `-d` flag in `docker run` so that the container runs in the background and does not block your terminal. For more information regarding the Docker deployment, you should check TensorFlow's explanation and notes available at [TF-Serving with Docker](https://www.tensorflow.org/tfx/serving/docker?hl=en), as it also explains how to use their Docker image (instead of a clear Ubuntu one) and some tips regarding the production deployment of the models using TF-Serving. Also, if you go through the [deployment/Dockerfile](https://github.com/alvarobartt/serving-tensorflow-models/blob/master/deployment/Dockerfile) you will see that there's a comment per Dockerfile line explaining what is it doing. So that you can also take that Dockerfile as a template, making it easier to prepare the deployment file for your custom model. --- ## :mage_man: Usage Along this section we will see how to interact with the deployed APIs (REST and gRPC) via Python, so as to send sample requests to the Prediction APIs to classify images from "The Simpsons Characters Dataset". __Note__: as the model is pretty simple the accuracy is not perfect, but that's part of any ML project lifecycle so that the model improves with iterations and retraining processes. Feel free to update/improve the model! <p align="center"> <img width="400" height="275" src="https://raw.githubusercontent.com/alvarobartt/serving-tensorflow-models/master/images/meme.jpg"/> </p> <p align="center"> <i>Source: <a href="https://www.reddit.com/r/TheSimpsons/comments/ffhufz/lenny_white_carl_black/">Reddit - r/TheSimpsons</a></i> </p> Before proceeding with the Python usage, just to mention that as the mapping between the labels and the predicted Tensor is a future task (see the [Future Tasks](#crystal_ball-future-tasks) section), we will be using the following dictionary so as to go from the predicted Tensor highest probability index to the matching label on "The Simpsons Characters Dataset". ```python { 0: "abraham_grampa_simpson", 1: "apu_nahasapeemapetilon", 2: "barney_gumble", 3: "bart_simpson", 4: "carl_carlson", 5: "charles_montgomery_burns", 6: "chief_wiggum", 7: "comic_book_guy", 8: "disco_stu", 9: "edna_krabappel", 10: "groundskeeper_willie", 11: "homer_simpson", 12: "kent_brockman", 13: "krusty_the_clown", 14: "lenny_leonard", 15: "lisa_simpson", 16: "maggie_simpson", 17: "marge_simpson", 18: "martin_prince", 19: "mayor_quimby", 20: "milhouse_van_houten", 21: "moe_szyslak", 22: "ned_flanders", 23: "nelson_muntz", 24: "patty_bouvier", 25: "principal_skinner", 26: "professor_john_frink", 27: "ralph_wiggum", 28: "selma_bouvier", 29: "sideshow_bob", 30: "snake_jailbird", 31: "waylon_smithers" } ``` --- If you want to interact with the deployed API from Python you can either use the [tensorflow-serving-api](https://github.com/tensorflow/serving) Python package that easily lets you send gRPC requests or otherwise, you can use the [requests](https://requests.readthedocs.io/en/master/) Python library to send the request to the REST API instead. ### __REST API requests using `requests`__: Regarding the REST requests to the deployed TF-Serving Prediction API you need to install the requirements as it follows: ``` pip install -r requirements/requirements-rest.txt ``` And then use the following script which will send a sample The Simpsons image to be classified using the deployed model: ```python import requests import tensorflow as tf # Apply the same preprocessing as during training (resize and rescale) image = tf.io.decode_image(open('../images/sample.jpg', 'rb').read(), channels=3) image = tf.image.resize(image, [224, 224]) image = image/255. # Convert the Tensor to a batch of Tensors and then to a list image_tensor = tf.expand_dims(image, 0) image_tensor = image_tensor.numpy().tolist() # Define the endpoint with the format: http://localhost:8501/v1/models/MODEL_NAME:predict endpoint = "http://localhost:8501/v1/models/simpsonsnet:predict" # Prepare the data that is going to be sent in the POST request json_data = { "instances": image_tensor } # Send the request to the Prediction API response = requests.post(endpoint, json=json_data) # Retrieve the highest probablity index of the Tensor (actual prediction) prediction = tf.argmax(response.json()['predictions'][0]) print(MAP_CHARACTERS[prediction.numpy()]) >>> "homer_simpson" ``` ### __gRPC API requests using `tensorflow-serving-api`__: Now, regarding the gRPC requests to the deployed TF-Serving Prediction API you need to install the requirements as it follows: ``` pip install -r requirements/requirements-grpc.txt ``` And then use the following script which will send a sample The Simpsons image to be classified using the deployed model: ```python import grpc import tensorflow as tf from tensorflow_serving.apis import predict_pb2, prediction_service_pb2_grpc # Apply the same preprocessing as during training (resize and rescale) image = tf.io.decode_image(open('../images/sample.jpg', 'rb').read(), channels=3) image = tf.image.resize(img, [224, 224]) image = image/255. # Convert the Tensor to a batch of Tensors and then to a list image_tensor = tf.expand_dims(image, 0) image_tensor = image_tensor.numpy().tolist() # Optional: define a custom message lenght in bytes MAX_MESSAGE_LENGTH = 20000000 # Optional: define a request timeout in seconds REQUEST_TIMEOUT = 5 # Open a gRPC insecure channel channel = grpc.insecure_channel( "localhost:8500", options=[ ("grpc.max_send_message_length", MAX_MESSAGE_LENGTH), ("grpc.max_receive_message_length", MAX_MESSAGE_LENGTH), ], ) # Create the PredictionServiceStub stub = prediction_service_pb2_grpc.PredictionServiceStub(channel) # Create the PredictRequest and set its values req = predict_pb2.PredictRequest() req.model_spec.name = 'simpsonsnet' req.model_spec.signature_name = '' # Convert to Tensor Proto and send the request # Note that shape is in NHWC (num_samples x height x width x channels) format tensor = tf.make_tensor_proto(image_tensor) req.inputs["conv2d_input"].CopyFrom(tensor) # Available at /metadata # Send request response = stub.Predict(req, REQUEST_TIMEOUT) # Handle request's response output_tensor_proto = response.outputs["dense_2"] # Available at /metadata shape = tf.TensorShape(output_tensor_proto.tensor_shape) result = tf.reshape(output_tensor_proto.float_val, shape) result = tf.argmax(result, 1).numpy()[0] print(MAP_CHARACTERS[result]) >>> "homer_simpson" ``` --- ## :computer: Credits Credits for the dataset to [Alexandre Attia](https://github.com/alexattia) for creating it, as well as the Kaggle community that made it possible, as they included a lot of images to the original dataset (from 20 characters to up to 42). --- ## :crystal_ball: Future Tasks - Include label-prediction mapping using [this solution](https://stackoverflow.com/questions/53530354/tensorflow-serving-predictions-mapped-to-labels).

LLM Tools & Chat UIs PaaS & Self-hosting
43 Github Stars