

n8n-templates
My personal used and created n8n workflow templates
Professional software vendor delivering innovative solutions on the Softono platform. Specialized in both open-source and proprietary software development.
My personal used and created n8n workflow templates
         # Bulk Automated Google Drive Files Sharing and Direct Download Link Generation This N8N workflow automates the process of sharing files from Google Drive. It includes OAuth2 authentication, batch processing, public link generation, and access status modification for efficient file handling. Suitable for users seeking to streamline their Google Drive file sharing process. sutiable for bulk actions, tested on 4.2K files folder working like charm.  ### How It Works 1. **Initialize Workflow**: The process begins with a Manual Trigger, allowing the user to start the workflow at their convenience. 2. **Folder ID Specification**: A 'Set Folder ID' node where the user can enter the desired Google Drive Folder ID. 3. **List Files from Google Drive**: The 'Google Drive' node lists all files within the specified folder using OAuth2 authentication. 4. **Batch Processing**: The 'Loop Over Items' node processes the files in batches for efficiency. 5. **Generate Public Links**: The 'Generate Download Links' node creates downloadable links for each file. 6. **Change File Access**: The 'Change Status' node alters the file status to make them publicly accessible. 7. **Merge and Output**: A 'Merge' node consolidates the data, preparing it for further actions or output. ### Set Up Steps * **Estimated Time**: The setup should take approximately 10-15 minutes. * **Initial Setup**: You'll need to provide OAuth2 credentials for Google Drive and specify a folder ID. * **Customization**: Adjust the batch size and file access permissions according to your needs. * **Detailed Descriptions**: For specific configuration details, refer to the sticky notes within the workflow. ### Example Item output ```JSON { "link": "https://drive.google.com/u/3/uc?id=1hojqPfXchNTY8YRTNkxSo-8txK9re-V4&export=download&confirm=t&authuser=0", "name": "firefox_rNjA0ybKu7.png", "kind": "drive#permission", "id": "anyoneWithLink", "type": "anyone", "role": "reader", "allowFileDiscovery": false } ``` You can store the output data with any data store node you want, for example save them into Excel Sheet or Airtable etc... ``` Keywords: n8n workflow, Google Drive integration, file sharing automation, batch file processing, public link generation, OAuth2 authentication, workflow automation ``` # Stats [](https://n8n.io/creators/nskha)
        # YouTube Channel Advanced RSS Feeds Generator [](https://youtu.be/EtzJmrmCiUY) ### Overview The **[n8n] YouTube Channel Advanced RSS Feeds Generator** workflow facilitates the generation of various RSS feed formats for YouTube channels without requiring API access or administrative permissions. It utilizes third-party services to extract data, making it extremely user-friendly and accessible. ### Key Use Cases and Benefits * **Content Aggregation**: Easily gather and syndicate content from any public YouTube channel. * **No API Key Required**: Avoid the complexities and limitations of Google's API. * **Multiple Formats**: Supports ATOM, JSON, MRSS, Plaintext, Sfeed, and direct YouTube XML feeds. * **Flexibility**: Input can be a YouTube channel or video URL, ID, or username. ### Services/APIs Utilized This workflow integrates with: * **commentpicker.com**: For retrieving YouTube channel IDs. * **rss-bridge.org**: To generate various RSS formats. ### Configuration Instructions 1. **Start the Workflow**: Activate the workflow in your n8n instance. 2. **Input Details**: Enter the YouTube channel or video URL, ID, or username via the provided form trigger. 3. **Run the Workflow**: Execute the workflow to receive links to 13 different RSS feeds, including community and video content feeds. ### Screenshots 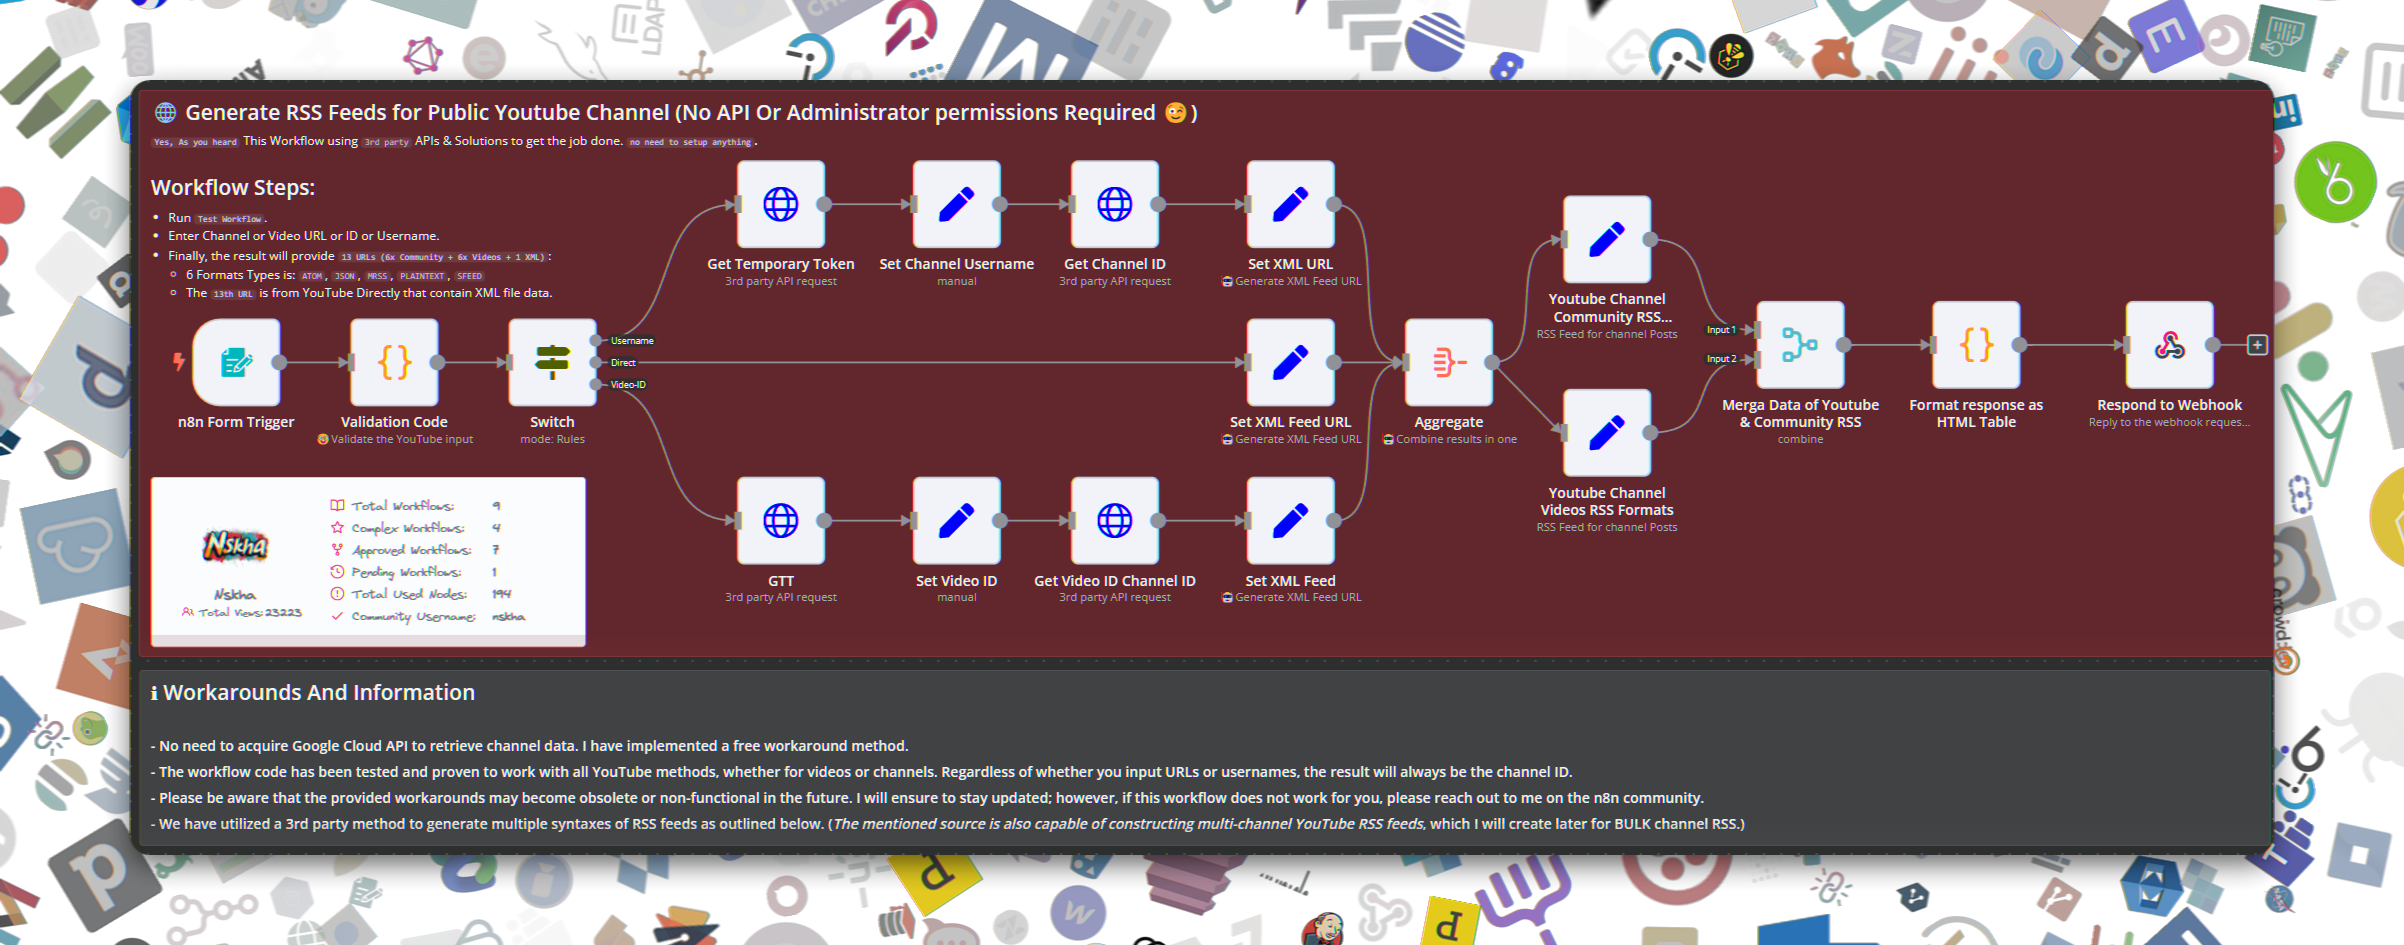 ### Additional Notes * **Customization**: You can modify the RSS feed formats or integrate additional services as needed. ### Support and Contributions For support, questions, or contributions, please visit the [n8n community forum](https://community.n8n.io) or the [GitHub repository](https://github.com/n8n-io/n8n). We welcome contributions from the community! # Stats [](https://n8n.io/creators/nskha)
           # Crypto Market Alert System with Binance and Telegram Integration An innovative N8N workflow that monitors cryptocurrency prices on Binance, identifies significant market movements, and sends customized alerts through Telegram. Ideal for traders and enthusiasts seeking real-time market insights. [](https://www.youtube.com/embed/slG_q_sT_E8) ### How It Works 1. **Trigger Options**: Choose between a manual trigger or a scheduled trigger to start the workflow. 2. **Fetch Market Data**: The 'Binance 24h Price Change' node retrieves the latest 24-hour price changes for cryptocurrencies from Binance. 3. **Identify Significant Changes**: The 'Filter by 10% Change rate' node filters out cryptocurrencies with price changes of 10% or more. 4. **Aggregate Data**: The 'Aggregate' node combines all significant changes into a single dataset. 5. **Format Data for Telegram**: The 'Split By 1K chars' node formats this data into chunks suitable for Telegram's message size limit. 6. **Send Telegram Message**: The 'Send Telegram Message' node broadcasts the formatted message to a specified Telegram chat. ### Set Up Steps * **Estimated Time**: About 1-5 minutes for setup. * **Initial Configuration**: Set up a Binance API connection (Optional) and your Telegram bot credentials. * **Customization**: Adjust the trigger according to your preference (manual or scheduled) and update the Telegram chat ID. * **Create Telegram bot steps**:- Setting up a Telegram bot and obtaining its token involves several steps. Here's a detailed guide: 1. **Start a Chat with BotFather:** - Open Telegram and search for "BotFather". This is the official bot that allows you to create new bots. - Start a chat with BotFather by clicking on the "Start" button at the bottom of the screen. 2. **Create a New Bot:** - In the chat with BotFather, type `/newbot` and send the message. - BotFather will ask you to choose a name for your bot. This is a display name and can be anything you like. - Next, you'll need to choose a username for your bot. This must be unique and end in `bot`. For example, `my_crypto_alert_bot`. 3. **Receive Your Token:** - After you've set the name and username, BotFather will provide you with a token. This token is like a password for your bot, so keep it secure. - The message will look something like this: ``` Done! Congratulations on your new bot. You will find it at t.me/my_crypto_alert_bot. You can now add a description, about section and profile picture for your bot, see /help for a list of commands. Use this token to access the HTTP API: 123456:ABC-DEF1234ghIkl-zyx57W2v1u123ew11 ``` - The token in this case is `123456:ABC-DEF1234ghIkl-zyx57W2v1u123ew11`. 4. **Test Your Bot:** - You can find your bot by searching for its username in Telegram. - Start a chat with your bot and try sending it a message. Although it won't respond yet, this step is essential to ensure it's set up correctly. 5. **Use the Token in n8n:** - In your n8n workflow, when setting up the Telegram node, you'll be prompted to enter credentials. - Choose to add new credentials and paste the token you received from BotFather. 6. **Get Your Chat ID:** - To send messages to a specific chat, you need to know the chat ID. - The easiest way to find this is to first message your bot, then use a bot like `@userinfobot` to get your chat ID. - Once you have the chat ID, you can configure it in the Telegram node in your n8n workflow. 7. **Finalize Your Workflow:** - With the bot token and chat ID set up in n8n, your Telegram notifications should work as intended in your workflow. Remember, keep your bot token secure and never share it publicly. If your token is compromised, you can always generate a new one by chatting with BotFather and selecting `/token`. ### Example result  ``` Keywords: n8n workflow, cryptocurrency market, Binance API, Telegram bot, price alert system, automated trading signals, market analysis ``` # Stats [](https://n8n.io/creators/nskha)
 # Scrappey n8n Node [](https://github.com/Automations-Project/n8n-nodes-scrappey/actions/workflows/ci.yml) [](https://github.com/Automations-Project/n8n-nodes-scrappey/actions/workflows/release.yml) [](https://github.com/Automations-Project/n8n-nodes-scrappey/actions/workflows/security.yml) [](https://www.npmjs.com/package/@nskha/n8n-nodes-scrappey) [](https://www.npmjs.com/package/@nskha/n8n-nodes-scrappey) [](https://github.com/Automations-Project/n8n-nodes-scrappey) [](https://n8n.io) [](https://nodejs.org) [](https://www.typescriptlang.org) [](https://libraries.io/npm/@nskha%2Fn8n-nodes-scrappey) [](LICENSE.md) [](https://github.com/Automations-Project/n8n-nodes-scrappey/stargazers) [](https://github.com/Automations-Project/n8n-nodes-scrappey/network) [](https://github.com/Automations-Project/n8n-nodes-scrappey/issues) [](https://github.com/Automations-Project/n8n-nodes-scrappey/commits) > 🚀 **Advanced web scraping and anti-bot bypass node for n8n workflows** A powerful n8n community node that integrates with the [Scrappey.com API](https://scrappey.com) to provide advanced web scraping capabilities with built-in anti-bot protection bypass. Perfect for automating data extraction from protected websites, handling CAPTCHAs, and managing complex browser interactions. ## ✨ Key Features ### 🛠️ **Three Operation Modes** 1. **Request Builder** - Create fully customized HTTP/browser requests with granular control 2. **HTTP Auto-Retry** - Automatically retry failed HTTP requests through Scrappey's anti-bot network 3. **Browser Auto-Retry** - Advanced browser-based retry with full anti-bot protection ### 🔒 **Anti-Bot Protection Bypass** - **Cloudflare** challenge solving - **Datadome** bypass capabilities - **hCaptcha & reCAPTCHA** automatic solving - **JavaScript-heavy websites** full browser simulation - **Mouse movement simulation** for enhanced stealth ### 🌍 **Advanced Proxy Management** - **Residential proxies** with country targeting - **Datacenter proxies** for fast requests - **Mobile proxies** for mobile-specific content - **Custom proxy** support (SOCKS4/5, HTTP/HTTPS) - **150+ countries** available for geo-targeting ### ⚙️ **Flexible Configuration** - **Multiple request types**: Standard HTTP, Browser, Patched Chrome - **Custom headers & cookies** with field-based or JSON input - **Session management** for maintaining state across requests - **POST/PUT/PATCH support** with body or form parameters - **CSS selector waiting** for dynamic content - **XHR/Fetch interception** for API data extraction ## 🚀 Installation ### Method 1: n8n Community Nodes (Recommended) 1. Open your n8n instance 2. Go to **Settings** → **Community Nodes** 3. Enter: `@automations-project/n8n-nodes-scrappey` 4. Click **Install** ### Method 2: Manual Installation ```bash # Using npm npm install @automations-project/n8n-nodes-scrappey # Using pnpm pnpm add @automations-project/n8n-nodes-scrappey # Using yarn yarn add @automations-project/n8n-nodes-scrappey ``` ### Method 3: Development Installation ```bash # Clone the repository git clone https://github.com/Automations-Project/n8n-nodes-scrappey.git cd n8n-nodes-scrappey # Install dependencies pnpm install # Build the node pnpm run build # Link for development pnpm run start:dev ``` ## 🔧 Configuration ### 1. Set Up Scrappey API Credentials 1. Sign up at [Scrappey.com](/#) to get your API key. 2. In n8n, create new **Scrappey API** credentials 3. Enter your API key and optional proxy settings > 🎯 **Get Started Free!** Try Scrappey with **750 Direct requests** and **150 Browser requests** at no cost. > [Start your free trial →](https://nodes.n8n.community/scrappey/signup) > > **Affordable scaling**: For just €100, you can get 600,000 request credits including proxies, captcha etc... ### 2. Credential Options - **API Key** (required): Your Scrappey.com API key - **Custom Proxy** (optional): Your own proxy URL (SOCKS4/5, HTTP/HTTPS) - **Whitelisted Domains** (optional): JSON array of allowed domains for enhanced security ## 📋 Operation Modes  ### 🛠️ Request Builder (Manual) **Primary mode for creating custom requests with full control** ```typescript // Example configuration options: { "url": "https://example.com/api/data", "httpMethod": "GET", "request_type": "Browser", // or "Request", "PatchedChrome" "whichProxyToUse": "proxyFromScrappey", "proxyType": "residential", // residential, datacenter, mobile "customProxyCountry": "UnitedStates", "antibot": true, "mouseMovements": true, "datadome": true } ``` **Use Cases:** - Complex form submissions with CAPTCHA solving - JavaScript-heavy SPA scraping - API data extraction with anti-bot protection - Multi-step workflows with session management ### 🔁 HTTP Auto-Retry **Fallback solution for failed n8n HTTP Request nodes**  Connect the **error output** (red connector) of a standard HTTP Request node to this operation. It automatically retries the same request through Scrappey's network when blocked by: - Cloudflare challenges - Rate limiting - IP blocks - Basic anti-bot measures ### 🌐 Browser Auto-Retry **Advanced browser-based retry with full anti-bot protection** Similar to HTTP Auto-Retry but uses a full browser environment with: - Automatic CAPTCHA solving (hCaptcha, reCAPTCHA) - Mouse movement simulation - Datadome bypass enabled - JavaScript execution - 3 automatic retries ## 💡 Usage Examples ### Basic Web Scraping ```javascript // Request Builder - Simple GET request { "operation": "requestBuilder", "url": "https://httpbin.org/get", "httpMethod": "request.get", "request_type": "Request" } ``` ### Advanced Browser Automation ```javascript // Browser request with anti-bot protection { "operation": "requestBuilder", "url": "https://protected-site.com", "request_type": "Browser", "antibot": true, "mouseMovements": true, "datadome": true, "cssSelector": ".content-loaded", "proxyType": "residential", "customProxyCountry": "UnitedStates" } ``` ### Form Submission with CAPTCHA ```javascript // POST request with CAPTCHA solving { "operation": "requestBuilder", "url": "https://example.com/submit", "httpMethod": "request.post", "request_type": "Browser", "bodyOrParams": "body_used", "body_for_request": "{\"name\":\"John\",\"email\":\"[email protected]\"}", "antibot": true } ``` ### Auto-Retry Fallback ```javascript // Connect HTTP Request node error output to Scrappey node input // Set operation to "httpRequestAutoRetry" or "httpRequestAutoRetryBrowser" { "operation": "httpRequestAutoRetry", "whichProxyToUse": "proxyFromScrappey", "proxyType": "residential" } ``` ## 🔒 Error Handling The node provides detailed error messages for common Scrappey API error codes: | Code | Description | Solution | | --------- | ------------------ | ----------------------------------- | | CODE-0001 | Server overloaded | Retry after a few minutes | | CODE-0002 | Cloudflare blocked | Try different proxy or browser mode | | CODE-0003 | Too many attempts | Wait before retrying | | CODE-0004 | Invalid command | Check request configuration | | CODE-0005 | Tunnel failed | Retry with different proxy | ## 🏗️ Development ### Building from Source ```bash # Install dependencies pnpm install # Development build with watch pnpm run build:watch # Production build pnpm run build # Linting & formatting pnpm run lint pnpm run format # Type checking pnpm run type-check # Full validation pnpm run validate ``` ### Project Structure ``` n8n-nodes-scrappey/ ├── nodes/Scrappey/ # Main node implementation │ ├── Scrappey.node.ts # Node definition and execution │ ├── execute.ts # Operation dispatcher │ ├── RequestMethods.ts # HTTP/Browser request handlers │ ├── requestBodyBuilder.ts # Request body construction │ ├── fields.ts # Node field definitions │ ├── GenericFunctions.ts # API integration utilities │ └── utils.ts # Helper functions ├── credentials/ # Credential definitions │ └── ScrappeyApi.credentials.ts ├── scripts/ # Build and deployment scripts ├── .github/workflows/ # CI/CD pipelines └── dist/ # Built output ``` ### CI/CD Pipeline This project includes a comprehensive CI/CD setup: - **Continuous Integration**: Automated testing, linting, and building on every PR - **Auto-versioning**: Automatic version bumps based on commit messages - **Automated Releases**: Publishes to GitHub Packages and optionally npm - **Security Scanning**: CodeQL analysis and dependency auditing - **Dependabot**: Automated dependency updates #### Commit Message Conventions - `feat: description` → Minor version bump - `fix: description` → Patch version bump - `BREAKING CHANGE` or `[major]` → Major version bump - `[skip ci]` or `[skip version]` → Skip automation ## 🤝 Contributing 1. Fork the repository 2. Create a feature branch: `git checkout -b feature/amazing-feature` 3. Commit changes: `git commit -m 'feat: add amazing feature'` 4. Push to branch: `git push origin feature/amazing-feature` 5. Open a Pull Request ## 📄 License This project is licensed under the MIT License - see the [LICENSE.md](LICENSE.md) file for details. ## 🔗 Links - **Scrappey Website**: [https://scrappey.com](https://scrappey.com) - **Scrappey Documentation**: [https://wiki.scrappey.com](https://wiki.scrappey.com) - **n8n Community**: [https://community.n8n.io](https://community.n8n.io) - **GitHub Issues**: [Report bugs or request features](https://github.com/Automations-Project/n8n-nodes-scrappey/issues) - **Nskha Discord**: [⚠️Incative community](https://nskha.com/discord) --- **Made with ❤️ for the n8n community**
# n8n-nodes-cloudflare [](https://github.com/Automations-Project/n8n-nodes-cloudflare/actions/workflows/ci.yml) [](https://docs.n8n.io/integrations/community-nodes/) [](https://developers.cloudflare.com/api/) [](#contributing) [](#-contributing) [](https://www.npmjs.com/package/n8n-nodes-cloudflare) [](https://www.npmjs.com/package/n8n-nodes-cloudflare) [](https://github.com/Automations-Project/n8n-nodes-cloudflare) [](https://nodejs.org) [](https://www.typescriptlang.org) [](LICENSE) [](https://github.com/Automations-Project/n8n-nodes-cloudflare/stargazers) [](https://github.com/Automations-Project/n8n-nodes-cloudflare/network) [](https://github.com/Automations-Project/n8n-nodes-cloudflare/issues) [](https://github.com/Automations-Project/n8n-nodes-cloudflare/commits)  Comprehensive n8n community nodes for **Cloudflare** - manage your entire Cloudflare infrastructure from n8n workflows. ## ✨ Features | Category | Services | | ----------------------- | -------------------------------------------------------------- | | **Core Infrastructure** | DNS, Zones, Cache, SSL/TLS, Page Rules | | **Developer Platform** | Workers, Pages, D1, KV, R2, Queues, Durable Objects, Vectorize | | **Security** | Firewall, WAF, Bot Management, Rate Limits, Zero Trust, Access | | **Media** | Stream, Images, Calls | | **Analytics** | Radar, Logpush, RUM, DEX | | **Networking** | Load Balancer, Argo, Tunnels, Spectrum, Magic Transit | **100+ Cloudflare API operations** with dynamic dropdowns for accounts, zones, and resources. ## 📦 Installation ### n8n Community Nodes (Recommended) 1. Go to **Settings → Community Nodes** 2. Click **Install** 3. Enter: `n8n-nodes-cloudflare` 4. Click **Install** ### npm ```bash npm install n8n-nodes-cloudflare ``` ## 🔑 Credentials Create Cloudflare API credentials in n8n: 1. Go to **Credentials → New** 2. Search for **Cloudflare API** 3. Enter your Cloudflare **API Token** or **API Key + Email** **Recommended:** Use API Tokens with minimal required permissions. ## 📚 Available Nodes ### Primary Nodes | Node | Description | | ------------------------- | -------------------------------------------------------------- | | **Cloudflare DNS** | Manage DNS records, analytics, firewall, secondary DNS | | **Cloudflare Workers** | Deploy scripts, KV bindings, AI inference, dispatch namespaces | | **Cloudflare Zones** | Zone settings, cache, page rules, waiting rooms, snippets | | **Cloudflare Zero Trust** | Access apps, tunnels, devices, DEX, gateway rules | | **Cloudflare Security** | WAF rulesets, bot management, rate limits, page shield | | **Cloudflare SSL** | Certificates, mTLS, Origin CA, Total TLS | ### Additional Nodes R2 Storage, D1 Database, Pages, Stream, Images, Queues, Load Balancer, Registrar, Email Routing, Logpush, Radar, and 50+ more specialized nodes. ## 🚀 Quick Start ### Example: Get All DNS Records With filter (Only Proxied - AKA: CF Orange) ```json { "nodes": [ { "parameters": { "zoneId": "2454f994f1057a933cf06857ea485578", "returnAll": true, "filters": { "proxied": true } }, "type": "CUSTOM.cloudflareDns", "typeVersion": 1, "position": [208, 0], "id": "ba613500-5af9-4a88-8334-1230e875c060", "name": "Get many DNS records", "credentials": { "cloudflareApi": { "id": "46t5YxHZ7Xygke2Z", "name": "Cloudflare account" } } } ], "connections": {} } ``` ## 🔧 Dynamic Dropdowns All nodes feature dynamic dropdowns that load data from your Cloudflare account: - **Accounts** - Select from your Cloudflare accounts - **Zones** - Choose domains from your account - **Workers** - Pick deployed worker scripts - **R2 Buckets** - Select storage buckets - **KV Namespaces** - Choose key-value stores - **And more...** ## ⚠️ Installation Notes n8n requires that all installed nodes have unique internal names. If you have other community node packages installed that register a node with the same name as a node in this package, n8n may throw an installation error. If you hit this, uninstall the conflicting package and restart n8n. Example report: https://github.com/Automations-Project/n8n-nodes-cloudflare/issues/2 ## 🤖 RAG Workflows (Vector Search) The **Cloudflare Vectorize** node includes a built-in **RAG (Embed + Store)** resource that combines Workers AI embeddings with Vectorize storage in a single operation: - **Insert Documents**: Text → Embeddings → Vector Storage - **Search Documents**: Query → Embedding → Similarity Search 📖 See [docs/RAG-WORKFLOW-GUIDE.md](docs/RAG-WORKFLOW-GUIDE.md) for complete workflow examples. > **Note:** Native LangChain cluster node integration (Document Loader, AI Agent tool connectors) requires n8n core support and is not available in community nodes. See the documentation for details and how to request this feature from n8n. ## 📋 Requirements - **n8n** >= 1.0.0 - **Node.js** >= 18.17.0 - **Cloudflare Account** with API access ## 🛠️ Development ### Testing ```bash # Run all tests npm test # Watch mode npm run test:watch # Coverage report npm run test:coverage ``` **Test Structure:** - `nodes/shared/GenericFunctions.test.ts` - Utility functions - `credentials/CloudflareApi.credentials.test.ts` - Credential validation - `nodes/CloudflareDns/CloudflareDns.test.ts` - Node structure template ### Building ```bash npm run build # Build for production npm run dev # Watch mode for development npm run lint # Run ESLint npm run format # Format with Prettier ``` ## 🤝 Contributing Contributions welcome! Please: 1. Fork the repository 2. Create a feature branch 3. **Run tests**: `npm test` 4. Submit a Pull Request See [CONTRIBUTING.md](CONTRIBUTING.md) for detailed guidelines. ## 🐛 Issues Found a bug? [Open an issue](https://github.com/automations-project/n8n-nodes-cloudflare/issues/new/choose) ## 📄 License [MIT](LICENSE) ## 👤 Author **nskha** - [@automations-project](https://github.com/automations-project) ## 🔗 Links - [npm Package](https://www.npmjs.com/package/n8n-nodes-cloudflare) - [GitHub Repository](https://github.com/automations-project/n8n-nodes-cloudflare) - [Cloudflare API Docs](https://developers.cloudflare.com/api/) - [n8n Community Nodes](https://docs.n8n.io/integrations/community-nodes/)
            # Advanced Telegram Support Ticket Management Workflow A robust n8n workflow designed to enhance Telegram bot functionality for user management and broadcasting. It facilitates automatic support ticket creation, efficient user data storage in Redis, and a sophisticated system for message forwarding and broadcasting.  ### How It Works 1. **Telegram Bot Setup**: Initiate the workflow with a Telegram bot configured for handling different chat types (private, supergroup, channel). 2. **User Data Management**: Formats and updates user data, storing it in a Redis database for efficient retrieval and management. 3. **Support Ticket Creation**: Automatically generates chat tickets for user messages and saves the corresponding topic IDs in Redis. 4. **Message Forwarding**: Forwards new messages to the appropriate chat thread, or creates a new thread if none exists. 5. **Support Forum Management**: Handles messages within a support forum, differentiating between various chat types and user statuses. 6. **Broadcasting System**: Implements a broadcasting mechanism that sends channel posts to all previous bot users, with a system to filter out blocked users. 7. **Blocked User Management**: Identifies and manages blocked users, preventing them from receiving broadcasted messages. 8. **Versatile Channel Handling**: Ensures that messages from verified channels are properly managed and broadcasted to relevant users. ### Set Up Steps * **Estimated Time**: Around 30 minutes. * **Requirements**: A Telegram bot, a Redis database, and Telegram group/channel IDs are necessary. * **Configuration**: Input the Telegram bot token and relevant group/channel IDs. Configure message handling and user data processing according to your needs. * **Detailed Instructions**: Sticky notes within the workflow provide extensive setup information and guidance.  ### **Live Demo Workflow** **Bot**: [Telegram Bot Link (Click here)](https://TheLiveChatBot.t.me) **Support Group**: [Telegram Group Link (Click here)](https://t.me/+-8BELbd0GDYxMTEx) **Broadcasting Channel**: [Telegram Channel Link (Click here)](https://broadcasting_channel.t.me) **Keywords**: n8n workflow, Telegram bot, chat ticket system, Redis database, message broadcasting, user data management, support forum automation # Stats [](https://n8n.io/creators/nskha)
<div align="center"> <p align="center"> <img alt="Perplexity MCP" src="./packages/extension/media/icon.png" height="120"> </p> # Perplexity MCP for 15+ IDEs **Long‑lived Perplexity browser session, auto‑config for 20+ IDEs, and a VS Code extension – all in one monorepo.** <p align="center"> <a href="https://marketplace.visualstudio.com/items?itemName=Nskha.perplexity-vscode"><img src="https://vsmarketplacebadges.dev/version-short/Nskha.perplexity-vscode.svg?style=for-the-badge&label=VS%20Code&colorB=007ACC" alt="VS Code version" /></a> <a href="https://www.npmjs.com/package/perplexity-user-mcp"><img src="https://img.shields.io/npm/v/perplexity-user-mcp?style=for-the-badge&logo=npm&logoColor=white&label=npm&color=CB3837" alt="npm version" /></a> <a href="https://registry.modelcontextprotocol.io"><img src="https://img.shields.io/badge/MCP%20Registry-Listed-1D4ED8?style=for-the-badge" alt="MCP Registry listing" /></a> </p> <p align="center"> <a href="https://marketplace.visualstudio.com/items?itemName=Nskha.perplexity-vscode"><img src="https://vsmarketplacebadges.dev/installs-short/Nskha.perplexity-vscode.svg?style=for-the-badge&label=VS%20Code%20Installs&colorB=1E8CBE" alt="VS Code installs" /></a> <a href="https://www.npmjs.com/package/perplexity-user-mcp"><img src="https://img.shields.io/npm/dw/perplexity-user-mcp?style=for-the-badge&logo=npm&logoColor=white&label=npm%20Downloads%2FWeek&color=F43F5E" alt="npm downloads per week" /></a> <a href="https://github.com/Automations-Project/VSCode-Perplexity-MCP/stargazers"><img src="https://img.shields.io/github/stars/Automations-Project/VSCode-Perplexity-MCP?style=for-the-badge&logo=github&logoColor=white&label=GitHub%20Stars&color=FBBF24" alt="GitHub stars" /></a> </p> <p align="center"> <a href="https://github.com/Automations-Project/VSCode-Perplexity-MCP/actions/workflows/ci.yml"><img src="https://img.shields.io/github/actions/workflow/status/Automations-Project/VSCode-Perplexity-MCP/ci.yml?branch=main&style=for-the-badge&logo=githubactions&logoColor=white&label=CI" alt="CI status" /></a> <a href="https://github.com/Automations-Project/VSCode-Perplexity-MCP/releases/latest"><img src="https://img.shields.io/github/v/release/Automations-Project/VSCode-Perplexity-MCP?style=for-the-badge&logo=github&logoColor=white&label=Latest%20Release&color=10B981" alt="Latest release" /></a> <a href="https://github.com/Automations-Project/VSCode-Perplexity-MCP/commits/main"><img src="https://img.shields.io/github/last-commit/Automations-Project/VSCode-Perplexity-MCP?style=for-the-badge&logo=github&logoColor=white&label=Last%20Commit&color=6366F1" alt="Last commit" /></a> <a href="LICENSE"><img src="https://img.shields.io/github/license/Automations-Project/VSCode-Perplexity-MCP?style=for-the-badge&logo=opensourceinitiative&logoColor=white&label=License&color=22C55E" alt="License" /></a> </p> <br /> > **Not affiliated with Perplexity AI, Inc.** This is a community-maintained project. > > **Experimental** — This project is under active development and not intended for production use. APIs, tools, and behavior may change without notice. </div> --- ## Demo <p align="center"> <a href="https://www.youtube.com/watch?v=wErgEe9Pgqo" title="Watch on YouTube"> <img src="https://readme-svg-youtube-preview.vercel.app/badge?id=wErgEe9Pgqo&width=640&radius=8&bg=0d1117&title_color=ffffff&title_opacity=1&plate_color=0f1117&plate_opacity=0.78&title_position=overlay_bottom&border_width=1&border_color=ffffff" alt="Perplexity MCP demo — Search, Reason, Research, and Computer mode as a native MCP tool in your code editor" width="720"> </a> </p> <p align="center"><sub>▶ Watch the demo on YouTube</sub></p> --- ## Install the Extension <div align="center"> | IDE | Install | |:---:|:--------| | <img src="./mcp-tool-icons/vscode.svg" height="20" valign="middle" alt="VS Code" /> **Visual Studio Code** | [](https://marketplace.visualstudio.com/items?itemName=Nskha.perplexity-vscode) | | <img src="./mcp-tool-icons/vscode.svg" height="20" valign="middle" alt="VS Code Insiders" /> **VS Code Insiders** | [](https://marketplace.visualstudio.com/items?itemName=Nskha.perplexity-vscode) | | <img src="./mcp-tool-icons/cursor.svg" height="20" valign="middle" alt="Cursor" /> **Cursor** | [](https://marketplace.visualstudio.com/items?itemName=Nskha.perplexity-vscode) | | <img src="./mcp-tool-icons/windsurf.svg" height="20" valign="middle" alt="Windsurf" /> **Windsurf** | [](https://marketplace.visualstudio.com/items?itemName=Nskha.perplexity-vscode) | | <img src="./mcp-tool-icons/trae.svg" height="20" valign="middle" alt="Trae" /> **Trae** | [](https://marketplace.visualstudio.com/items?itemName=Nskha.perplexity-vscode) | | <img src="./mcp-tool-icons/vscode.svg" height="20" valign="middle" alt="Open VSX" /> **Open VSX** (Gitpod · Theia · Coder) | [](https://open-vsx.org/extension/Nskha/perplexity-vscode) | </div> --- ## TL;DR – what lives here? A monorepo that ships the Perplexity MCP runtime two ways: - **`perplexity-vscode`** – native VS Code extension with an embedded MCP daemon, webview dashboard, and auto‑config for 20+ MCP‑capable IDEs.[^ver] - **`perplexity-user-mcp`** – the same MCP server as a standalone npm package for Cursor, Claude Desktop, Claude Code, Windsurf, Cline, Amp, Codex CLI, and any other MCP client that talks stdio. Both wrap a long‑lived **patchright** browser session against your existing Perplexity account, so the tools consume your logged‑in plan (Free / Pro / Max) instead of an API key.[^runtime] [^ver]: See [CHANGELOG.md](./CHANGELOG.md) for current version and release notes. [^runtime]: Browser and profile details: [packages/mcp-server](./packages/mcp-server/) and [Architecture notes](#architecture-notes). --- ## Who should use what? <table> <thead> <tr> <th align="left">You want to…</th> <th align="left">Use</th> <th align="left">How</th> </tr> </thead> <tbody> <tr> <td>Use Perplexity inside VS Code with a dashboard, login flows, and auto‑config for other IDEs.</td> <td><strong><code>perplexity-vscode</code></strong> (extension)</td> <td>Install the VSIX or from Marketplace, run <code>Perplexity: Login</code>, optionally enable auto‑config.</td> </tr> <tr> <td>Run the MCP server standalone for Cursor / Claude Desktop / Windsurf / Cline / Amp / Codex CLI.</td> <td><strong><code>perplexity-user-mcp</code></strong> (npm CLI)</td> <td><code>npm install -g perplexity-user-mcp</code> or <code>npx perplexity-user-mcp</code>, point your MCP client at it.</td> </tr> <tr> <td>Keep a long‑lived HTTP MCP daemon with tunnels (Cloudflare Quick Tunnels / ngrok).</td> <td><strong>Daemon mode</strong> (mcp‑server <code>daemon/</code>)</td> <td>Use the daemon entrypoint & tunnel providers under <code>packages/mcp-server/src/daemon/</code>.</td> </tr> </tbody> </table> --- ## Repo shape Four npm workspaces under <a href="./packages/">packages/</a>. Almost every aggregate task builds **shared first** because the extension host and the webview both import its contracts from source.[^shape] - **[`packages/shared`](./packages/shared/)** – message contracts, `IdeTarget` / `DashboardState` types, and the `PERPLEXITY_RULES_SECTION_START/END` markers used by auto‑config. - **[`packages/mcp-server`](./packages/mcp-server/)** – Perplexity MCP runtime. Ships standalone as `perplexity-user-mcp` and is bundled into the extension’s `dist/mcp/server.mjs` (ESM only). - **[`packages/webview`](./packages/webview/)** – React 19 + Vite + Tailwind v4 + zustand dashboard. Built assets copied into `packages/extension/media/webview/`. - **[`packages/extension`](./packages/extension/)** – VS Code extension host (CommonJS via tsup, `target: node20`). Registers the bundled MCP server via `mcpServerDefinitionProviders`, owns the webview, auto‑config, and the embedded daemon. [^shape]: See [tsconfig.base.json](./tsconfig.base.json) and [vitest.config.ts](./vitest.config.ts) for workspace wiring and test globs. --- ## Quick start Prerequisites: - Node.js **20+** - npm (workspaces enabled) - A Perplexity account (Free / Pro / Max) ```bash git clone https://github.com/Automations-Project/VSCode-Perplexity-MCP.git cd VSCode-Perplexity-MCP npm install npm run build # shared → mcp-server → webview → extension (in that order) npm test # vitest across all packages npm run package:vsix # produces packages/extension/perplexity-vscode-<version>.vsix ``` Install the unpacked extension into VS Code: ```bash code --install-extension packages/extension/perplexity-vscode-<version>.vsix ``` > **Build order matters.** `packages/shared` must build before the other three. The root scripts enforce this; keep that invariant when adding new scripts. --- ## Browser support matrix The MCP server automates a **real Chromium browser** via patchright to survive Cloudflare and serve Perplexity.[^browser] <table> <thead> <tr> <th align="left">Priority</th> <th align="left">Runtime</th> <th align="left">Env hints</th> <th align="left">Notes</th> </tr> </thead> <tbody> <tr> <td>#1</td> <td><strong>Google Chrome</strong></td> <td><code>PERPLEXITY_BROWSER_CHANNEL=chrome</code></td> <td>Recommended, best Cloudflare compatibility.</td> </tr> <tr> <td>#2</td> <td><strong>Microsoft Edge</strong></td> <td><code>PERPLEXITY_BROWSER_CHANNEL=msedge</code></td> <td>All three platforms, works like Chrome.</td> </tr> <tr> <td>#3</td> <td><strong>System Chromium</strong></td> <td><code>PERPLEXITY_BROWSER_CHANNEL=chromium</code></td> <td>Mainly Linux; good for headless servers.</td> </tr> <tr> <td>#4</td> <td><strong>Brave</strong></td> <td>auto‑detected</td> <td>Chromium‑based; works with no special flags.</td> </tr> <tr> <td>#5</td> <td><strong>Patchright’s bundled Chromium</strong></td> <td> <code>npx patchright install chromium</code><br> then auto‑detected </td> <td>Fallback when nothing else is present.</td> </tr> </tbody> </table> Extra overrides: - `PERPLEXITY_BROWSER_PATH` – absolute browser executable path (wins over detection). - `PERPLEXITY_CHROME_PATH` – legacy alias for `PERPLEXITY_BROWSER_PATH`. - `PERPLEXITY_CONFIG_DIR` – overrides `~/.perplexity-mcp` (profiles, vault, daemon state). --- ## First run, profiles, and the vault Perplexity serves a Cloudflare Turnstile on first run; the server opens a headed browser for you to log in, then caches `cf_clearance` + session in `~/.perplexity-mcp/`.[^login] - Profiles live under `~/.perplexity-mcp/profiles/<name>/`. - Cookies are encrypted into `vault.enc` (keytar with passphrase fallback). On boxes without an OS keychain, run `npx perplexity-user-mcp setup-vault` to generate a strong passphrase and get OS-specific persistence snippets (PowerShell / setx / zsh / bash / systemd / MCP-client env block). - Any process that mutates profile state touches a `.reinit` sentinel, which running MCP servers watch and hot‑reload from (no restart required). v0.8.40+ also watches the active-pointer file, so switching the active profile in the extension dashboard propagates to running MCP servers automatically. - Login has a wall-clock timeout (5 min default, env-overridable) and a Cancel button in the dashboard; if the browser fallback hangs you can recover without restarting the extension. - Vault decryption transparently falls back across keychain ↔ env-var-passphrase, so a key rotation or extension-upgrade-induced unseal-preference flip won't lock you out of an existing vault. If no material can decrypt the blob, login quarantines it and writes a fresh one. Delete `~/.perplexity-mcp/` to start over completely, or use `PERPLEXITY_HEADLESS_ONLY=1` once a valid clearance is cached. --- ## Search Sources and Advanced Queries This MCP mirrors Perplexity's web app source picker more closely than the official API-key MCP server. The search-style tools accept a `sources` array with these values: - `web` - general web search. This is the default. - `scholar` - scholarly / academic source focus. - `social` - social discussion source focus. The source selector is explicit. If your MCP client calls a tool without `sources`, the server sends `["web"]`. Ask your agent for the source mode you want, or pass it directly when your client exposes tool arguments. Examples: ```json { "tool": "perplexity_search", "arguments": { "query": "recent papers on retrieval augmented generation evaluation", "sources": ["scholar"], "language": "en-US" } } ``` ```json { "tool": "perplexity_ask", "arguments": { "query": "What are practitioners saying about Cursor versus Windsurf for large TypeScript repos?", "sources": ["social"], "mode": "copilot" } } ``` ```json { "tool": "perplexity_research", "arguments": { "query": "Compare academic evidence and practitioner discussion around code review automation", "sources": ["scholar", "social"], "language": "en-US" } } ``` Natural-language prompts usually work too, as long as they are specific: - "Use Perplexity scholar sources for recent papers on agentic search evaluation." - "Search social sources for developer reports about Claude Code memory issues." - "Run deep research using both scholar and web sources, and cite every claim." - "Use `perplexity_ask` with `sources: [\"social\"]` and keep the answer concise." Useful shorthand: - "search ..." usually maps to `perplexity_search` for quick lookup and source discovery. - "ask Perplexity ..." usually maps to `perplexity_ask` for a synthesized answer with citations. - "reason through ..." usually maps to `perplexity_reason` for multi-step analysis. - "research deeply ..." usually maps to `perplexity_research` for longer reports. - "use ASI", "Computer mode", "run a compute task", or "do code/execution-style analysis" maps to `perplexity_compute` when the account has Computer-mode access. For ASI / Computer mode, ask for `perplexity_compute` by name when precision matters: ```json { "tool": "perplexity_compute", "arguments": { "query": "Model the true cost of a 5 kW residential solar installation in the Philippines versus investing the same cash at 6% annually over 10 and 20 years. Show assumptions, calculations, and sensitivity cases.", "language": "en-US" } } ``` ### Search defaults When no optional arguments are supplied: | Tool | Model default | Mode default | Sources default | Language default | |---|---|---|---|---| | `perplexity_search` | Authenticated: `pplx_pro`; anonymous: `turbo` | Authenticated: `copilot`; anonymous: `concise` | `["web"]` | `en-US` | | `perplexity_ask` | `PERPLEXITY_SEARCH_MODEL` or `pplx_pro` | `copilot` | `["web"]` | `en-US` | | `perplexity_reason` | `PERPLEXITY_REASON_MODEL` or `claude46sonnetthinking` | `copilot` | `["web"]` | `en-US` | | `perplexity_research` | `PERPLEXITY_RESEARCH_MODEL` or `pplx_alpha` | `copilot` | `["web"]` | `en-US` | | `perplexity_compute` | Tool argument, then `PERPLEXITY_COMPUTE_MODEL`, then account ASI default, then `pplx_asi` | `asi` | web-only Computer mode | `en-US` | Model defaults are configurable with environment variables: - `PERPLEXITY_SEARCH_MODEL` - `PERPLEXITY_REASON_MODEL` - `PERPLEXITY_RESEARCH_MODEL` - `PERPLEXITY_COMPUTE_MODEL` `perplexity_ask`, `perplexity_reason`, and `perplexity_compute` also accept a per-call `model` argument. `perplexity_ask` accepts `mode: "concise" | "copilot"`. `perplexity_search`, `perplexity_reason`, `perplexity_research`, and `perplexity_ask` accept `sources` and `language`. ### How requests reach Perplexity For search-style tools, the MCP server builds the same kind of request body the Perplexity web app sends: `query_str`, selected model, mode, source list, language, and optional follow-up thread context. It posts that body from the logged-in browser session to `https://www.perplexity.ai/rest/sse/perplexity_ask`. Perplexity responds as a Server-Sent Events stream. The MCP runtime reads the stream and turns it into a normal tool response: answer text, citation sources, media items, suggested follow-ups, follow-up context, and the Perplexity thread URL. This is why the server can use your existing Free / Pro / Max account features without a Perplexity API key, but it also means the request shape can drift if Perplexity changes its private web endpoint. ### Current tuning opportunities - The auto-config rules catalogue in `packages/extension/src/auto-config/index.ts` is a static copy of the tool list and summaries. Tests keep it in sync with registered tool names, but summaries and usage guidance still have to be updated by hand. A future improvement would generate the rules block from the MCP tool schemas, or share one typed catalogue between the runtime and auto-config. - `sources` defaults to `["web"]` even for queries that clearly ask for papers or social discussion. We can either document prompt patterns, as above, or add a small routing layer that infers `scholar` / `social` from the user's request before calling Perplexity. - `perplexity_search` uses browser-backed search by default. Experimental browser-free search exists behind `PERPLEXITY_EXPERIMENTAL_IMPIT_SEARCH=1`, but it is intentionally opt-in because Perplexity's private search request body can change. - `perplexity_models` already uses a warm disk cache before launching the browser. Similar cache-first behavior may help for repeated model/tier/rate-limit checks from agents. --- ## Supported IDEs / MCP clients Auto‑config writes MCP configs and rulesets for 15+ IDEs and agents; the same server also runs everywhere else.[^ide] <table> <thead> <tr> <th align="left">Client</th> <th align="left">How it’s wired</th> <th align="left">Config artifact</th> </tr> </thead> <tbody> <tr> <td><strong>VS Code</strong></td> <td>Native extension, embedded daemon, webview dashboard.</td> <td><code>settings.json</code>, <code>Perplexity: Login</code>, agent MCP config.</td> </tr> <tr> <td><strong>Cursor</strong></td> <td>Auto‑written MCP settings + rules section.</td> <td><code>.cursor/rules/*.mdc</code>, <code>mcp.json</code>.</td> </tr> <tr> <td><strong>Claude Desktop / Claude Code</strong></td> <td>Config + rules docs, upsert between markers.</td> <td><code>claude_desktop_config.json</code>, <code>CLAUDE.md</code>.</td> </tr> <tr> <td><strong>Windsurf, Cline, Amp, Codex CLI</strong></td> <td>MCP config and rules files per target.</td> <td><code>mcp_config.json</code>, <code>.rules</code>, <code>.github/instructions/*</code>, etc.</td> </tr> <tr> <td><strong>Visual Studio 2022, VS Code MCP</strong></td> <td>Workspace‑scoped MCP config under <code>servers</code> root key.</td> <td><code><sln>/.mcp.json</code>, <code>.vscode/mcp.json</code>.</td> </tr> <tr> <td><strong>OpenCode</strong></td> <td>Auto‑written under <code>mcp</code> root key with OpenCode's local‑server entry shape.</td> <td><code>~/.config/opencode/opencode.json</code>, <code>AGENTS.md</code>.</td> </tr> <tr> <td><strong>Antigravity, Kiro, Firebase Studio, Goose, Amazon Q, LM Studio, Trae</strong></td> <td>Detected and listed in the dashboard; auto‑config gated by primary‑source verification (registry only for some).</td> <td><code>.idx/mcp.json</code>, <code>.kiro/settings/mcp.json</code>, <code>~/.gemini/antigravity/mcp_config.json</code>, …</td> </tr> <tr> <td><strong>GitHub Copilot CLI, Factory Droid, Qwen Code</strong></td> <td>User‑scoped MCP config + AGENTS.md rules section.</td> <td><code>~/.copilot/mcp-config.json</code>, <code>~/.factory/mcp.json</code>, <code>~/.qwen/settings.json</code>.</td> </tr> </tbody> </table> Auto‑config uses `IDE_METADATA` in `packages/shared/src/constants.ts` and upserts `PERPLEXITY-MCP-START` / `PERPLEXITY-MCP-END` sections without touching hand‑written content. --- ## Commands All commands run from the repo root. ```bash npm install npm run build # shared → mcp-server → webview → extension npm run typecheck # tsc --noEmit across all four packages npm test # builds shared, then runs vitest npm run test:coverage # vitest with v8 coverage; enforces per-file thresholds npm run package:vsix # full build + vendored deps + vsce package npm run dev:webview # Vite dev server for dashboard npm run dev:extension # tsup --watch for extension host npm run clean # rm dist + media/webview across packages ``` Single‑file / single‑test runs: ```bash npx vitest run packages/mcp-server/test/redact.test.js npx vitest run packages/extension/tests/auth-manager.login.test.ts npx vitest run -t "resolves .reinit sentinel" ``` Coverage thresholds are enforced: e.g., `redact.js` / `vault.js` ≥ 95%, `profiles.js` / `cli.js` ≥ 85%. --- ## Architecture notes A few cross‑cutting pieces that matter: - **Bundled MCP with curated externals.** `packages/extension/package.json` `build:mcp` tsups `packages/mcp-server/src/index.ts` into `dist/mcp/server.mjs`, renames `index.mjs → server.mjs`, and copies the mcp‑server `package.json` next to it. Externals (`patchright`, `got-scraping`, `tough-cookie`, `gray-matter`, `express`, `@ngrok/ngrok`, `helmet`, `keytar`, …) are deliberately left out of the bundle and vendored into `dist/node_modules/` by `packages/extension/scripts/prepare-package-deps.mjs`. - **Daemon + pluggable tunnels.** `packages/mcp-server/src/daemon/` runs a long‑lived HTTP MCP server with OAuth 2.1 (via `@modelcontextprotocol/sdk`’s `mcpAuthRouter`) and pluggable tunnels under `daemon/tunnel-providers/` (`cf-quick` and `ngrok`). Daemon state lives in `<configDir>/daemon.lock`, `daemon.token`, `tunnel-settings.json`, and `ngrok.json`. - **Browser detection & download manager.** `packages/extension/src/browser/browser-detect.ts` probes Chrome → Edge → system Chromium → Brave → patchright’s Chromium, with `BrowserDownloadManager` managing `patchright install chromium` into VS Code’s globalStorage and `AuthManager` syncing env to the detached daemon. For deeper internals, see: - [`docs/release-process.md`](./docs/release-process.md) - [`docs/smoke-tests.md`](./docs/smoke-tests.md) --- ## Troubleshooting - **External MCP clients (Claude Code, Antigravity, Codex CLI, Cursor) hitting "Vault locked":** [docs/troubleshooting/external-mcp-clients.md](docs/troubleshooting/external-mcp-clients.md) --- ## Find Us <div align="center"> | Registry | Link | |:---------|:-----| | **VS Code Marketplace** | [`Nskha.perplexity-vscode`](https://marketplace.visualstudio.com/items?itemName=Nskha.perplexity-vscode) | | **npm** | [`perplexity-user-mcp`](https://www.npmjs.com/package/perplexity-user-mcp) | | **MCP Registry** | [`io.github.Automations-Project/perplexity-user-mcp`](https://registry.modelcontextprotocol.io) | </div> --- ## Support This Project This project is built and maintained with the help of AI coding tools. If you find it useful and want to support continued development (new tools, updates, bug fixes), you can contribute by gifting **Claude Code credits** — the primary tool used to build this project. Interested? [Open an issue](https://github.com/Automations-Project/VSCode-Perplexity-MCP/issues/new) or reach out to discuss feature requests and sponsorship. --- ## Contributing Contributions are welcome! Conventions: - Branch from `main` and open a PR (protected). - Run the smoke‑test checklist in `docs/smoke-tests.md` on Windows 11, macOS 14+, and Ubuntu 22+ before tagging a release. - Version `packages/extension` and `packages/mcp-server` together and add a [CHANGELOG](./CHANGELOG.md) entry that follows Keep a Changelog + SemVer. - Avoid hand‑editing auto‑managed blocks between `PERPLEXITY-MCP-START` / `PERPLEXITY-MCP-END`. --- ## License The repository is licensed under the **MIT License** – see [LICENSE](./LICENSE). > ### Important notice > > This project is an **unofficial, community‑maintained integration** for Perplexity. > It is **not affiliated with, endorsed by, or sponsored by Perplexity AI, Inc.** in any way. > > The MCP server works by automating a logged‑in Perplexity browser session on **your local machine**. > This may be considered **automated access / scraping / technical misuse** under Perplexity’s > Terms of Service and Acceptable Use Policy, and Perplexity may change or block this behaviour > at any time. > > By using this project, **you are solely responsible for ensuring your use complies with > Perplexity’s terms, policies, and any applicable law**, and you accept the risk that your > Perplexity account could be rate‑limited, suspended, or terminated. > > This software is provided **“as is”**, on an **experimental** basis, **without any warranty**. > Do not use it for anything where reliability, correctness, or policy compliance are critical.