<a href="https://explosion.ai"><img src="https://explosion.ai/assets/img/logo.svg" width="125" height="125" align="right" /></a>
# sense2vec: Contextually-keyed word vectors
sense2vec ([Trask et. al](https://arxiv.org/abs/1511.06388), 2015) is a nice
twist on [word2vec](https://en.wikipedia.org/wiki/Word2vec) that lets you learn
more interesting and detailed word vectors. This library is a simple Python
implementation for loading, querying and training sense2vec models. For more
details, check out
[our blog post](https://explosion.ai/blog/sense2vec-reloaded). To explore the
semantic similarities across all Reddit comments of 2015 and 2019, see the
[interactive demo](https://demos.explosion.ai/sense2vec).
🦆 **Version 2.0 (for spaCy v3) out now!**
[Read the release notes here.](https://github.com/explosion/sense2vec/releases/)
[](https://github.com/explosion/sense2vec/actions/workflows/tests.yml)
[](https://github.com/explosion/sense2vec/releases)
[](https://pypi.org/project/sense2vec/)
[](https://github.com/ambv/black)
## ✨ Features

- Query **vectors for multi-word phrases** based on part-of-speech tags and
entity labels.
- spaCy **pipeline component** and **extension attributes**.
- Fully **serializable** so you can easily ship your sense2vec vectors with your
spaCy model packages.
- Optional **caching of nearest neighbors** for super fast "most similar"
queries.
- **Train your own vectors** using a pretrained spaCy model, raw text and
[GloVe](https://github.com/stanfordnlp/GloVe) or Word2Vec via
[fastText](https://github.com/facebookresearch/fastText)
([details](#-training-your-own-sense2vec-vectors)).
- [Prodigy](https://prodi.gy) **annotation recipes** for evaluating models,
creating lists of similar multi-word phrases and converting them to match
patterns, e.g. for rule-based NER or to bootstrap NER annotation
([details & examples](#-prodigy-recipes)).
## 🚀 Quickstart
### Standalone usage
```python
from sense2vec import Sense2Vec
s2v = Sense2Vec().from_disk("/path/to/s2v_reddit_2015_md")
query = "natural_language_processing|NOUN"
assert query in s2v
vector = s2v[query]
freq = s2v.get_freq(query)
most_similar = s2v.most_similar(query, n=3)
# [('machine_learning|NOUN', 0.8986967),
# ('computer_vision|NOUN', 0.8636297),
# ('deep_learning|NOUN', 0.8573361)]
```
### Usage as a spaCy pipeline component
> ⚠️ Note that this example describes usage with
> [spaCy v3](https://spacy.io/usage/v3). For usage with spaCy v2, download
> `sense2vec==1.0.3` and check out the
> [`v1.x`](https://github.com/explosion/sense2vec/tree/v1.x) branch of this
> repo.
```python
import spacy
nlp = spacy.load("en_core_web_sm")
s2v = nlp.add_pipe("sense2vec")
s2v.from_disk("/path/to/s2v_reddit_2015_md")
doc = nlp("A sentence about natural language processing.")
assert doc[3:6].text == "natural language processing"
freq = doc[3:6]._.s2v_freq
vector = doc[3:6]._.s2v_vec
most_similar = doc[3:6]._.s2v_most_similar(3)
# [(('machine learning', 'NOUN'), 0.8986967),
# (('computer vision', 'NOUN'), 0.8636297),
# (('deep learning', 'NOUN'), 0.8573361)]
```
### Interactive demos
<img width="34%" src="https://user-images.githubusercontent.com/13643239/68093565-1bb6ea80-fe97-11e9-8192-e293acc290fe.png" align="right" />
To try out our pretrained vectors trained on Reddit comments, check out the
[interactive sense2vec demo](https://explosion.ai/demos/sense2vec).
This repo also includes a [Streamlit](https://streamlit.io) demo script for
exploring vectors and the most similar phrases. After installing `streamlit`,
you can run the script with `streamlit run` and **one or more paths to
pretrained vectors** as **positional arguments** on the command line. For
example:
```bash
pip install streamlit
streamlit run https://raw.githubusercontent.com/explosion/sense2vec/master/scripts/streamlit_sense2vec.py /path/to/vectors
```
### Pretrained vectors
To use the vectors, download the archive(s) and pass the extracted directory to
`Sense2Vec.from_disk` or `Sense2VecComponent.from_disk`. The vector files are
**attached to the GitHub release**. Large files have been split into multi-part
downloads.
| Vectors | Size | Description | 📥 Download (zipped) |
| -------------------- | -----: | ---------------------------- | ------------------------------------------------------------------------------------------------------------------------------------------------------------------------------------------------------------------------------------------------------------------------------------------------------------------------- |
| `s2v_reddit_2019_lg` | 4 GB | Reddit comments 2019 (01-07) | [part 1](https://github.com/explosion/sense2vec/releases/download/v1.0.0/s2v_reddit_2019_lg.tar.gz.001), [part 2](https://github.com/explosion/sense2vec/releases/download/v1.0.0/s2v_reddit_2019_lg.tar.gz.002), [part 3](https://github.com/explosion/sense2vec/releases/download/v1.0.0/s2v_reddit_2019_lg.tar.gz.003) |
| `s2v_reddit_2015_md` | 573 MB | Reddit comments 2015 | [part 1](https://github.com/explosion/sense2vec/releases/download/v1.0.0/s2v_reddit_2015_md.tar.gz) |
To merge the multi-part archives, you can run the following:
```bash
cat s2v_reddit_2019_lg.tar.gz.* > s2v_reddit_2019_lg.tar.gz
```
## ⏳ Installation & Setup
sense2vec releases are available on pip:
```bash
pip install sense2vec
```
To use pretrained vectors, download
[one of the vector packages](#pretrained-vectors), unpack the `.tar.gz` archive
and point `from_disk` to the extracted data directory:
```python
from sense2vec import Sense2Vec
s2v = Sense2Vec().from_disk("/path/to/s2v_reddit_2015_md")
```
## 👩💻 Usage
### Usage with spaCy v3
The easiest way to use the library and vectors is to plug it into your spaCy
pipeline. The `sense2vec` package exposes a `Sense2VecComponent`, which can be
initialised with the shared vocab and added to your spaCy pipeline as a
[custom pipeline component](https://spacy.io/usage/processing-pipelines#custom-components).
By default, components are added to the _end of the pipeline_, which is the
recommended position for this component, since it needs access to the dependency
parse and, if available, named entities.
```python
import spacy
from sense2vec import Sense2VecComponent
nlp = spacy.load("en_core_web_sm")
s2v = nlp.add_pipe("sense2vec")
s2v.from_disk("/path/to/s2v_reddit_2015_md")
```
The component will add several
[extension attributes and methods](https://spacy.io/usage/processing-pipelines#custom-components-attributes)
to spaCy's `Token` and `Span` objects that let you retrieve vectors and
frequencies, as well as most similar terms.
```python
doc = nlp("A sentence about natural language processing.")
assert doc[3:6].text == "natural language processing"
freq = doc[3:6]._.s2v_freq
vector = doc[3:6]._.s2v_vec
most_similar = doc[3:6]._.s2v_most_similar(3)
```
For entities, the entity labels are used as the "sense" (instead of the token's
part-of-speech tag):
```python
doc = nlp("A sentence about Facebook and Google.")
for ent in doc.ents:
assert ent._.in_s2v
most_similar = ent._.s2v_most_similar(3)
```
#### Available attributes
The following extension attributes are exposed on the `Doc` object via the `._`
property:
| Name | Attribute Type | Type | Description |
| ------------- | -------------- | ---- | ----------------------------------------------------------------------------------- |
| `s2v_phrases` | property | list | All sense2vec-compatible phrases in the given `Doc` (noun phrases, named entities). |
The following attributes are available via the `._` property of `Token` and
`Span` objects – for example `token._.in_s2v`:
| Name | Attribute Type | Return Type | Description |
| ------------------ | -------------- | ------------------ | ---------------------------------------------------------------------------------- |
| `in_s2v` | property | bool | Whether a key exists in the vector map. |
| `s2v_key` | property | unicode | The sense2vec key of the given object, e.g. `"duck NOUN"`. |
| `s2v_vec` | property | `ndarray[float32]` | The vector of the given key. |
| `s2v_freq` | property | int | The frequency of the given key. |
| `s2v_other_senses` | property | list | Available other senses, e.g. `"duck\|VERB"` for `"duck\|NOUN"`. |
| `s2v_most_similar` | method | list | Get the `n` most similar terms. Returns a list of `((word, sense), score)` tuples. |
| `s2v_similarity` | method | float | Get the similarity to another `Token` or `Span`. |
> ⚠️ **A note on span attributes:** Under the hood, entities in `doc.ents` are
> `Span` objects. This is why the pipeline component also adds attributes and
> methods to spans and not just tokens. However, it's not recommended to use the
> sense2vec attributes on arbitrary slices of the document, since the model
> likely won't have a key for the respective text. `Span` objects also don't
> have a part-of-speech tag, so if no entity label is present, the "sense"
> defaults to the root's part-of-speech tag.
#### Adding sense2vec to a trained pipeline
If you're training and packaging a spaCy pipeline and want to include a
sense2vec component in it, you can load in the data via the
[`[initialize]` block](https://spacy.io/usage/training#config-lifecycle) of the
training config:
```ini
[initialize.components]
[initialize.components.sense2vec]
data_path = "/path/to/s2v_reddit_2015_md"
```
### Standalone usage
You can also use the underlying `Sense2Vec` class directly and load in the
vectors using the `from_disk` method. See below for the available API methods.
```python
from sense2vec import Sense2Vec
s2v = Sense2Vec().from_disk("/path/to/reddit_vectors-1.1.0")
most_similar = s2v.most_similar("natural_language_processing|NOUN", n=10)
```
> ⚠️ **Important note:** To look up entries in the vectors table, the keys need
> to follow the scheme of `phrase_text|SENSE` (note the `_` instead of spaces
> and the `|` before the tag or label) – for example, `machine_learning|NOUN`.
> Also note that the underlying vector table is case-sensitive.
## 🎛 API
### <kbd>class</kbd> `Sense2Vec`
The standalone `Sense2Vec` object that holds the vectors, strings and
frequencies.
#### <kbd>method</kbd> `Sense2Vec.__init__`
Initialize the `Sense2Vec` object.
| Argument | Type | Description |
| -------------- | --------------------------- | ---------------------------------------------------------------------------------------------------------------------- |
| `shape` | tuple | The vector shape. Defaults to `(1000, 128)`. |
| `strings` | `spacy.strings.StringStore` | Optional string store. Will be created if it doesn't exist. |
| `senses` | list | Optional list of all available senses. Used in methods that generate the best sense or other senses. |
| `vectors_name` | unicode | Optional name to assign to the `Vectors` table, to prevent clashes. Defaults to `"sense2vec"`. |
| `overrides` | dict | Optional custom functions to use, mapped to names registered via the registry, e.g. `{"make_key": "custom_make_key"}`. |
| **RETURNS** | `Sense2Vec` | The newly constructed object. |
```python
s2v = Sense2Vec(shape=(300, 128), senses=["VERB", "NOUN"])
```
#### <kbd>method</kbd> `Sense2Vec.__len__`
The number of rows in the vectors table.
| Argument | Type | Description |
| ----------- | ---- | ---------------------------------------- |
| **RETURNS** | int | The number of rows in the vectors table. |
```python
s2v = Sense2Vec(shape=(300, 128))
assert len(s2v) == 300
```
#### <kbd>method</kbd> `Sense2Vec.__contains__`
Check if a key is in the vectors table.
| Argument | Type | Description |
| ----------- | ------------- | -------------------------------- |
| `key` | unicode / int | The key to look up. |
| **RETURNS** | bool | Whether the key is in the table. |
```python
s2v = Sense2Vec(shape=(10, 4))
s2v.add("avocado|NOUN", numpy.asarray([4, 2, 2, 2], dtype=numpy.float32))
assert "avocado|NOUN" in s2v
assert "avocado|VERB" not in s2v
```
#### <kbd>method</kbd> `Sense2Vec.__getitem__`
Retrieve a vector for a given key. Returns None if the key is not in the table.
| Argument | Type | Description |
| ----------- | --------------- | --------------------- |
| `key` | unicode / int | The key to look up. |
| **RETURNS** | `numpy.ndarray` | The vector or `None`. |
```python
vec = s2v["avocado|NOUN"]
```
#### <kbd>method</kbd> `Sense2Vec.__setitem__`
Set a vector for a given key. Will raise an error if the key doesn't exist. To
add a new entry, use `Sense2Vec.add`.
| Argument | Type | Description |
| -------- | --------------- | ------------------ |
| `key` | unicode / int | The key. |
| `vector` | `numpy.ndarray` | The vector to set. |
```python
vec = s2v["avocado|NOUN"]
s2v["avacado|NOUN"] = vec
```
#### <kbd>method</kbd> `Sense2Vec.add`
Add a new vector to the table.
| Argument | Type | Description |
| -------- | --------------- | ------------------------------------------------------------ |
| `key` | unicode / int | The key to add. |
| `vector` | `numpy.ndarray` | The vector to add. |
| `freq` | int | Optional frequency count. Used to find best matching senses. |
```python
vec = s2v["avocado|NOUN"]
s2v.add("🥑|NOUN", vec, 1234)
```
#### <kbd>method</kbd> `Sense2Vec.get_freq`
Get the frequency count for a given key.
| Argument | Type | Description |
| ----------- | ------------- | ------------------------------------------------- |
| `key` | unicode / int | The key to look up. |
| `default` | - | Default value to return if no frequency is found. |
| **RETURNS** | int | The frequency count. |
```python
vec = s2v["avocado|NOUN"]
s2v.add("🥑|NOUN", vec, 1234)
assert s2v.get_freq("🥑|NOUN") == 1234
```
#### <kbd>method</kbd> `Sense2Vec.set_freq`
Set a frequency count for a given key.
| Argument | Type | Description |
| -------- | ------------- | ----------------------------- |
| `key` | unicode / int | The key to set the count for. |
| `freq` | int | The frequency count. |
```python
s2v.set_freq("avocado|NOUN", 104294)
```
#### <kbd>method</kbd> `Sense2Vec.__iter__`, `Sense2Vec.items`
Iterate over the entries in the vectors table.
| Argument | Type | Description |
| ---------- | ----- | ----------------------------------------- |
| **YIELDS** | tuple | String key and vector pairs in the table. |
```python
for key, vec in s2v:
print(key, vec)
for key, vec in s2v.items():
print(key, vec)
```
#### <kbd>method</kbd> `Sense2Vec.keys`
Iterate over the keys in the table.
| Argument | Type | Description |
| ---------- | ------- | ----------------------------- |
| **YIELDS** | unicode | The string keys in the table. |
```python
all_keys = list(s2v.keys())
```
#### <kbd>method</kbd> `Sense2Vec.values`
Iterate over the vectors in the table.
| Argument | Type | Description |
| ---------- | --------------- | ------------------------- |
| **YIELDS** | `numpy.ndarray` | The vectors in the table. |
```python
all_vecs = list(s2v.values())
```
#### <kbd>property</kbd> `Sense2Vec.senses`
The available senses in the table, e.g. `"NOUN"` or `"VERB"` (added at
initialization).
| Argument | Type | Description |
| ----------- | ---- | --------------------- |
| **RETURNS** | list | The available senses. |
```python
s2v = Sense2Vec(senses=["VERB", "NOUN"])
assert "VERB" in s2v.senses
```
#### <kbd>property</kbd> `Sense2vec.frequencies`
The frequencies of the keys in the table, in descending order.
| Argument | Type | Description |
| ----------- | ---- | -------------------------------------------------- |
| **RETURNS** | list | The `(key, freq)` tuples by frequency, descending. |
```python
most_frequent = s2v.frequencies[:10]
key, score = s2v.frequencies[0]
```
#### <kbd>method</kbd> `Sense2vec.similarity`
Make a semantic similarity estimate of two keys or two sets of keys. The default
estimate is cosine similarity using an average of vectors.
| Argument | Type | Description |
| ----------- | ------------------------ | ----------------------------------- |
| `keys_a` | unicode / int / iterable | The string or integer key(s). |
| `keys_b` | unicode / int / iterable | The other string or integer key(s). |
| **RETURNS** | float | The similarity score. |
```python
keys_a = ["machine_learning|NOUN", "natural_language_processing|NOUN"]
keys_b = ["computer_vision|NOUN", "object_detection|NOUN"]
print(s2v.similarity(keys_a, keys_b))
assert s2v.similarity("machine_learning|NOUN", "machine_learning|NOUN") == 1.0
```
#### <kbd>method</kbd> `Sense2Vec.most_similar`
Get the most similar entries in the table. If more than one key is provided, the
average of the vectors is used. To make this method faster, see the
[script for precomputing a cache](scripts/06_precompute_cache.py) of the nearest
neighbors.
| Argument | Type | Description |
| ------------ | ------------------------- | ------------------------------------------------------- |
| `keys` | unicode / int / iterable | The string or integer key(s) to compare to. |
| `n` | int | The number of similar keys to return. Defaults to `10`. |
| `batch_size` | int | The batch size to use. Defaults to `16`. |
| **RETURNS** | list | The `(key, score)` tuples of the most similar vectors. |
```python
most_similar = s2v.most_similar("natural_language_processing|NOUN", n=3)
# [('machine_learning|NOUN', 0.8986967),
# ('computer_vision|NOUN', 0.8636297),
# ('deep_learning|NOUN', 0.8573361)]
```
#### <kbd>method</kbd> `Sense2Vec.get_other_senses`
Find other entries for the same word with a different sense, e.g. `"duck|VERB"`
for `"duck|NOUN"`.
| Argument | Type | Description |
| ------------- | ------------- | ----------------------------------------------------------------- |
| `key` | unicode / int | The key to check. |
| `ignore_case` | bool | Check for uppercase, lowercase and titlecase. Defaults to `True`. |
| **RETURNS** | list | The string keys of other entries with different senses. |
```python
other_senses = s2v.get_other_senses("duck|NOUN")
# ['duck|VERB', 'Duck|ORG', 'Duck|VERB', 'Duck|PERSON', 'Duck|ADJ']
```
#### <kbd>method</kbd> `Sense2Vec.get_best_sense`
Find the best-matching sense for a given word based on the available senses and
frequency counts. Returns `None` if no match is found.
| Argument | Type | Description |
| ------------- | ------- | ------------------------------------------------------------------------------------------------------- |
| `word` | unicode | The word to check. |
| `senses` | list | Optional list of senses to limit the search to. If not set / empty, all senses in the vectors are used. |
| `ignore_case` | bool | Check for uppercase, lowercase and titlecase. Defaults to `True`. |
| **RETURNS** | unicode | The best-matching key or None. |
```python
assert s2v.get_best_sense("duck") == "duck|NOUN"
assert s2v.get_best_sense("duck", ["VERB", "ADJ"]) == "duck|VERB"
```
#### <kbd>method</kbd> `Sense2Vec.to_bytes`
Serialize a `Sense2Vec` object to a bytestring.
| Argument | Type | Description |
| ----------- | ----- | ----------------------------------------- |
| `exclude` | list | Names of serialization fields to exclude. |
| **RETURNS** | bytes | The serialized `Sense2Vec` object. |
```python
s2v_bytes = s2v.to_bytes()
```
#### <kbd>method</kbd> `Sense2Vec.from_bytes`
Load a `Sense2Vec` object from a bytestring.
| Argument | Type | Description |
| ------------ | ----------- | ----------------------------------------- |
| `bytes_data` | bytes | The data to load. |
| `exclude` | list | Names of serialization fields to exclude. |
| **RETURNS** | `Sense2Vec` | The loaded object. |
```python
s2v_bytes = s2v.to_bytes()
new_s2v = Sense2Vec().from_bytes(s2v_bytes)
```
#### <kbd>method</kbd> `Sense2Vec.to_disk`
Serialize a `Sense2Vec` object to a directory.
| Argument | Type | Description |
| --------- | ---------------- | ----------------------------------------- |
| `path` | unicode / `Path` | The path. |
| `exclude` | list | Names of serialization fields to exclude. |
```python
s2v.to_disk("/path/to/sense2vec")
```
#### <kbd>method</kbd> `Sense2Vec.from_disk`
Load a `Sense2Vec` object from a directory.
| Argument | Type | Description |
| ----------- | ---------------- | ----------------------------------------- |
| `path` | unicode / `Path` | The path to load from |
| `exclude` | list | Names of serialization fields to exclude. |
| **RETURNS** | `Sense2Vec` | The loaded object. |
```python
s2v.to_disk("/path/to/sense2vec")
new_s2v = Sense2Vec().from_disk("/path/to/sense2vec")
```
---
### <kbd>class</kbd> `Sense2VecComponent`
The pipeline component to add sense2vec to spaCy pipelines.
#### <kbd>method</kbd> `Sense2VecComponent.__init__`
Initialize the pipeline component.
| Argument | Type | Description |
| --------------- | --------------------------------------------------------------------------------------------------------------------- | ----------------------------------------------------------------------------------------------------------- |
| `vocab` | `Vocab` | The shared `Vocab`. Mostly used for the shared `StringStore`. |
| `shape` | tuple | The vector shape. |
| `merge_phrases` | bool | Whether to merge sense2vec phrases into one token. Defaults to `False`. |
| `lemmatize` | bool | Always look up lemmas if available in the vectors, otherwise default to original word. Defaults to `False`. |
| `overrides` | Optional custom functions to use, mapped to names registred via the registry, e.g. `{"make_key": "custom_make_key"}`. |
| **RETURNS** | `Sense2VecComponent` | The newly constructed object. |
```python
s2v = Sense2VecComponent(nlp.vocab)
```
#### <kbd>classmethod</kbd> `Sense2VecComponent.from_nlp`
Initialize the component from an nlp object. Mostly used as the component
factory for the entry point (see setup.cfg) and to auto-register via the
`@spacy.component` decorator.
| Argument | Type | Description |
| ----------- | -------------------- | ----------------------------- |
| `nlp` | `Language` | The `nlp` object. |
| `**cfg` | - | Optional config parameters. |
| **RETURNS** | `Sense2VecComponent` | The newly constructed object. |
```python
s2v = Sense2VecComponent.from_nlp(nlp)
```
#### <kbd>method</kbd> `Sense2VecComponent.__call__`
Process a `Doc` object with the component. Typically only called as part of the
spaCy pipeline and not directly.
| Argument | Type | Description |
| ----------- | ----- | ------------------------ |
| `doc` | `Doc` | The document to process. |
| **RETURNS** | `Doc` | the processed document. |
#### <kbd>method</kbd> `Sense2Vec.init_component`
Register the component-specific extension attributes here and only if the
component is added to the pipeline and used – otherwise, tokens will still get
the attributes even if the component is only created and not added.
#### <kbd>method</kbd> `Sense2VecComponent.to_bytes`
Serialize the component to a bytestring. Also called when the component is added
to the pipeline and you run `nlp.to_bytes`.
| Argument | Type | Description |
| ----------- | ----- | ------------------------- |
| **RETURNS** | bytes | The serialized component. |
#### <kbd>method</kbd> `Sense2VecComponent.from_bytes`
Load a component from a bytestring. Also called when you run `nlp.from_bytes`.
| Argument | Type | Description |
| ------------ | -------------------- | ------------------ |
| `bytes_data` | bytes | The data to load. |
| **RETURNS** | `Sense2VecComponent` | The loaded object. |
#### <kbd>method</kbd> `Sense2VecComponent.to_disk`
Serialize the component to a directory. Also called when the component is added
to the pipeline and you run `nlp.to_disk`.
| Argument | Type | Description |
| -------- | ---------------- | ----------- |
| `path` | unicode / `Path` | The path. |
#### <kbd>method</kbd> `Sense2VecComponent.from_disk`
Load a `Sense2Vec` object from a directory. Also called when you run
`nlp.from_disk`.
| Argument | Type | Description |
| ----------- | -------------------- | --------------------- |
| `path` | unicode / `Path` | The path to load from |
| **RETURNS** | `Sense2VecComponent` | The loaded object. |
---
### <kbd>class</kbd> `registry`
Function registry (powered by
[`catalogue`](https://github.com/explosion/catalogue)) to easily customize the
functions used to generate keys and phrases. Allows you to decorate and name
custom functions, swap them out and serialize the custom names when you save out
the model. The following registry options are available:
| Name | Description |
| ------------------------- | -------------------------------------------------------------------------------------------------------------------------------------------------------------------------------------------------------------------------------------------------- |
| `registry.make_key` | Given a `word` and `sense`, return a string of the key, e.g. `"word\|sense".` |
| `registry.split_key` | Given a string key, return a `(word, sense)` tuple. |
| `registry.make_spacy_key` | Given a spaCy object (`Token` or `Span`) and a boolean `prefer_ents` keyword argument (whether to prefer the entity label for single tokens), return a `(word, sense)` tuple. Used in extension attributes to generate a key for tokens and spans. |
| `registry.get_phrases` | Given a spaCy `Doc`, return a list of `Span` objects used for sense2vec phrases (typically noun phrases and named entities). |
| `registry.merge_phrases` | Given a spaCy `Doc`, get all sense2vec phrases and merge them into single tokens. |
Each registry has a `register` method that can be used as a function decorator
and takes one argument, the name of the custom function.
```python
from sense2vec import registry
@registry.make_key.register("custom")
def custom_make_key(word, sense):
return f"{word}###{sense}"
@registry.split_key.register("custom")
def custom_split_key(key):
word, sense = key.split("###")
return word, sense
```
When initializing the `Sense2Vec` object, you can now pass in a dictionary of
overrides with the names of your custom registered functions.
```python
overrides = {"make_key": "custom", "split_key": "custom"}
s2v = Sense2Vec(overrides=overrides)
```
This makes it easy to experiment with different strategies and serializing the
strategies as plain strings (instead of having to pass around and/or pickle the
functions themselves).
## 🚂 Training your own sense2vec vectors
The [`/scripts`](/scripts) directory contains command line utilities for
preprocessing text and training your own vectors.
### Requirements
To train your own sense2vec vectors, you'll need the following:
- A **very large** source of raw text (ideally more than you'd use for word2vec,
since the senses make the vocabulary more sparse). We recommend at least 1
billion words.
- A [pretrained spaCy model](https://spacy.io/models) that assigns
part-of-speech tags, dependencies and named entities, and populates the
`doc.noun_chunks`. If the language you need doesn't provide a built in
[syntax iterator for noun phrases](https://spacy.io/usage/adding-languages#syntax-iterators),
you'll need to write your own. (The `doc.noun_chunks` and `doc.ents` are what
sense2vec uses to determine what's a phrase.)
- [GloVe](https://github.com/stanfordnlp/GloVe) or
[fastText](https://github.com/facebookresearch/fastText) installed and built.
You should be able to clone the repo and run `make` in the respective
directory.
### Step-by-step process
The training process is split up into several steps to allow you to resume at
any given point. Processing scripts are designed to operate on single files,
making it easy to parallellize the work. The scripts in this repo require either
[Glove](https://github.com/stanfordnlp/GloVe) or
[fastText](https://github.com/facebookresearch/fastText) which you need to clone
and `make`.
For Fasttext, the scripts will require the path to the created binary file. If
you're working on Windows, you can build with `cmake`, or alternatively use the
`.exe` file from this **unofficial** repo with FastText binary builds for
Windows: https://github.com/xiamx/fastText/releases.
| | Script | Description |
| ------ | -------------------------------------------------------------------------------------------------------------------------------------------- | ------------------------------------------------------------------------------------------------------------------------------------------------------------------------------------------- |
| **1.** | [`01_parse.py`](scripts/01_parse.py) | Use spaCy to parse the raw text and output binary collections of `Doc` objects (see [`DocBin`](https://spacy.io/api/docbin)). |
| **2.** | [`02_preprocess.py`](scripts/02_preprocess.py) | Load a collection of parsed `Doc` objects produced in the previous step and output text files in the sense2vec format (one sentence per line and merged phrases with senses). |
| **3.** | [`03_glove_build_counts.py`](scripts/03_glove_build_counts.py) | Use [GloVe](https://github.com/stanfordnlp/GloVe) to build the vocabulary and counts. Skip this step if you're using Word2Vec via [FastText](https://github.com/facebookresearch/fastText). |
| **4.** | [`04_glove_train_vectors.py`](scripts/04_glove_train_vectors.py)<br />[`04_fasttext_train_vectors.py`](scripts/04_fasttext_train_vectors.py) | Use [GloVe](https://github.com/stanfordnlp/GloVe) or [FastText](https://github.com/facebookresearch/fastText) to train vectors. |
| **5.** | [`05_export.py`](scripts/05_export.py) | Load the vectors and frequencies and output a sense2vec component that can be loaded via `Sense2Vec.from_disk`. |
| **6.** | [`06_precompute_cache.py`](scripts/06_precompute_cache.py) | **Optional:** Precompute nearest-neighbor queries for every entry in the vocab to make `Sense2Vec.most_similar` faster. |
For more detailed documentation of the scripts, check out the source or run them
with `--help`. For example, `python scripts/01_parse.py --help`.
## 🍳 Prodigy recipes
This package also seamlessly integrates with the [Prodigy](https://prodi.gy)
annotation tool and exposes recipes for using sense2vec vectors to quickly
generate lists of multi-word phrases and bootstrap NER annotations. To use a
recipe, `sense2vec` needs to be installed in the same environment as Prodigy.
For an example of a real-world use case, check out this
[NER project](https://github.com/explosion/projects/tree/master/ner-fashion-brands)
with downloadable datasets.
The following recipes are available – see below for more detailed docs.
| Recipe | Description |
| ------------------------------------------------------------------- | -------------------------------------------------------------------- |
| [`sense2vec.teach`](#recipe-sense2vecteach) | Bootstrap a terminology list using sense2vec. |
| [`sense2vec.to-patterns`](#recipe-sense2vecto-patterns) | Convert phrases dataset to token-based match patterns. |
| [`sense2vec.eval`](#recipe-sense2veceval) | Evaluate a sense2vec model by asking about phrase triples. |
| [`sense2vec.eval-most-similar`](#recipe-sense2veceval-most-similar) | Evaluate a sense2vec model by correcting the most similar entries. |
| [`sense2vec.eval-ab`](#recipe-sense2veceval-ab) | Perform an A/B evaluation of two pretrained sense2vec vector models. |
### <kbd>recipe</kbd> `sense2vec.teach`
Bootstrap a terminology list using sense2vec. Prodigy will suggest similar terms
based on the most similar phrases from sense2vec, and the suggestions will be
adjusted as you annotate and accept similar phrases. For each seed term, the
best matching sense according to the sense2vec vectors will be used.
```bash
prodigy sense2vec.teach [dataset] [vectors_path] [--seeds] [--threshold]
[--n-similar] [--batch-size] [--resume]
```
| Argument | Type | Description |
| -------------------- | ---------- | ----------------------------------------- |
| `dataset` | positional | Dataset to save annotations to. |
| `vectors_path` | positional | Path to pretrained sense2vec vectors. |
| `--seeds`, `-s` | option | One or more comma-separated seed phrases. |
| `--threshold`, `-t` | option | Similarity threshold. Defaults to `0.85`. |
| `--n-similar`, `-n` | option | Number of similar items to get at once. |
| `--batch-size`, `-b` | option | Batch size for submitting annotations. |
| `--resume`, `-R` | flag | Resume from an existing phrases dataset. |
#### Example
```bash
prodigy sense2vec.teach tech_phrases /path/to/s2v_reddit_2015_md
--seeds "natural language processing, machine learning, artificial intelligence"
```
### <kbd>recipe</kbd> `sense2vec.to-patterns`
Convert a dataset of phrases collected with `sense2vec.teach` to token-based
match patterns that can be used with
[spaCy's `EntityRuler`](https://spacy.io/usage/rule-based-matching#entityruler)
or recipes like `ner.match`. If no output file is specified, the patterns are
written to stdout. The examples are tokenized so that multi-token terms are
represented correctly, e.g.:
`{"label": "SHOE_BRAND", "pattern": [{ "LOWER": "new" }, { "LOWER": "balance" }]}`.
```bash
prodigy sense2vec.to-patterns [dataset] [spacy_model] [label] [--output-file]
[--case-sensitive] [--dry]
```
| Argument | Type | Description |
| ------------------------- | ---------- | -------------------------------------------- |
| `dataset` | positional | Phrase dataset to convert. |
| `spacy_model` | positional | spaCy model for tokenization. |
| `label` | positional | Label to apply to all patterns. |
| `--output-file`, `-o` | option | Optional output file. Defaults to stdout. |
| `--case-sensitive`, `-CS` | flag | Make patterns case-sensitive. |
| `--dry`, `-D` | flag | Perform a dry run and don't output anything. |
#### Example
```bash
prodigy sense2vec.to-patterns tech_phrases en_core_web_sm TECHNOLOGY
--output-file /path/to/patterns.jsonl
```
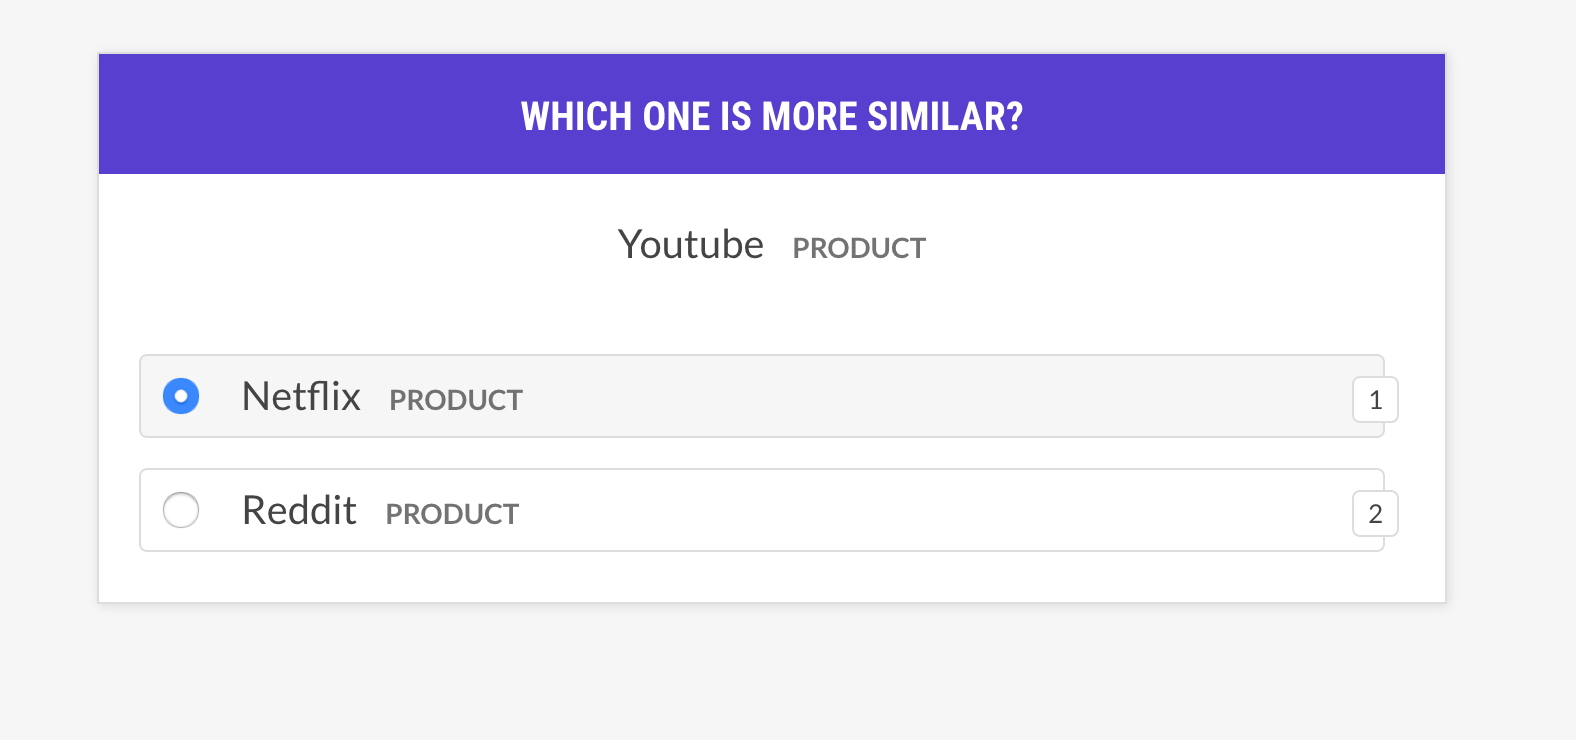
### <kbd>recipe</kbd> `sense2vec.eval`
Evaluate a sense2vec model by asking about phrase triples: is word A more
similar to word B, or to word C? If the human mostly agrees with the model, the
vectors model is good. The recipe will only ask about vectors with the same
sense and supports different example selection strategies.
```bash
prodigy sense2vec.eval [dataset] [vectors_path] [--strategy] [--senses]
[--exclude-senses] [--n-freq] [--threshold] [--batch-size] [--eval-whole]
[--eval-only] [--show-scores]
```
| Argument | Type | Description |
| ------------------------- | ---------- | ------------------------------------------------------------------------------------------------------------- |
| `dataset` | positional | Dataset to save annotations to. |
| `vectors_path` | positional | Path to pretrained sense2vec vectors. |
| `--strategy`, `-st` | option | Example selection strategy. `most similar` (default) or `random`. |
| `--senses`, `-s` | option | Comma-separated list of senses to limit the selection to. If not set, all senses in the vectors will be used. |
| `--exclude-senses`, `-es` | option | Comma-separated list of senses to exclude. See `prodigy_recipes.EVAL_EXCLUDE_SENSES` fro the defaults. |
| `--n-freq`, `-f` | option | Number of most frequent entries to limit to. |
| `--threshold`, `-t` | option | Minimum similarity threshold to consider examples. |
| `--batch-size`, `-b` | option | Batch size to use. |
| `--eval-whole`, `-E` | flag | Evaluate the whole dataset instead of the current session. |
| `--eval-only`, `-O` | flag | Don't annotate, only evaluate the current dataset. |
| `--show-scores`, `-S` | flag | Show all scores for debugging. |
#### Strategies
| Name | Description |
| -------------------- | --------------------------------------------------------------------------------------------------------------------------------------------------------------------- |
| `most_similar` | Pick a random word from a random sense and get its most similar entries of the same sense. Ask about the similarity to the last and middle entry from that selection. |
| `most_least_similar` | Pick a random word from a random sense and get the least similar entry from its most similar entries, and then the last most similar entry of that. |
| `random` | Pick a random sample of 3 words from the same random sense. |
#### Example
```bash
prodigy sense2vec.eval vectors_eval /path/to/s2v_reddit_2015_md
--senses NOUN,ORG,PRODUCT --threshold 0.5
```
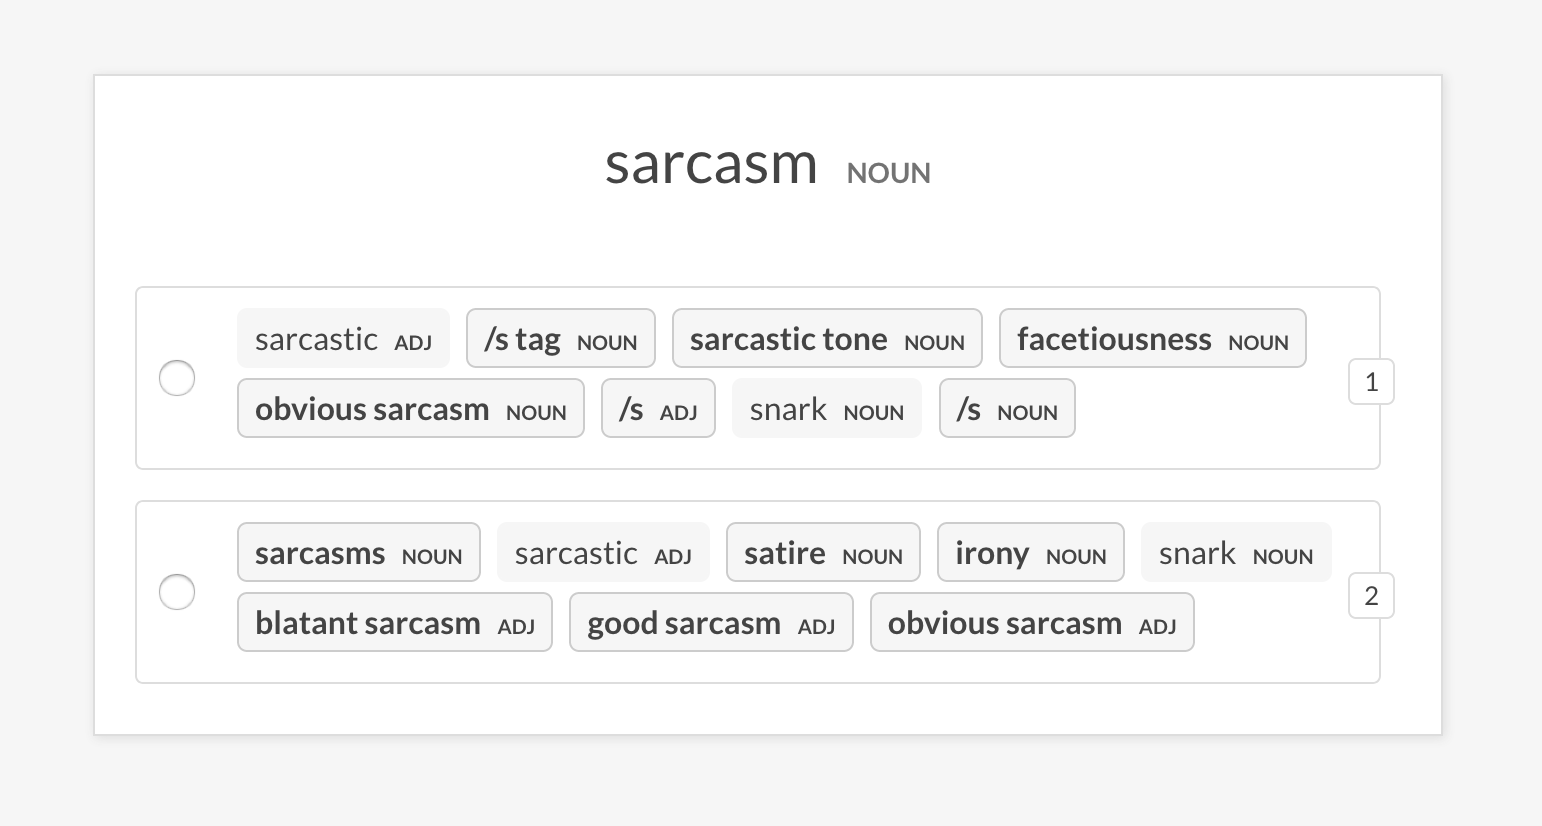
### <kbd>recipe</kbd> `sense2vec.eval-most-similar`
Evaluate a vectors model by looking at the most similar entries it returns for a
random phrase and unselecting the mistakes.
```bash
prodigy sense2vec.eval [dataset] [vectors_path] [--senses] [--exclude-senses]
[--n-freq] [--n-similar] [--batch-size] [--eval-whole] [--eval-only]
[--show-scores]
```
| Argument | Type | Description |
| ------------------------- | ---------- | ------------------------------------------------------------------------------------------------------------- |
| `dataset` | positional | Dataset to save annotations to. |
| `vectors_path` | positional | Path to pretrained sense2vec vectors. |
| `--senses`, `-s` | option | Comma-separated list of senses to limit the selection to. If not set, all senses in the vectors will be used. |
| `--exclude-senses`, `-es` | option | Comma-separated list of senses to exclude. See `prodigy_recipes.EVAL_EXCLUDE_SENSES` fro the defaults. |
| `--n-freq`, `-f` | option | Number of most frequent entries to limit to. |
| `--n-similar`, `-n` | option | Number of similar items to check. Defaults to `10`. |
| `--batch-size`, `-b` | option | Batch size to use. |
| `--eval-whole`, `-E` | flag | Evaluate the whole dataset instead of the current session. |
| `--eval-only`, `-O` | flag | Don't annotate, only evaluate the current dataset. |
| `--show-scores`, `-S` | flag | Show all scores for debugging. |
```bash
prodigy sense2vec.eval-most-similar vectors_eval_sim /path/to/s2v_reddit_2015_md
--senses NOUN,ORG,PRODUCT
```
### <kbd>recipe</kbd> `sense2vec.eval-ab`
Perform an A/B evaluation of two pretrained sense2vec vector models by comparing
the most similar entries they return for a random phrase. The UI shows two
randomized options with the most similar entries of each model and highlights
the phrases that differ. At the end of the annotation session the overall stats
and preferred model are shown.
```bash
prodigy sense2vec.eval [dataset] [vectors_path_a] [vectors_path_b] [--senses]
[--exclude-senses] [--n-freq] [--n-similar] [--batch-size] [--eval-whole]
[--eval-only] [--show-mapping]
```
| Argument | Type | Description |
| ------------------------- | ---------- | ------------------------------------------------------------------------------------------------------------- |
| `dataset` | positional | Dataset to save annotations to. |
| `vectors_path_a` | positional | Path to pretrained sense2vec vectors. |
| `vectors_path_b` | positional | Path to pretrained sense2vec vectors. |
| `--senses`, `-s` | option | Comma-separated list of senses to limit the selection to. If not set, all senses in the vectors will be used. |
| `--exclude-senses`, `-es` | option | Comma-separated list of senses to exclude. See `prodigy_recipes.EVAL_EXCLUDE_SENSES` fro the defaults. |
| `--n-freq`, `-f` | option | Number of most frequent entries to limit to. |
| `--n-similar`, `-n` | option | Number of similar items to check. Defaults to `10`. |
| `--batch-size`, `-b` | option | Batch size to use. |
| `--eval-whole`, `-E` | flag | Evaluate the whole dataset instead of the current session. |
| `--eval-only`, `-O` | flag | Don't annotate, only evaluate the current dataset. |
| `--show-mapping`, `-S` | flag | Show which models are option 1 and option 2 in the UI (for debugging). |
```bash
prodigy sense2vec.eval-ab vectors_eval_sim /path/to/s2v_reddit_2015_md /path/to/s2v_reddit_2019_md --senses NOUN,ORG,PRODUCT
```
## Pretrained vectors
The pretrained Reddit vectors support the following "senses", either
part-of-speech tags or entity labels. For more details, see spaCy's
[annotation scheme overview](https://spacy.io/api/annotation).
| Tag | Description | Examples |
| ------- | ------------------------- | ------------------------------------ |
| `ADJ` | adjective | big, old, green |
| `ADP` | adposition | in, to, during |
| `ADV` | adverb | very, tomorrow, down, where |
| `AUX` | auxiliary | is, has (done), will (do) |
| `CONJ` | conjunction | and, or, but |
| `DET` | determiner | a, an, the |
| `INTJ` | interjection | psst, ouch, bravo, hello |
| `NOUN` | noun | girl, cat, tree, air, beauty |
| `NUM` | numeral | 1, 2017, one, seventy-seven, MMXIV |
| `PART` | particle | 's, not |
| `PRON` | pronoun | I, you, he, she, myself, somebody |
| `PROPN` | proper noun | Mary, John, London, NATO, HBO |
| `PUNCT` | punctuation | , ? ( ) |
| `SCONJ` | subordinating conjunction | if, while, that |
| `SYM` | symbol | \$, %, =, :), 😝 |
| `VERB` | verb | run, runs, running, eat, ate, eating |
| Entity Label | Description |
| ------------- | ---------------------------------------------------- |
| `PERSON` | People, including fictional. |
| `NORP` | Nationalities or religious or political groups. |
| `FACILITY` | Buildings, airports, highways, bridges, etc. |
| `ORG` | Companies, agencies, institutions, etc. |
| `GPE` | Countries, cities, states. |
| `LOC` | Non-GPE locations, mountain ranges, bodies of water. |
| `PRODUCT` | Objects, vehicles, foods, etc. (Not services.) |
| `EVENT` | Named hurricanes, battles, wars, sports events, etc. |
| `WORK_OF_ART` | Titles of books, songs, etc. |
| `LANGUAGE` | Any named language. |

