Home
Softono
w

wp-autoplugin

Professional software vendor delivering innovative solutions on the Softono platform. Specialized in both open-source and proprietary software development.

Total Products
4

Software by wp-autoplugin

wp-autoplugin
Open Source

wp-autoplugin

# WP-Autoplugin <p align="center"> <img src="https://wp-autoplugin.com/logo192.png" alt="WP-Autoplugin Logo" width="128"> </p> WP-Autoplugin is a free WordPress plugin that uses AI to assist in generating, fixing, and extending plugins on-demand. It enables users to quickly create functional plugins from simple descriptions, addressing specific needs without unnecessary bloat. - Generate plugins using AI - Fix and extend existing plugins - Full control over the generation process - Support for multiple AI models, and any OpenAI-compatible custom API - View the list of generated plugins for easy management --- WP-Autoplugin offers practical solutions for various WordPress development scenarios: - **Lightweight Alternatives**: Create simple, focused plugins to replace large, feature-heavy plugins that may slow down your site or include unnecessary features and advertisements. - **Custom Solutions**: Develop site-specific plugins tailored to your unique requirements, eliminating the need for complex workarounds or multiple plugins. - **Developer Foundations**: Generate solid base plugins that developers can extend and build upon, streamlining the process of creating complex, custom plugins. - **Professional Multi-File Plugins**: Create sophisticated plugins with proper file structure, organization, and scalability using complex plugin mode. ## Plugin Highlights - **Completely Free**: No premium version, no ads, no account required. - **Privacy-Focused**: No data collection or external communication (except for the AI API you choose). - **BYOK (Bring Your Own Key)**: Use your own API key from the AI provider of your choice. - **Flexible AI Models**: Choose from a variety of AI models to suit your needs, or set up custom models. - **Use in Your Language**: The plugin is fully translatable and has built-in support for 10+ languages. ## How It Works 1. **Describe Your Plugin**: Provide a description of the plugin you want to create. 2. **AI Generation**: WP-Autoplugin uses AI to generate a development plan and write the code. 3. **Review and Install**: Review the generated plan and code, make any necessary changes, and install the plugin with a single click. You can also use WP-Autoplugin to **fix bugs**, **add new features**, or **explain plugins** you've created with the tool. The **Explain Plugin** feature allows you to ask questions or obtain general overviews of generated plugins, helping you better understand their functionality and structure. ## Complex Plugin Generation WP-Autoplugin's complex plugin mode enables the creation of sophisticated, multi-file plugins with: - **Proper File Structure**: Organized directories and file hierarchies - **Object-Oriented Design**: Well-structured classes and namespaces - **Scalable Architecture**: Plugins designed for growth and maintenance - **Professional Standards**: Code that follows WordPress development best practices <details> <summary>Click to view complex plugin generation screenshot</summary> ![Complex plugin generation interface](https://wp-autoplugin.com/screenshot-6.png) 
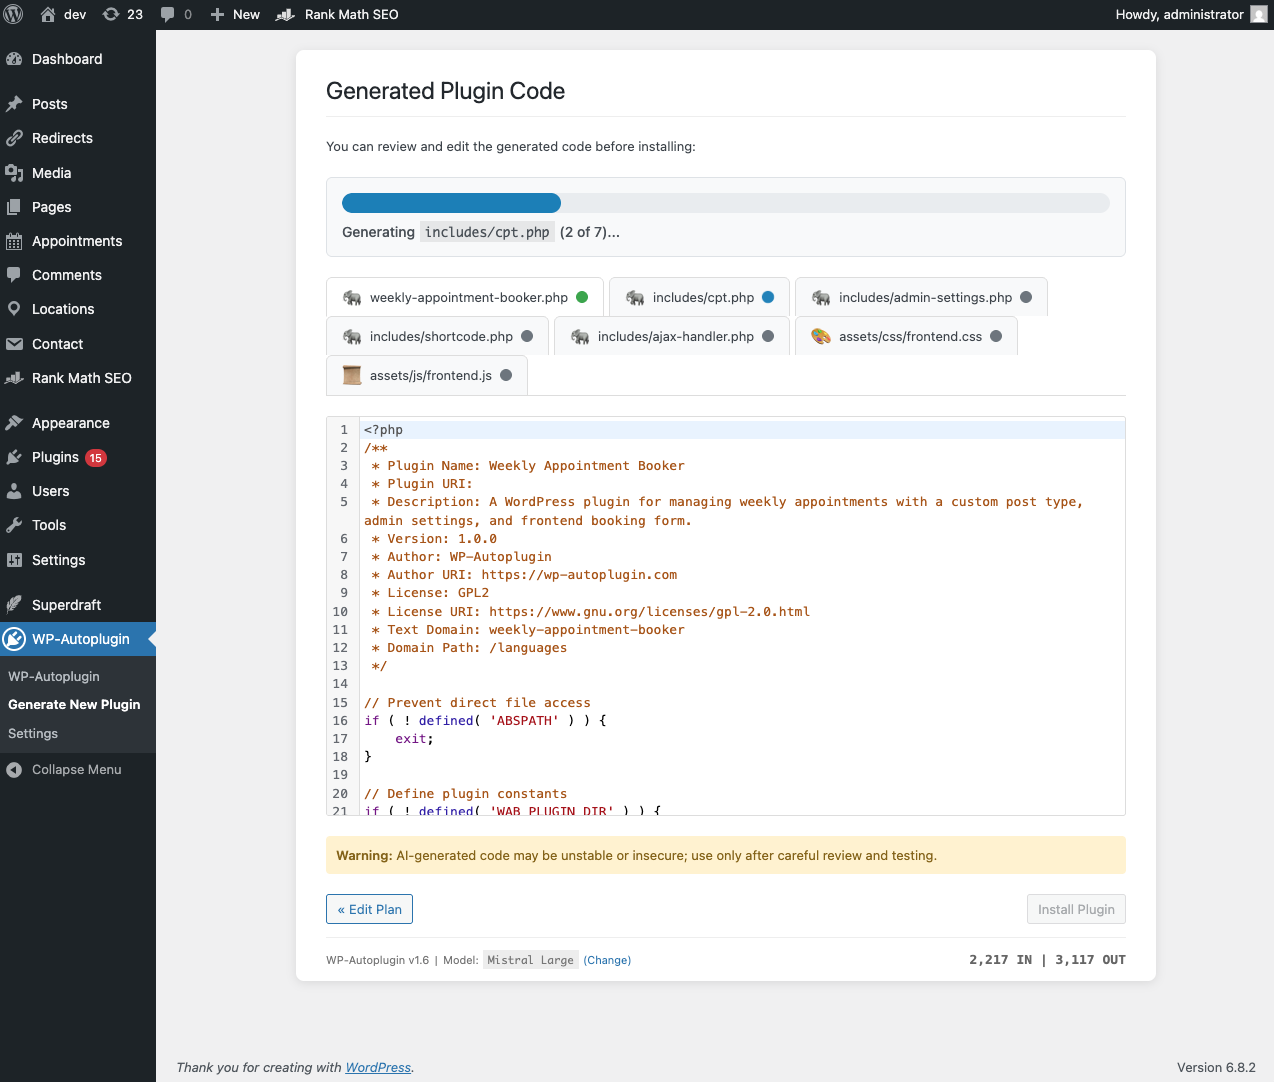
</details> ## Specialized Models Configuration Optimize your plugin generation workflow by assigning different AI models to specific tasks: - **Planner Model**: Handles plugin analysis and extension planning - **Coder Model**: Focuses on code generation and implementation - **Reviewer Model**: Provides code explanations and reviews This approach allows you to: - Use reasoning models for planning complex architectures - Employ fast, cost-effective models for simple coding tasks - Leverage specialized models for code review and explanations - Optimize both performance and API costs ## Token Usage Tracking Monitor your API consumption with detailed usage information: - Real-time token count display during generation - Per-step token usage breakdown - Duration of each API request This helps you: - Control API costs effectively - Choose the most cost-efficient models for your needs - Understand the token impact of different generation modes <details> <summary>Click to view token usage information screenshot</summary> ![Token usage information](https://wp-autoplugin.com/screenshot-7.png) 
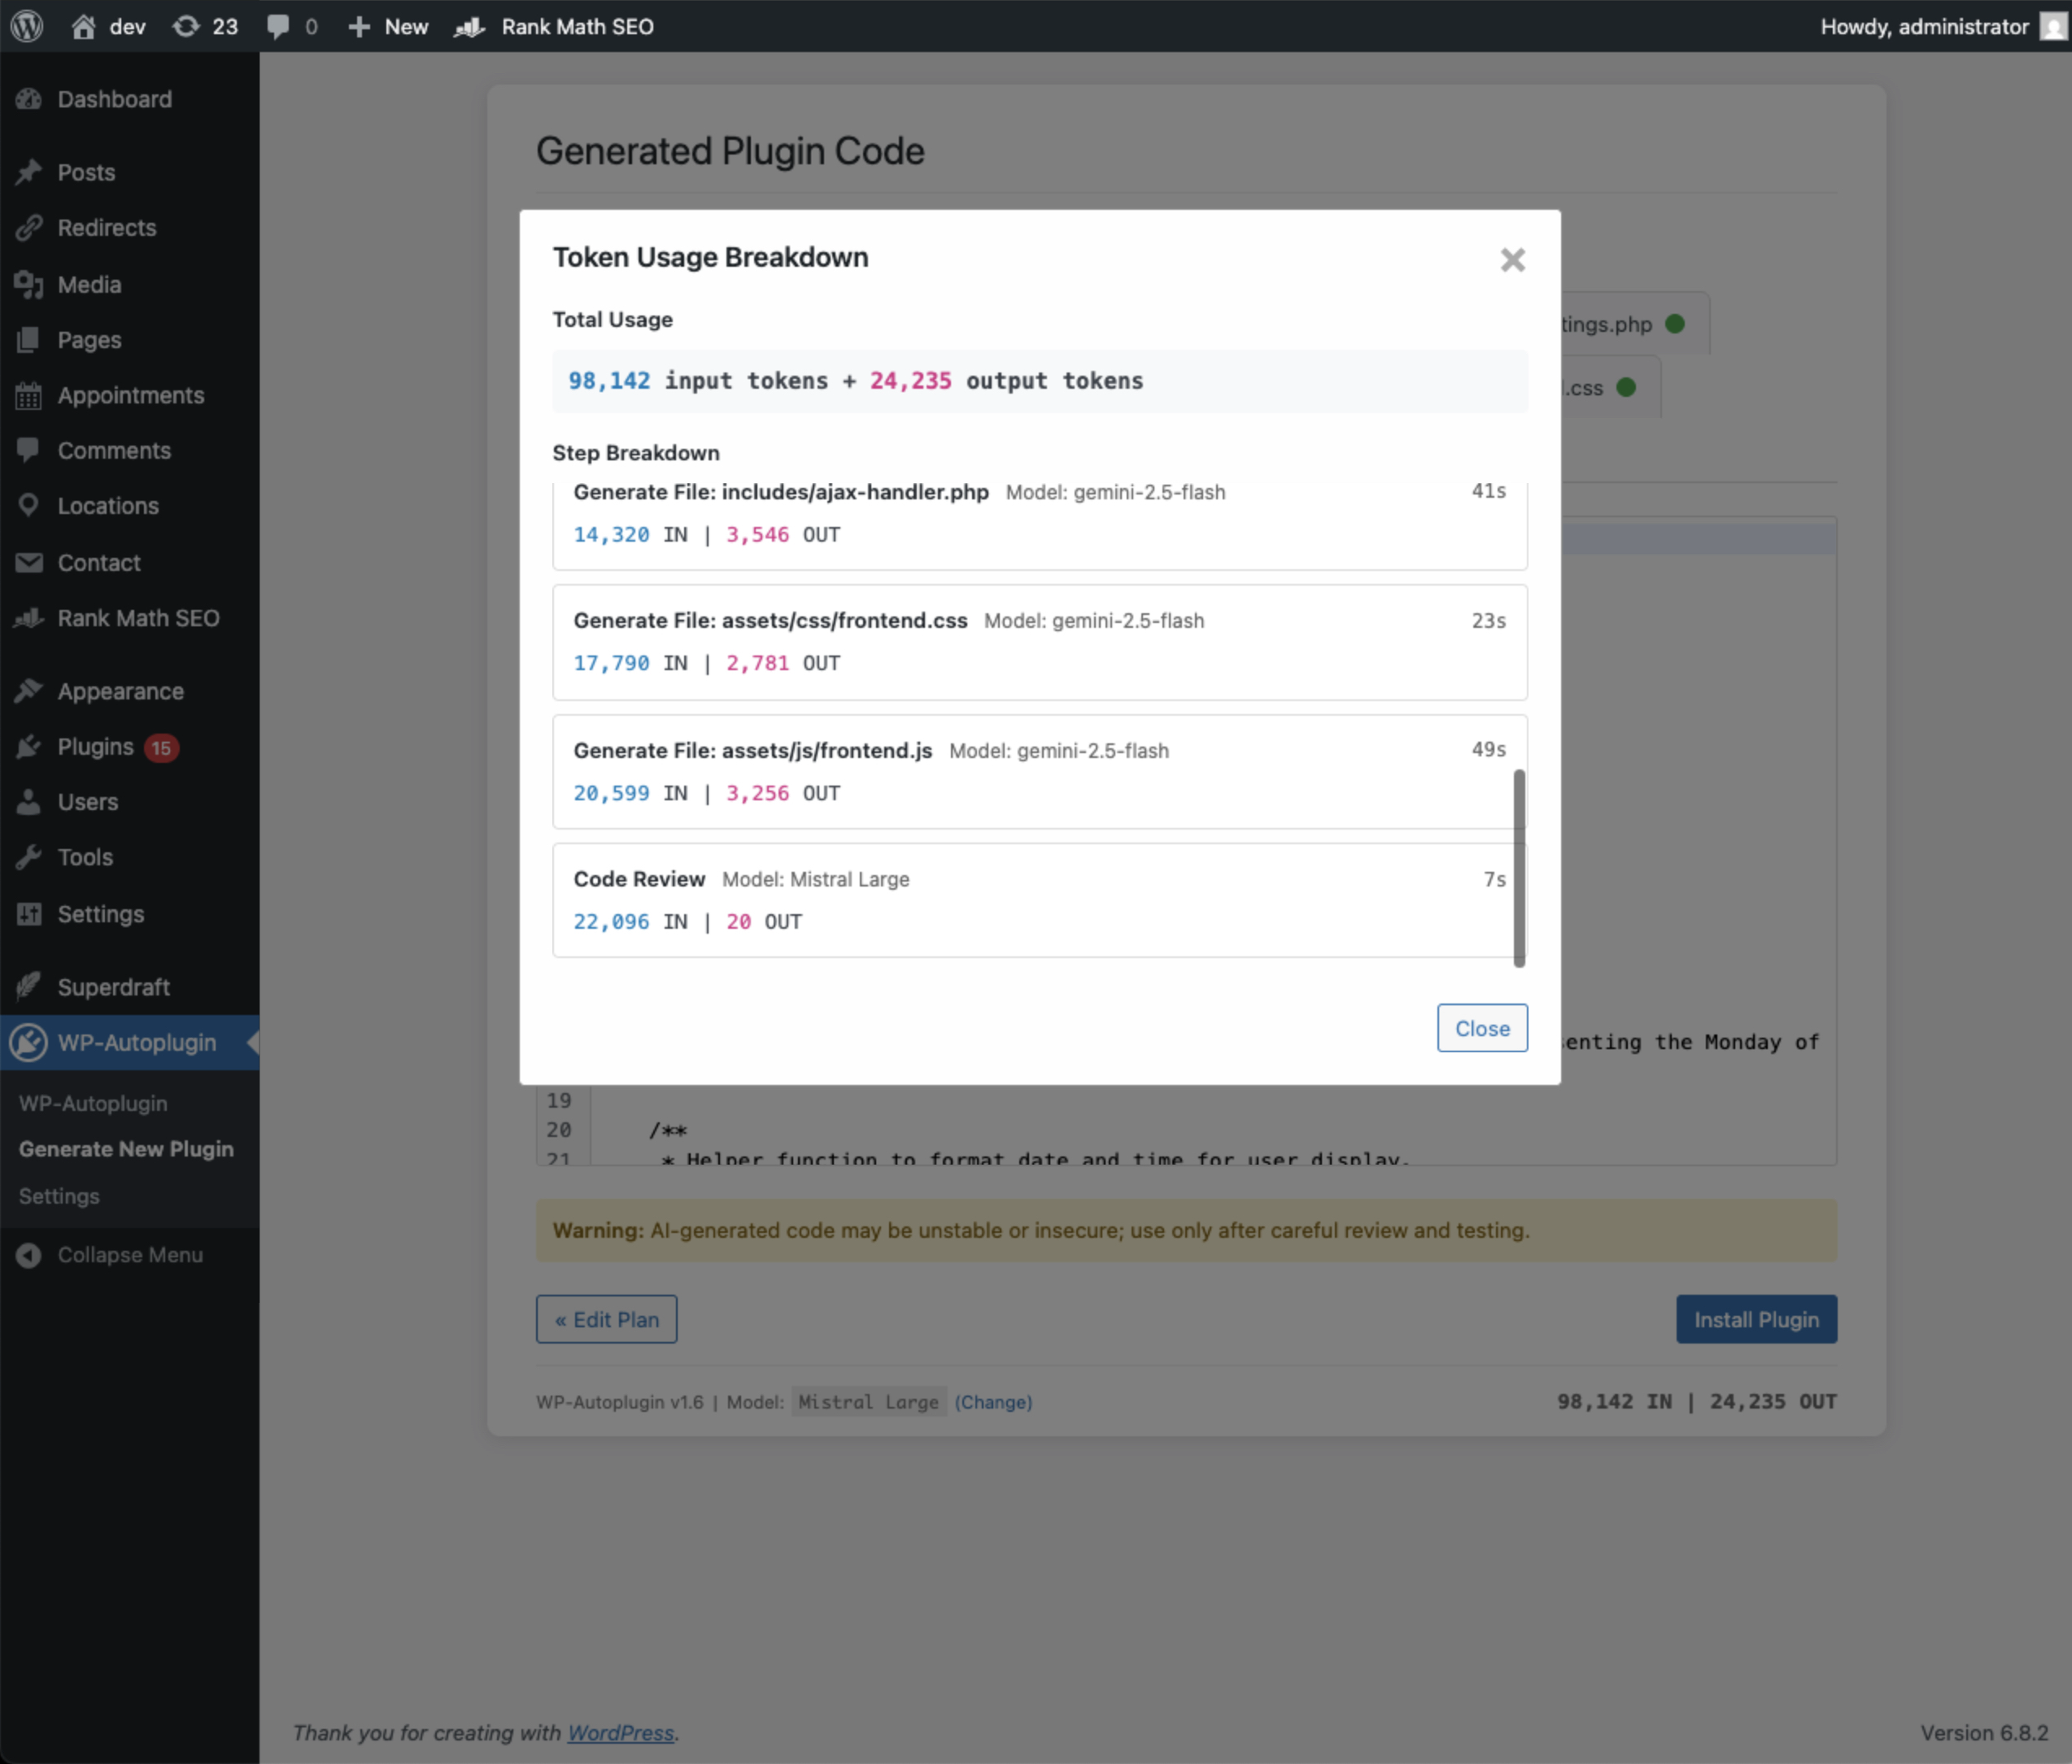
</details> ## Extend Third-Party Plugins and Themes with Hooks WP-Autoplugin allows you to easily extend **any plugin** or **theme** directly from the WordPress admin dashboard: - Click on the "**Extend Plugin**" action link for the plugin you'd like to enhance, or look for the "**Extend**" button on the Appearance > Themes page. - WP-Autoplugin will analyze the selected plugin or theme, extracting available action and filter hooks along with relevant contextual details. - Provide a description of the desired extension; WP-Autoplugin assesses the technical feasibility using available hooks. - A new extension plugin will be generated based on your description, allowing seamless integration with the existing functionality. Demo video: [Extend a third-party plugin with WP-Autoplugin](https://www.youtube.com/watch?v=_9RnFcEGncY) ## Auto-detect Fatal Errors When you activate an AI-generated plugin, WP-Autoplugin will automatically detect fatal errors and deactivate the plugin to prevent site crashes. A message with the error details will be displayed, along with a link to fix the issue automatically with AI. ## Supported Models WP-Autoplugin supports 30+ AI models, including: - Claude Opus 4.8 - Claude Opus 4.7 - Claude Opus 4.6 - Claude Opus 4.5 - Claude Sonnet 4.6 - Claude Sonnet 4.5 - Claude Haiku 4.5 - o3 - o3-pro - GPT-5.5 - GPT-5.5 Pro - GPT-5.4 - GPT-5.4 Pro - GPT-5.4 mini - GPT-5.4 nano - GPT-5 Pro - GPT-5 - GPT-5 mini - GPT-5 nano - GPT-4.1 - GPT-4.1 mini - GPT-4o - GPT-4o mini - Google Gemini 3.1 Pro Preview - Google Gemini 3.5 Flash - Google Gemini 3 Flash Preview - Google Gemini 3.1 Flash Lite - Google Gemini 2.5 Pro - Google Gemini 2.5 Flash - Google Gemini 2.5 Flash Lite - xAI Grok 4.3 - xAI Grok 4.3 Latest - xAI Grok Latest - xAI Grok Build 0.1 While WP-Autoplugin is free to use, you may need to pay for API usage based on your chosen model. ## Custom Models WP-Autoplugin supports custom models: you can plug in any OpenAI-compatible API by providing the endpoint URL, model name, and API key. This feature allows you to use any model you have access to, including locally hosted models, or custom models you've trained yourself. ## BYOK (Bring Your Own Key) To use WP-Autoplugin, you'll need an API key from an AI provider. Insert your key in the plugin settings to get started. Your API key remains on your server and is not shared with anyone. Some AI platforms currently offer free plans and include SOTA models, like **Gemini 2.5 Pro** through [Google AI Studio](https://aistudio.google.com/). Refer to the respective websites for pricing information. ## AI-Generated Plugins Plugins created by WP-Autoplugin are standard WordPress plugins: - They function independently and will continue to work even if WP-Autoplugin is deactivated or deleted. - You can install them on other WordPress sites without WP-Autoplugin. - While WP-Autoplugin provides a convenient listing screen for generated plugins, they can also be managed from the standard WordPress Plugins screen. ## Code Quality and Security WP-Autoplugin aims to generate code that adheres to WordPress coding standards. However, it's important to treat AI-generated code with the same caution you would apply to any third-party code. We strongly recommend: - Reviewing and testing all generated code before use in a production environment. - Conducting thorough testing on a staging site before deployment. - Considering a professional security audit for critical applications. ## Installation 1. Download the latest release from the [Releases](https://github.com/WP-Autoplugin/wp-autoplugin/releases) page. 2. Upload the plugin zip file through the 'Plugins' screen in WordPress, or unzip the file and upload the `wp-autoplugin` folder to the `/wp-content/plugins/` directory. 3. Activate the plugin through the 'Plugins' screen in WordPress. 4. Go to the WP-Autoplugin settings page and enter your API key(s). 5. Choose your preferred AI model in the settings. 6. Start generating plugins! ## Screenshots <details> <summary>Click to view screenshots</summary> 1. Generate plugin form ![Generate plugin form](https://wp-autoplugin.com/screenshot-1.png) 
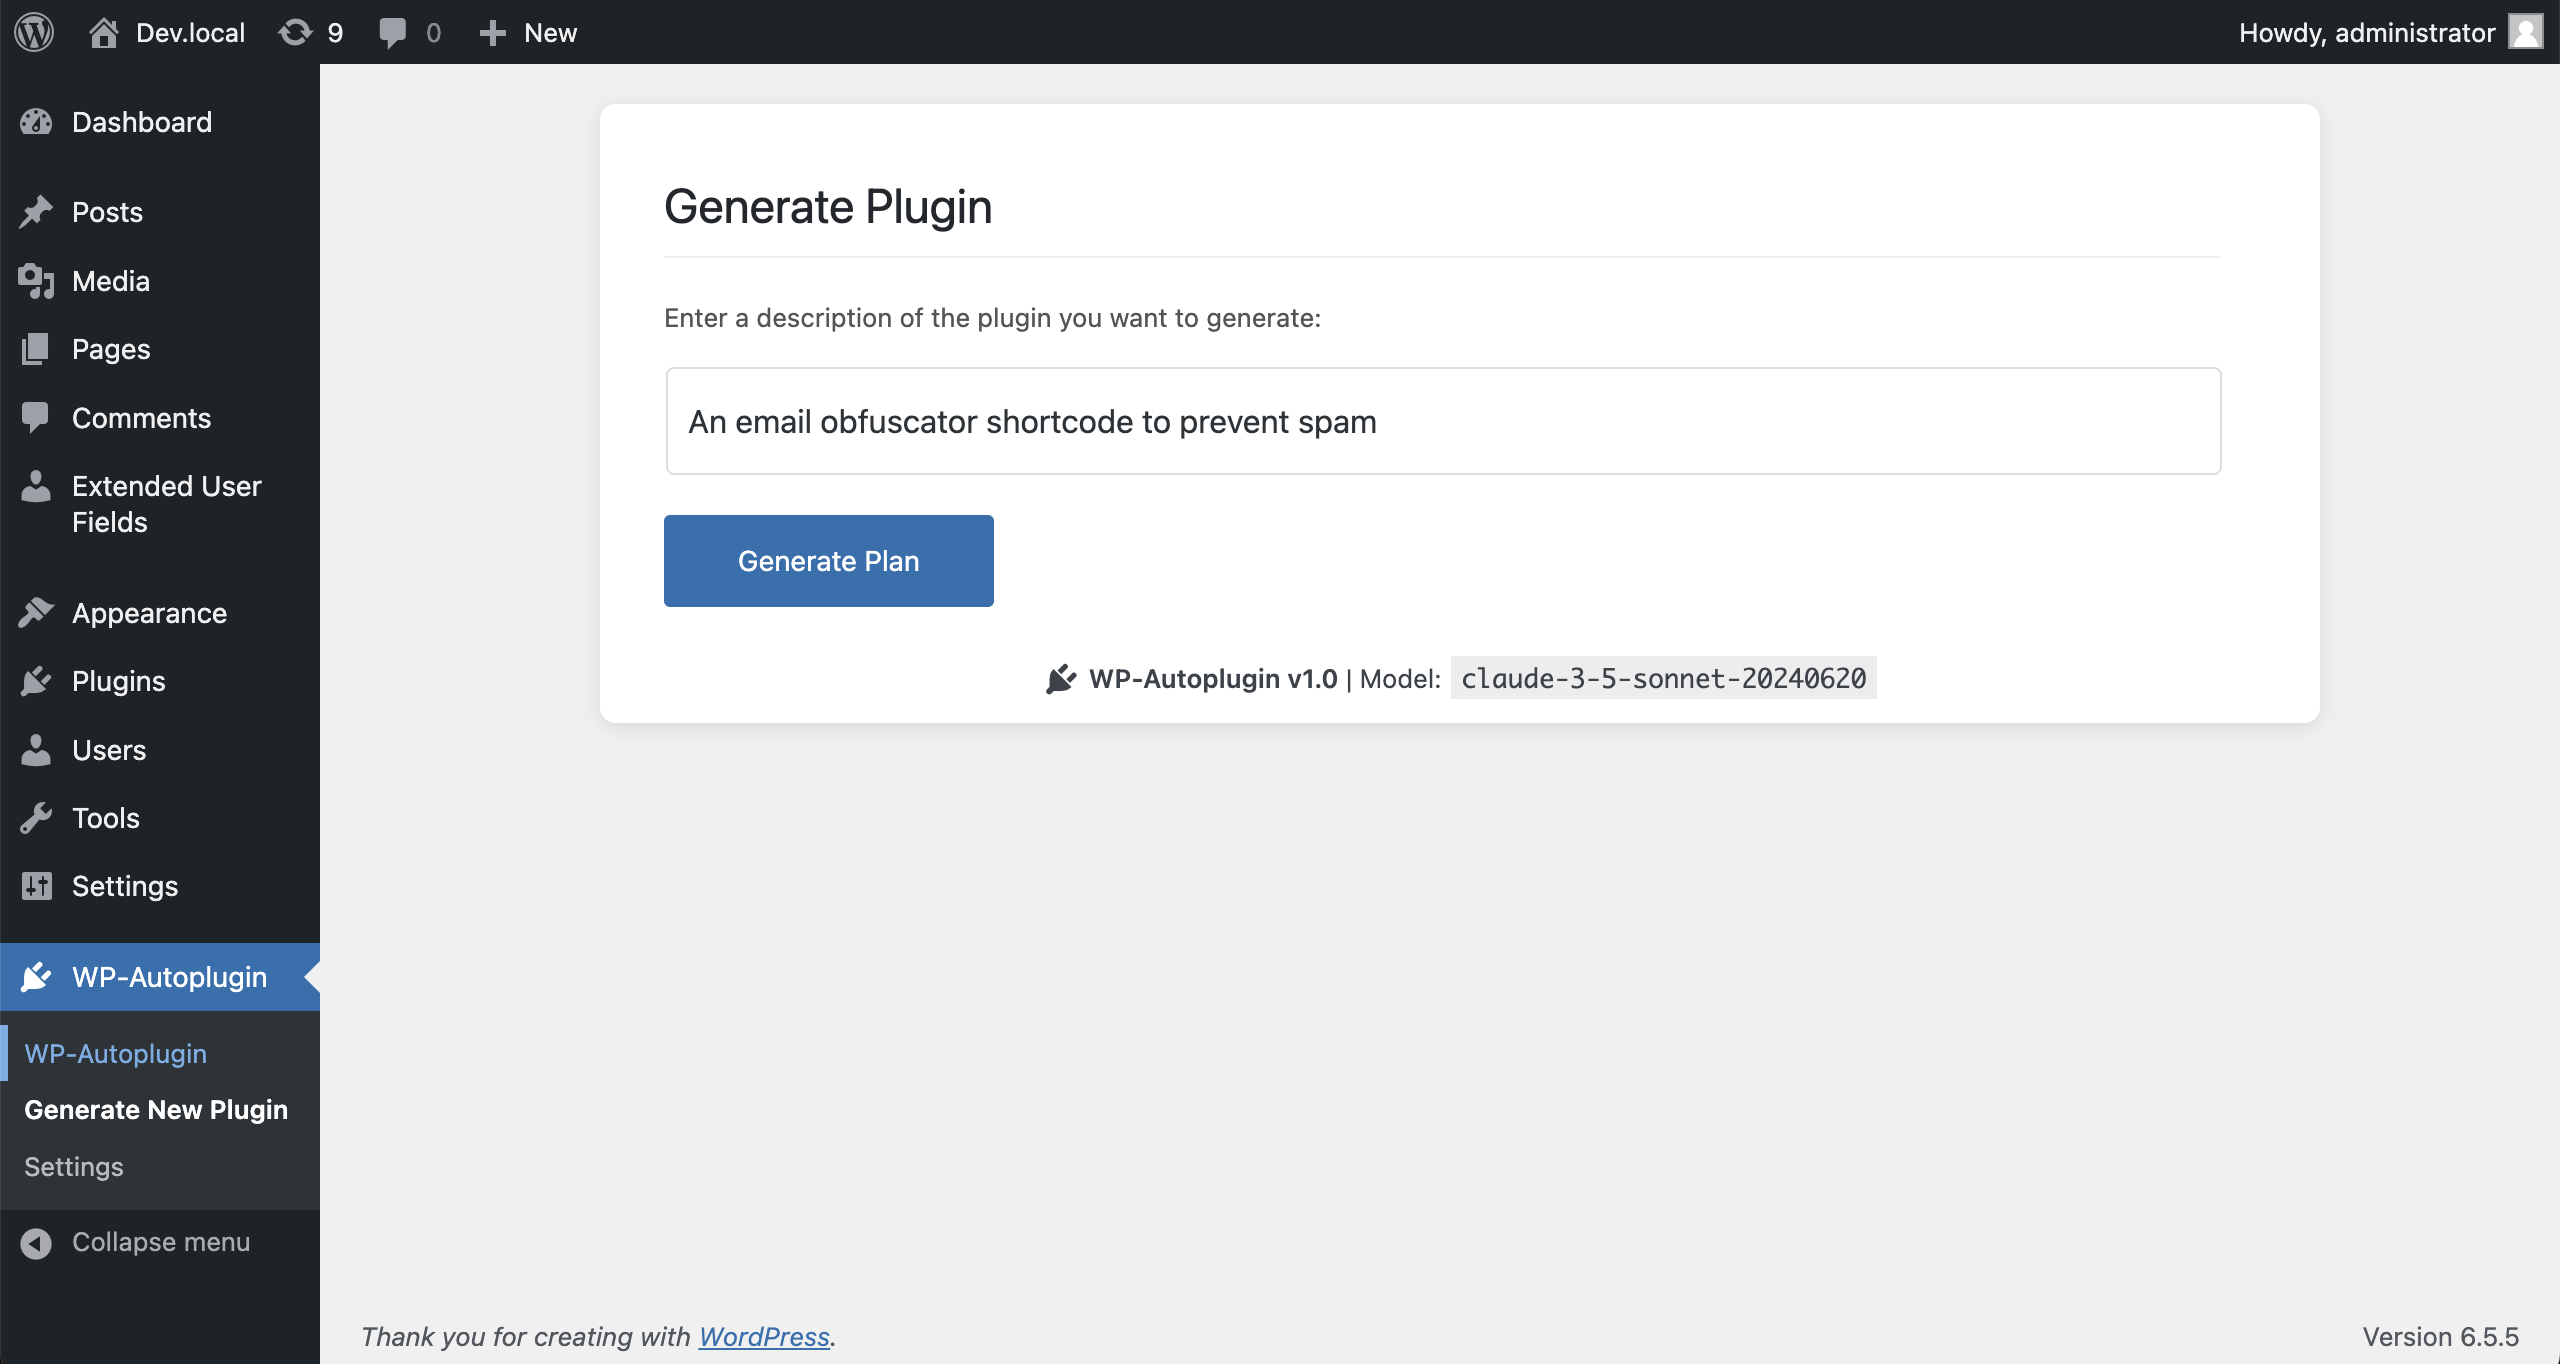
2. Review generated plan
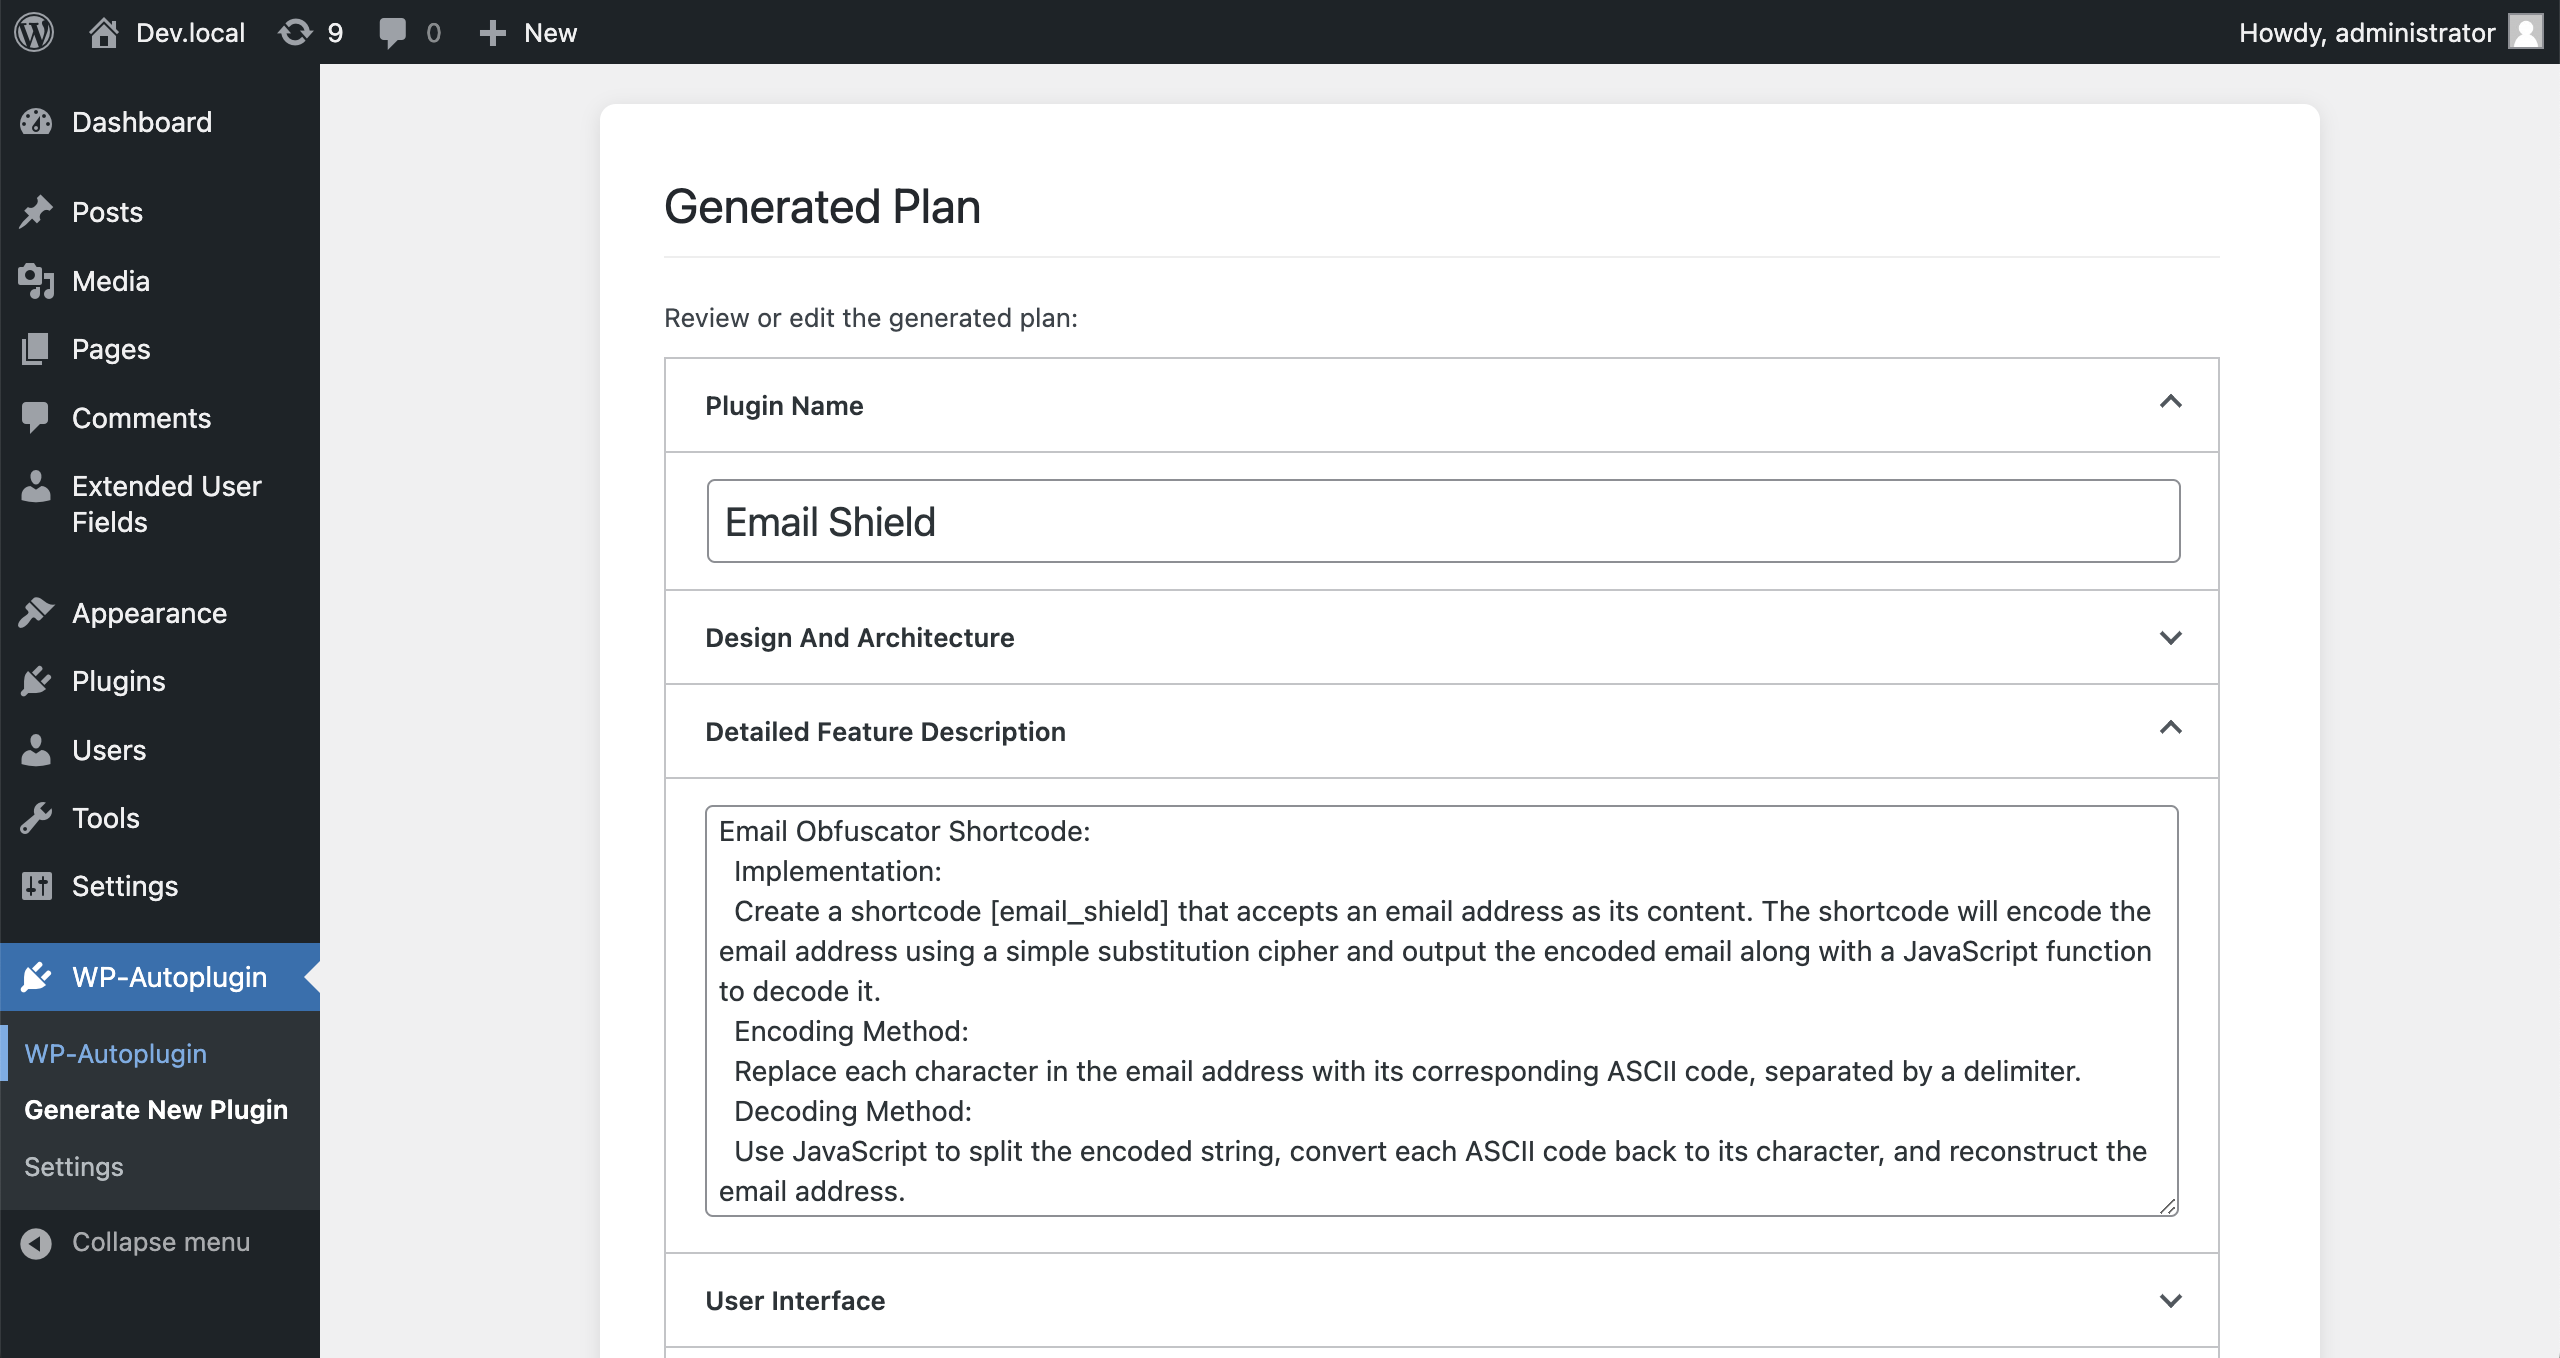
 ![Review generated plan](https://wp-autoplugin.com/screenshot-2.png) 3. Review generated code ![Review generated code](https://wp-autoplugin.com/screenshot-3.png) 4. Autoplugins listing screen ![Autoplugins listing screen](https://wp-autoplugin.com/screenshot-4.png) 5. Fix plugin form ![Fix plugin form](https://wp-autoplugin.com/screenshot-5.png) 
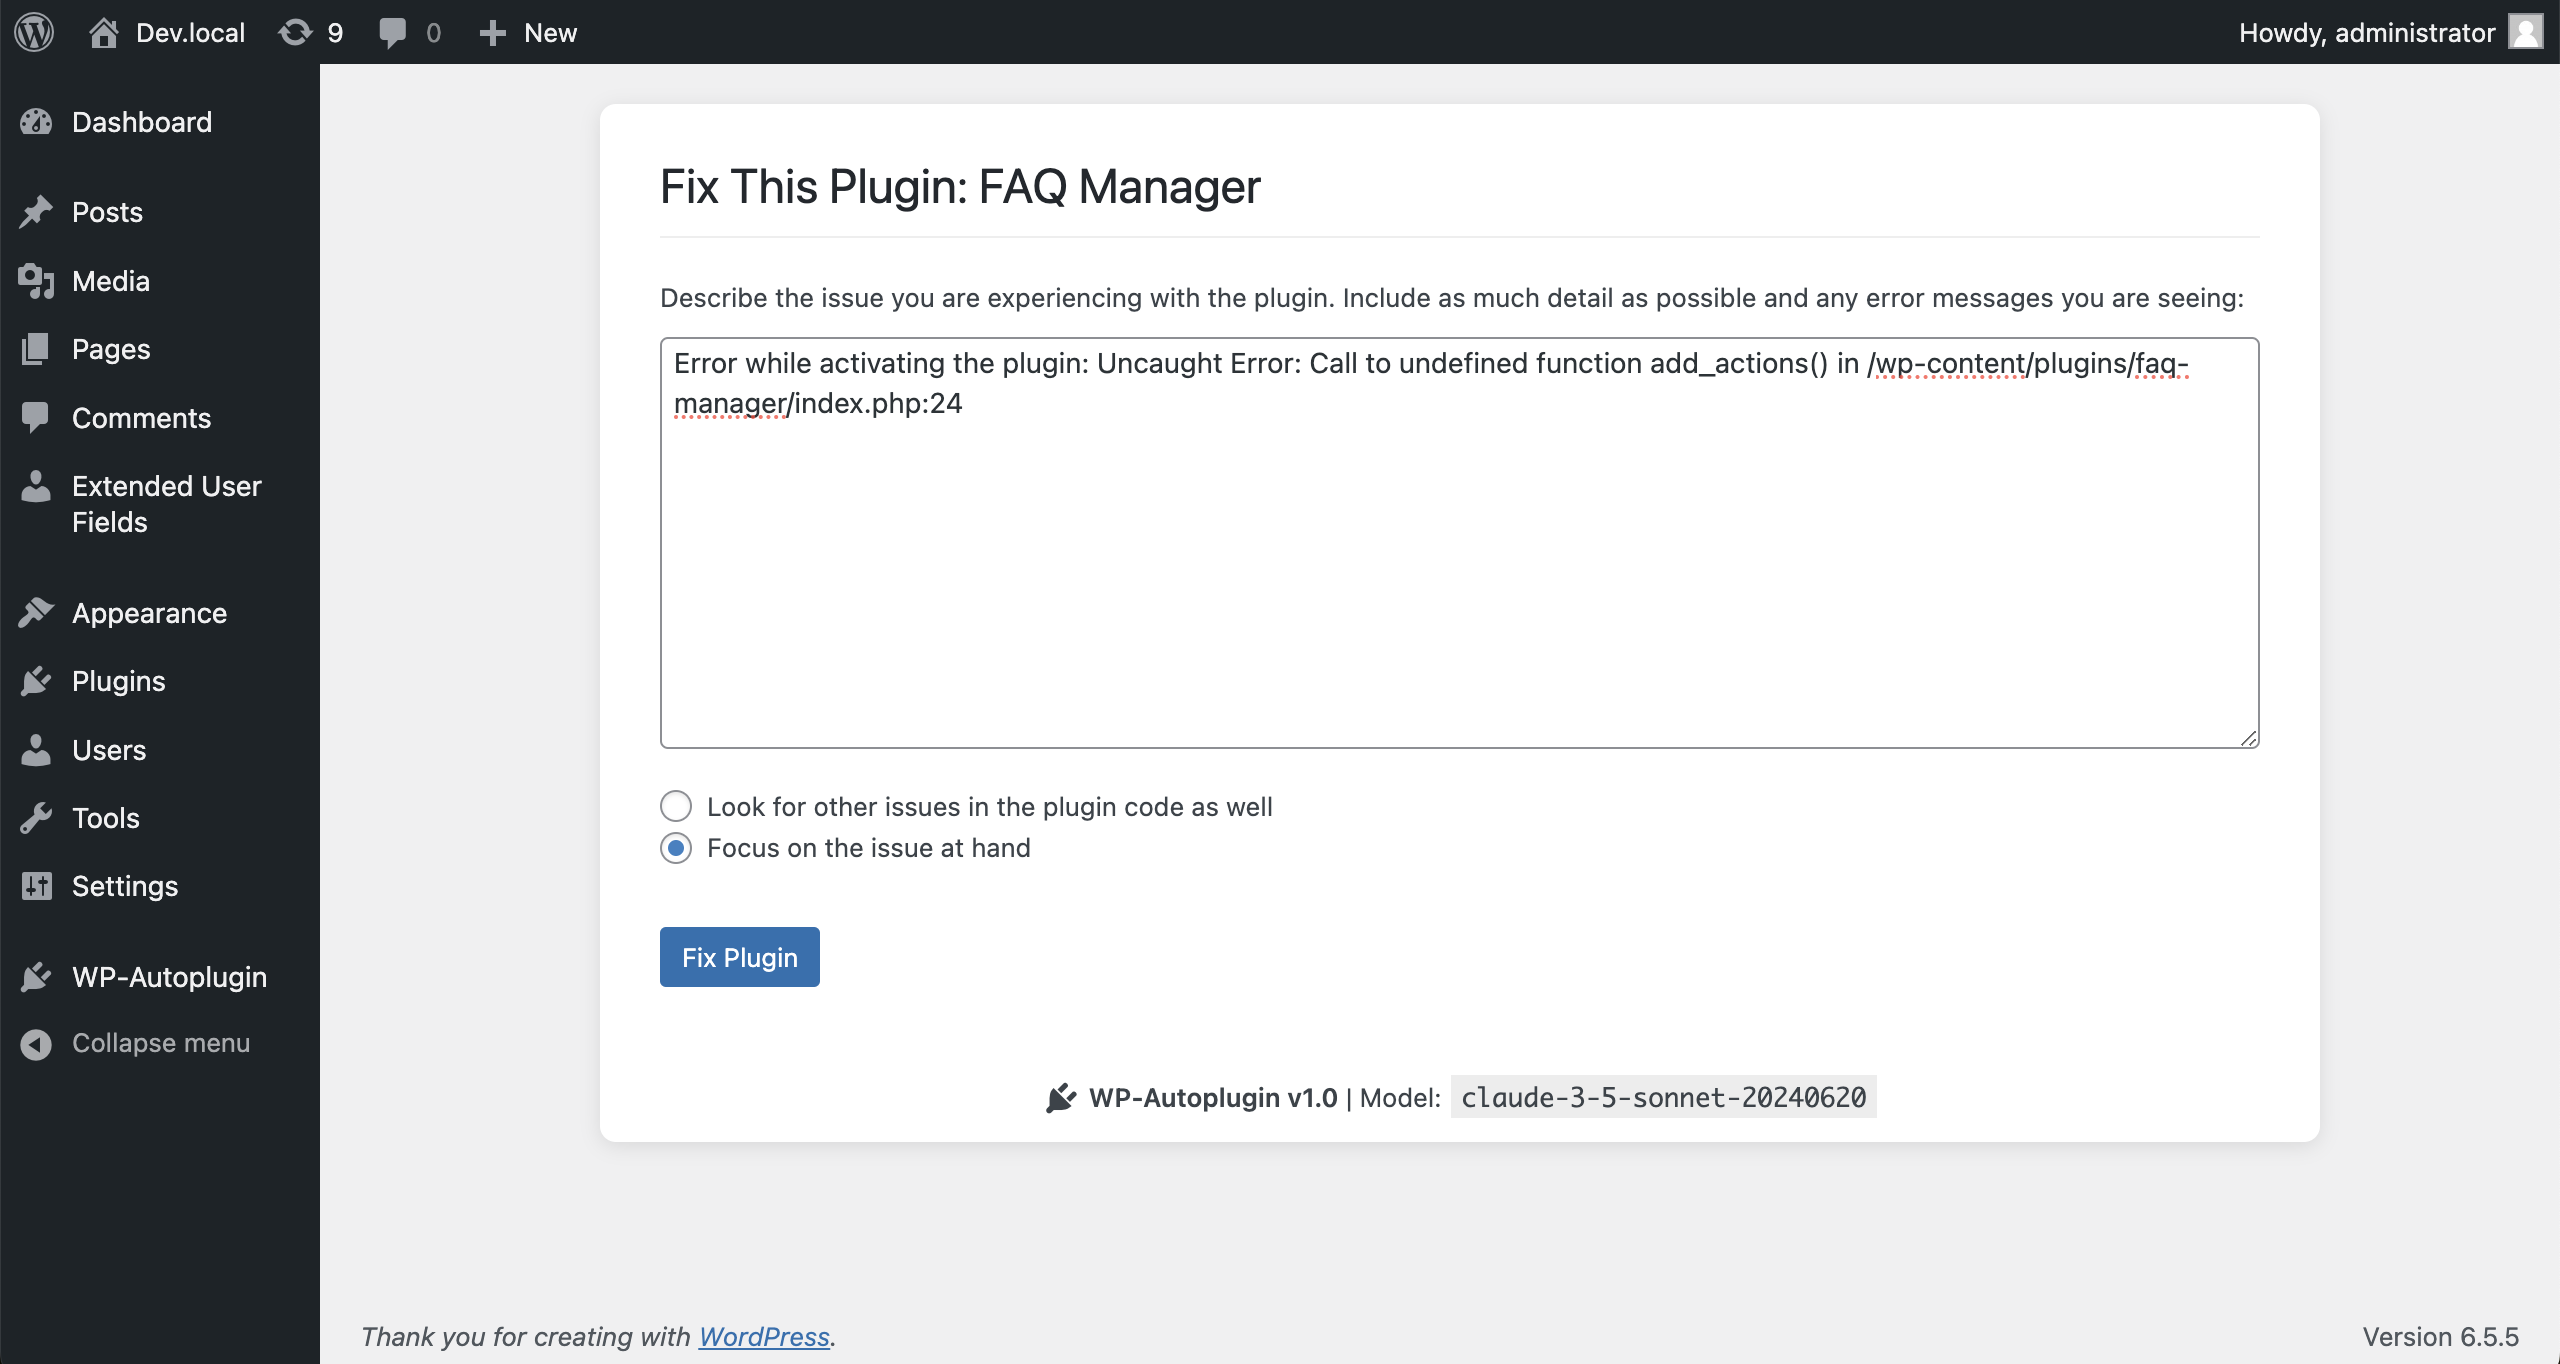
</details> Or watch the [WP-Autoplugin demo video on Youtube](https://www.youtube.com/watch?v=b36elwTLfa4) that shows how it generates a plugin and fixes a bug. ## Translations WP-Autoplugin is fully translatable. If you would like to contribute a translation, please create a pull request with the translation files. Currently, the plugin includes translations for the following languages: - English - `en_US` - Français (French) - `fr_FR` - Español (Spanish) - `es_ES` - Deutsch (German) - `de_DE` - Português (Portuguese) - `pt_PT` - Italiano (Italian) - `it_IT` - Magyar (Hungarian) - `hu_HU` - Nederlands (Dutch) - `nl_NL` - Polski (Polish) - `pl_PL` - Türkçe (Turkish) - `tr_TR` - Русский (Russian) - `ru_RU` ## Licensing WP-Autoplugin is licensed under the GPLv3 or later. ## Changelog ### 1.8.0 - Updated translations (thanks ShutterStarTW) - New setting: AI output language (thanks ShutterStarTW) - Added support for new Google, Anthropic, OpenAI and xAI models ### 1.7.1 - Added support for new models across all providers ### 1.7 - Added image input support for OpenAI, Anthropic and Google models - Added support for Claude Sonnet 4.5-20250929 model - Added support for GPT-5-Codex model and the OpenAI Responses API ### 1.6 - Added complex plugin mode for multi-file plugin generation - Added specialized model settings to delegate tasks to specific AI models - Added detailed token usage tracking and display - Improved plugin generation architecture - Enhanced UI with better progress indicators ### 1.5 - Added Extend Themes feature to extend existing themes with hooks - Added support for new AI models ### 1.4.3 - Added support for Google Gemini 2.5 Pro model - Fixed minor UI issue in the Fix Plugin form - Improved code generation step for the Fix Plugin feature to avoid fatal errors ### 1.4.2 - Added a "Copy Hooks" button to use the extracted hooks with any LLM - Added CMD/CTRL + Enter shortcut to submit the forms - Fixed minor UI issues ### 1.4.1 - Added option to change model at every step - Fixed minor issues with the Extend Plugin feature ### 1.4 - Analyze and extend any third-party plugin ### 1.3 - Added new Explain Plugin feature - Refactored admin-side PHP & JS codes - Added new Google models ### 1.2.1 - Added support for reasoning models (o1, o3-mini, Claude 3.7 Sonnet Thinking) - Fixed PHPCS issues throughout the codebase ### 1.2 - Added support for any OpenAI-compatible API with the custom models option - Added translations for 10 more languages - Fixed PHP notice on "Add New Plugin" screen. ### 1.1.2 - Added support for Google Gemini Flash 2.0 Thinking model - Added support for xAI Grok-2-1212 model ### 1.1.1 - Added support for Claude 3.5 Sonnet-20241022, Gemini 2.0 Flash Experimental, and Gemini Experimental 1206 models - Some refactoring and code cleanup ### 1.1 - Added support for Claude 3.5 Haiku - Added support for xAI and its only current model, Grok-beta - Fixed an issue that prevented the code from being edited in the code editor - Fixed wrong model name for "chatgpt-4o-latest" - Improved the generator prompt for better code generation on lower-end models - Improved inline documentation ### 1.0.6 - Fixed Github updater class - Fixed a few bugs - Added i18n support and Hungarian translation - Adjusted prompt for better code generation - Added docblocks to the code ### 1.0.5 - Added update from GitHub feature - Reorganized files and folders and added Composer support - Fixed small bugs ### 1.0.4 - Added support for Google Gemini models ### 1.0.3 - Added support for gpt-4o-2024-08-06 - Cleaned up prompts for better readability ### 1.0.2 - Added support for GPT-4o mini - Added support for the high-limit (8192 tokens) version of Claude 3.5 Sonnet ### 1.0.1 - Fixed max_tokens value for OpenAI models ### 1.0 - Initial release

WordPress Themes & Plugins AI Tools
383 Github Stars
wp-banana
Open Source

wp-banana

<img src="assets/images/header.png" alt="WP Banana Logo" width="400" /> --- # WP Banana WP Banana is a free WordPress plugin that lets you generate and edit images with AI, right inside your WordPress admin. Connects directly to your AI image generation API of choice. No ads, no locked features, no upsells, no flashy UI — just clean, native-like integration that feels like part of WordPress core. - Combine existing images from your Media Library with new uploads - Generate completely new images from text prompts - Edit, enhance, and transform images using state-of-the-art models like **Google Nano Banana 2** (with 4K resolution support) - Native-like integration in Gutenberg, Classic Editor, and most page builders [▼ **See Screenshots & Demo**](#screenshots--demo) ## Plugin Highlights - **Native Integration**: Looks and feels like WordPress core — no flashy UI, no distractions - **Free & Open Source**: 100% free, GPL-licensed, no upsells - **Bring Your Own Key**: Connect your own Google, OpenAI, Fal or Replicate API key (no middleman fees) - **Multiple AI Models**: Supports OpenAI’s `gpt-image-2`, Google's Nano Banana 2 (`gemini-3.1-flash-image`), and more - **Secure & Performant**: Clean codebase, minimal overhead, optimized for WordPress best practices - **Universal Compatibility**: Works with Gutenberg, Classic Editor, Elementor, WooCommerce, ACF, and more ## Features ### AI Image Generation - Create new images from simple text prompts - Attach optional reference images from your computer or the Media Library to guide generation - Use AI to generate featured images, blog graphics, product photos, and more - Multiple model support: ChatGPT Image model, Seedream 5, Gemini 3 Pro Image, FLUX.2 models ### AI Image Editing - Select images from your Media Library or upload new ones - Combine images to generate unique composites (e.g. product in different settings) - Apply targeted edits (replace background, adjust style, regenerate parts) ### Media Library Integration - Access AI generation and editing directly inside the Media Library and Media pop-up - Edit images directly from the attachment details view - Generate images while creating or editing posts and pages - Compatible with image fields across WordPress, themes, and plugins - Generated images are automatically saved to your WordPress Media Library ### Edit History & Undo - Non-destructive editing with a full history of changes - Preview edits before saving - Undo/redo individual changes or revert to the original image - Save edits as a new image or overwrite the original - Detailed API usage logs with a review table ### WP Command Palette Integration - Quick access to WP Banana features via the WordPress Command Palette (Cmd+K / Ctrl+K) - Navigate to settings, generate images, and access API logs without menu hunting - Requires WordPress 6.9+ for full Command Palette support ### Developer-Friendly - Built with hooks and filters for extensibility - BYOK (Bring Your Own Key) approach — use your own API credentials - Store keys in the database or define them in `wp-config.php` - Transparent, polished codebase — easy to audit and extend ## Installation 1. Download or clone this repository into your `/wp-content/plugins/` directory. ```bash git clone https://github.com/WP-Autoplugin/wp-banana.git ``` 2. Activate **WP Banana** from the **Plugins** menu in WordPress. 3. Go to **Settings → WP Banana** and add your API key (OpenAI, Replicate, etc.). 4. Start generating and editing images right inside your WordPress dashboard. For environments where you don’t want keys in the DB, you can define them in `wp-config.php`: ``` define( 'WP_BANANA_OPENAI_API_KEY', 'sk-...' ); define( 'WP_BANANA_GOOGLE_API_KEY', 'AIza...' ); define( 'WP_BANANA_REPLICATE_API_KEY', 'r8_...' ); define( 'WP_BANANA_FAL_API_KEY', '...' ); ``` Constants (if present) take priority over saved settings. ## Updates WP Banana uses a customized version of the [GitHub Updater library](https://github.com/radishconcepts/WordPress-GitHub-Plugin-Updater) to enable seamless updates directly from GitHub. When a new release is published, you can update WP Banana just like any other plugin from the WordPress dashboard. You can disable these update checks if you prefer by adding the following line to your `wp-config.php`: ```php define( 'WP_BANANA_DISABLE_GITHUB_UPDATER', true ); ``` Or use the filter in your theme’s `functions.php` or a custom plugin: ```php add_filter( 'wp_banana_disable_github_updater', '__return_true' ); ``` ## Usage Examples ### Generate a New Image 1. Open the Media Library or the Media pop-up in the Post Editor. 2. Click **Generate Image**. 3. Enter your text prompt (e.g. *"banana-shaped rocket flying through space in retro 90s neon style"*). 4. Click **Generate Image** to create the image in a few seconds and save it to your Media Library. 5. Want variations? Use the preview button to queue 1–4 images at once, review them inline, and decide which ones to save or discard before they hit the Media Library. ### Combine Images 1. Select one or more images from the Media Library. 2. Click **Combine with AI**. 3. Provide a text prompt to guide the transformation. 4. A new AI-generated composite image is created and saved. ### Edit Existing Image 1. Open any image in the Media Library. 2. Click **Edit Image**, then **Edit with AI**. 3. Describe changes (e.g. *"remove background"*, *"make it look like watercolor"*, *"add subtle circuit board texture"*). 4. The edited image will appear in the preview area. You can undo changes if needed. 5. Click **Save Changes** to apply the edits or **Save Copy** to keep both versions. ## Screenshots & Demo <details open> <summary>Watch a 1-minute demo video</summary> https://github.com/user-attachments/assets/28a5ef2d-682e-4206-99e7-6eb1f141146d </details> <details> <summary>AI image generation from the Media Library</summary> <img src="assets/screenshot-1.png" alt="AI image generation from the Media Library" /> </details> <details> <summary>Image editing inside Elementor</summary> <img src="assets/screenshot-2.png" alt="Image editing inside Elementor" /> </details> <details> <summary>Select and combine images</summary> <img src="assets/screenshot-3.png" alt="Select and combine images" /> </details> <details> <summary>Settings page for API configuration</summary> <img src="assets/screenshot-4.png" alt="Settings page for API configuration" /> </details> ## Requirements * WordPress 6.0+ * PHP 7.4+ * ImageMagick enabled on your server * API key for supported AI providers (OpenAI, Replicate, Fal, Google AI Studio) ## Supported AI Models WP Banana supports a wide range of state-of-the-art AI image models for both generation and editing. Below are some of the available models you can use: ### Via fal.ai - **FLUX.2 [dev]** (`fal-ai/flux-2`) - **FLUX.2 [pro]** (`fal-ai/flux-2-pro`) - **FLUX.2 [max]** (`fal-ai/flux-2-max`) - **FLUX.2 [turbo]** (`fal-ai/flux-2/turbo`) - **FLUX.2 [flash]** (`fal-ai/flux-2/flash`) - **FLUX.2 [flex]** (`fal-ai/flux-2-flex`) - **Nano Banana 2** (`fal-ai/nano-banana-2`) - **Nano Banana Pro** (`fal-ai/nano-banana-pro`) - **Gemini 3.1 Flash Image** (`fal-ai/gemini-3.1-flash-image-preview`) - **Gemini 3 Pro Image** (`fal-ai/gemini-3-pro-image-preview`) - **Imagen 4** (`fal-ai/imagen4/preview`) - **Imagen 4 Fast** (`fal-ai/imagen4/preview/fast`) - **Imagen 4 Ultra** (`fal-ai/imagen4/preview/ultra`) - **GPT-Image-2** (`fal-ai/gpt-image-2`) - **GPT-Image-1.5** (`fal-ai/gpt-image-1.5`) - **GPT-Image-1 Mini** (`fal-ai/gpt-image-1-mini`) - **Reve** (`fal-ai/reve/text-to-image`) - **Reve Remix** (`fal-ai/reve/remix`) - **Recraft V3** (`fal-ai/recraft/v3/text-to-image`) - **Ideogram V3** (`fal-ai/ideogram/v3`) - **Hidream I1** (`fal-ai/hidream-i1-full`, `fal-ai/hidream-i1-dev`, `fal-ai/hidream-i1-fast`) ### Via Google AI Studio (Gemini API) - **Google Gemini 3.1 Flash Image Preview**, a.k.a. **Nano Banana 2** (`gemini-3.1-flash-image-preview`) - **Google Gemini 3 Pro Image Preview**, a.k.a. **Nano Banana Pro** (`gemini-3-pro-image-preview`) - **Google Gemini 2.5 Flash Image**, a.k.a. **Google Nano Banana** (`gemini-2.5-flash-image`) - **Google Imagen 4** (`imagen-4.0-generate-001`, `imagen-4.0-ultra-generate-001`, `imagen-4.0-fast-generate-001`) ### Via OpenAI - **OpenAI GPT-Image-2** (`gpt-image-2`) - **OpenAI GPT-Image-1.5** (`gpt-image-1.5`) - **OpenAI GPT-Image-1** (`gpt-image-1`) - **OpenAI GPT-Image-1-Mini** (`gpt-image-1-mini`) ### Via Replicate - **FLUX.2** (`black-forest-labs/flux-2-dev`, `black-forest-labs/flux-2-pro`, `black-forest-labs/flux-2-flex`) - **FLUX Kontext** (`black-forest-labs/flux-kontext-max`, `black-forest-labs/flux-kontext-dev`) - **FLUX 1.1 Pro** (`black-forest-labs/flux-1.1-pro`) - **FLUX Schnell** (`black-forest-labs/flux-schnell`) - **FLUX Dev** (`black-forest-labs/flux-dev`) - **OpenAI GPT-Image-2** (`openai/gpt-image-2`) - **OpenAI GPT-Image-1.5** (`openai/gpt-image-1.5`) - **OpenAI GPT-Image-1** (`openai/gpt-image-1`) - **OpenAI GPT-Image-1-Mini** (`openai/gpt-image-1-mini`) - **Nano Banana 2** (`google/nano-banana-2`) - **Nano Banana Pro** (`google/nano-banana-pro`) - **Nano Banana** (`google/nano-banana`) - **Google Imagen 4** (`google/imagen-4`, `google/imagen-4-ultra`, `google/imagen-4-fast`) - **Recraft v3** (`recraft-ai/recraft-v3`) - **Reve Create, Edit, Remix** (`reve/create`, `reve/edit`, `reve/remix`) - **Ideogram v3** (`ideogram-ai/ideogram-v3-turbo`, `ideogram-ai/ideogram-v3-quality`, `ideogram-ai/ideogram-v3-balanced`) - **Bytedance Seedream 5 Lite** (`bytedance/seedream-5-lite`) - **Bytedance Seedream 4.5** (`bytedance/seedream-4.5`) - **Bytedance Seedream 4** (`bytedance/seedream-4`) - **Bytedance Seededit 3.0** (`bytedance/seededit-3.0`) - **Tencent Hunyuan Image 3** (`tencent/hunyuan-image-3`) - **Stability AI Stable Diffusion 3.5 Large** (`stability-ai/stable-diffusion-3.5-large`) - **Minimax Image 01** (`minimax/image-01`) - **Qwen Image** (`qwen/qwen-image`, `qwen/qwen-image-edit`) You can select from these models when generating or editing images, depending on your connected provider and the task at hand. ## Contributing Contributions are welcome! Please open an [issue](https://github.com/WP-Autoplugin/wp-banana/issues) or submit a pull request. [![Ask DeepWiki](https://deepwiki.com/badge.svg)](https://deepwiki.com/WP-Autoplugin/wp-banana) ## License GPL-2.0 or later — [https://www.gnu.org/licenses/gpl-2.0.html](https://www.gnu.org/licenses/gpl-2.0.html)

WordPress Themes & Plugins LLM Tools & Chat UIs
108 Github Stars
hub2wp
Open Source

hub2wp

# hub2wp hub2wp is a WordPress plugin that lets you discover, install, and update plugins and themes hosted on GitHub directly from your WordPress dashboard. By leveraging GitHub's ecosystem, it provides a straightforward way to extend your WordPress site beyond the resources available on WordPress.org. hub2wp does not require any changes to existing plugins or approvals from a central authority to make themes and plugins discoverable or updatable. All it takes is for developers to add the `wordpress-plugin`/`wordpress-theme` tag to their public GitHub repository. hub2wp automatically verifies that a repository is a valid WordPress extension. Thousands of valid plugins and themes are already available on GitHub, ready to be installed right away! Private repositories are also supported, and you can manually set up update monitoring for themes and plugins installed outside hub2wp. ![GitHub Plugin Browsing](assets/hub2wp-screenshot-1.png) Also check out the [hub2wp Plugin Repository](https://hub2wp.com/) a public website to browse, search, and explore WordPress plugins hosted on GitHub. --- ## Features - **Search GitHub Plugins and Themes**: Browse and search repositories on GitHub to find plugins and themes that meet your needs. - **Install with One Click**: Easily add GitHub-hosted plugins and themes to your site. - **Update Management**: Receive notifications and perform updates for GitHub plugins and themes directly from your admin panel, like you would for WordPress.org plugins. - **Optional GitHub Token Support**: Increase the GitHub API rate limit by adding a personal access token. Normal usage does not require a token, thanks to GitHub's generous API limits for unauthenticated requests. - **Caching**: Built-in caching minimizes API requests for faster performance and reduced API quota usage. - **Manual Update Monitoring**: Set up update monitoring for plugins and themes installed outside hub2wp. - **Private Repository Support**: Browse, install, and update plugins and themes from private GitHub repositories. - **Release-Based Updates**: When a repository has GitHub releases, hub2wp uses the latest release tag for version checks and downloads. This behavior can be disabled in settings to fall back to branch-based checking. - **Custom Branch Tracking**: Track a specific branch for updates instead of the repository's default branch. --- ## How It Works 1. **Plugin and Theme Eligibility**: To appear in hub2wp as an installable package, a repository must have the `wordpress-plugin` or `wordpress-theme` GitHub topic. Plugins also need a `Stable tag:` header in their `readme.txt` or `readme.md`, and themes need a `Version:` header in `style.css`. These version headers are used for update monitoring. 2. **Update Mechanism**: hub2wp checks for updates using a two-step priority system. First, if the repository has GitHub releases, it uses the **latest release tag** to determine the current version and downloads the release archive. If no releases exist — or if release-based checking is disabled in "Settings > GitHub Plugins" — it falls back to reading the `Stable tag:` or `Version:` header from the tracked branch (the repository's default branch, or a custom branch you configure). When a new version is detected, you will receive an update notification in your WordPress dashboard, allowing you to update the plugin or theme directly from there. 3. **Installation**: - Install the latest GitHub release with WP-CLI: ```bash wp plugin install "https://github.com/WP-Autoplugin/hub2wp/archive/refs/tags/$(curl -fsSL https://api.github.com/repos/WP-Autoplugin/hub2wp/releases/latest | php -r '$release = json_decode(stream_get_contents(STDIN), true); echo $release[\"tag_name\"];').zip" --activate ``` - Or download the latest release from the [Releases](https://github.com/WP-Autoplugin/hub2wp/releases) page and upload the ZIP file via the 'Plugins' screen in WordPress or extract it to the `/wp-content/plugins/` directory. - Activate hub2wp from the 'Plugins' menu. - Start exploring GitHub plugins under "Plugins > Add GitHub Plugin". Browse themes by clicking on the "GitHub Themes" button under "Appearance > Themes". 4. **Configuration (Optional)**: - Add a personal GitHub token in “Settings > GitHub Plugins” to increase API limits and access private repositories. - Adjust caching settings for optimized performance. - Set up update monitoring for manually installed plugins and themes. --- ## Screenshots <details> <summary>GitHub Plugin Browsing</summary> ![GitHub Plugin Browsing](assets/hub2wp-screenshot-1.png) </details> <details> <summary>Plugin Details Popup</summary> ![Plugin Details Popup](assets/hub2wp-screenshot-2.png) </details> <details> <summary>Set up Update Monitoring for Plugins on the Settings Page</summary> ![Set up Update Monitoring for Plugins on the Settings Page](assets/hub2wp-screenshot-4.png) </details> <details> <summary>Update Processing via GitHub API</summary> ![Update Processing via GitHub API](assets/hub2wp-screenshot-3.png) </details> --- ## FAQs **Do I need a GitHub token?** No, but adding one increases the API request limit, which may be useful for high usage scenarios. Without a token, you can make up to 60 API requests per hour, which is sufficient for most users. You only need a token if you have a large number of plugins or if you want to use private repositories. **Will this plugin interfere with WordPress.org plugins?** No, hub2wp operates independently of WordPress.org and only manages plugins sourced from GitHub. **What happens if a plugin is updated on GitHub?** hub2wp will first check the repository's latest GitHub release for a new version. If the repository has no releases (or you have disabled release-based checking in settings), it falls back to reading the `Stable tag:` version from the tracked branch. Either way, when a new version is detected you will receive an update notification in your WordPress dashboard. **Can I use hub2wp for private repositories?** Yes, you can add private repositories to hub2wp by providing a GitHub token with the appropriate permissions. Private repositories will be listed in a separate tab in the plugin browser. --- ## Developer-Friendly hub2wp is designed to be useful for site builders and developers, not just end users. It supports private repositories, custom tracked branches, and release-priority update checking. It also exposes filters so projects can adapt hub2wp to their own workflow without forking the plugin. ### WP-CLI hub2wp now ships with tracked GitHub install commands for plugins and themes: ```bash wp hub2wp plugin install owner/repo --activate wp hub2wp plugin list wp hub2wp theme install owner/repo --activate wp hub2wp theme list ``` Useful flags: - `--branch=<branch>` to track a specific branch. - `--no-release-priority` to force branch-based tracking even if releases exist. - `--token=<token>` to install from a private repository or override the stored hub2wp token for this run. These commands install the extension from GitHub and immediately register it in hub2wp's monitored plugins or monitored themes list so update checks behave the same as installs started from the hub2wp UI. The `list` commands show the tracked plugin or theme name, GitHub repository, and local directory/slug. You can also manage hub2wp settings from WP-CLI: ```bash wp hub2wp settings set access_token ghp_xxx wp hub2wp settings set cache_duration 6 wp hub2wp settings get access_token wp hub2wp settings list ``` ### Filters Current custom filters: - **`hub2wp_repo_tracking_preferences`**: Override the effective tracked branch and `prioritize_releases` setting for one repository. - **`hub2wp_github_request_args`**: Adjust request arguments before a GitHub API request is sent. Useful for timeouts, custom headers, or enterprise/proxy integrations. - **`hub2wp_install_source_context`**: Override the resolved source context after hub2wp decides between branch-based and release-based tracking. - **`hub2wp_compatibility_result`**: Adjust the final compatibility result after plugin/theme headers have been parsed. Example: ```php add_filter( 'hub2wp_repo_tracking_preferences', function( $preferences, $owner, $repo, $repo_type, $repo_data ) { if ( 'acme' === $owner && 'my-plugin' === $repo ) { $preferences['branch'] = 'develop'; $preferences['prioritize_releases'] = false; } return $preferences; }, 10, 5 ); add_filter( 'hub2wp_github_request_args', function( $args, $url, $github_api ) { $args['timeout'] = 20; return $args; }, 10, 3 ); add_filter( 'hub2wp_install_source_context', function( $context, $owner, $repo, $github_api ) { if ( 'acme' === $owner && 'my-plugin' === $repo ) { $context['source'] = 'branch'; $context['uses_releases'] = false; $context['ref'] = 'develop'; $context['download_url'] = $github_api->get_download_url( $owner, $repo, 'develop' ); } return $context; }, 10, 4 ); add_filter( 'hub2wp_compatibility_result', function( $compatibility, $headers, $owner, $repo, $repo_type, $source_context, $github_api ) { if ( 'acme' === $owner && 'legacy-plugin' === $repo ) { $compatibility['is_compatible'] = true; $compatibility['reason'] = ''; } return $compatibility; }, 10, 7 ); ``` --- ## Agentic Workflows hub2wp is designed to be fully operable by AI agents and automated systems without any manual UI interaction. It exposes three complementary interfaces that agents can use to install, inspect, and maintain GitHub-hosted WordPress plugins and themes. The preferred interface order is: 1. **WP-CLI** for routine local administration. 2. **Abilities API** for structured PHP or REST execution on WordPress 6.9+. 3. **Admin UI** for interactive browsing or dashboard-specific tasks only. ### WP-CLI Every hub2wp operation is available as a WP-CLI command, making the plugin fully scriptable. See the [WP-CLI](#wp-cli) commands in the Developer-Friendly section above for the complete command reference. Agents should prefer hub2wp's own install commands over raw `wp plugin install` or `wp theme install` so that update tracking is set up automatically alongside the installation. ### Abilities API On WordPress 6.9 and later, hub2wp registers structured abilities through the WordPress Abilities API. Abilities provide typed input/output schemas that make hub2wp's functionality easy to call from PHP code, other plugins, or the REST API. Two categories are registered: - **`hub2wp-discovery`** – Read-only abilities for inspecting repositories and tracked items. These are also exposed via the REST API under `/wp-json/wp-abilities/v1`. - **`hub2wp-management`** – Mutating abilities for installing extensions, clearing the cache, and running update checks. Available in PHP only. | Ability | Category | REST | |---|---|---| | `hub2wp/list-tracked-plugins` | discovery | ✓ | | `hub2wp/list-tracked-themes` | discovery | ✓ | | `hub2wp/get-repository-details` | discovery | ✓ | | `hub2wp/check-repository-compatibility` | discovery | ✓ | | `hub2wp/install-plugin-from-github` | management | – | | `hub2wp/install-theme-from-github` | management | – | | `hub2wp/clear-cache` | management | – | | `hub2wp/run-update-check` | management | – | ### Skill for AI Agents hub2wp ships with a structured **skill** at `skills/hub2wp/` that AI coding assistants and autonomous agents can load to understand how to operate the plugin correctly. Any agent that loads this skill will know to prefer hub2wp's own commands for GitHub packages over raw WordPress installs, preserve update-tracking semantics, and avoid exposing GitHub tokens in outputs. The skill includes: - **`SKILL.md`** – A concise instruction file describing the preferred interface order, environment verification steps, and guardrails for handling secrets and troubleshooting. - **`references/operations.md`** – A complete command-and-ability reference with copy-paste examples for every WP-CLI command, PHP ability invocation, and REST endpoint. - **`agents/openai.yaml`** – An OpenAI-compatible agent definition for structured tool-use integrations. --- ## Contribution hub2wp is open source and welcomes contributions. If you encounter issues or have suggestions, please create an issue or pull request in the [GitHub repository](https://github.com/WP-Autoplugin/hub2wp). --- ## Changelog See [readme.txt](readme.txt) for the full changelog.

WordPress Themes & Plugins Code Quality & Linting
73 Github Stars
llms-txt-for-wp
Open Source

llms-txt-for-wp

# LLMs.txt for WP LLMs.txt for WP is a WordPress plugin designed to generate machine-learning-friendly content from your site. It automatically creates an `llms.txt` file that compiles key content in a standardized format, making your site ready for Large Language Models (LLMs). This ensures that your content can be easily discovered and utilized by AI tools and applications. Additionally, this plugin allows you to access **Markdown versions of your posts** by appending `.md` to the post URLs or by sending an `Accept: text/markdown` header. Posts automatically include a `<link rel="alternate" type="text/markdown">` tag in their HTML `<head>`, and a `Link` HTTP response header pointing to the Markdown version for better discoverability. Markdown responses include an `X-Markdown-Tokens` header indicating the token count of the output. ### About the `llms.txt` Standard The `llms.txt` standard provides a simple, machine-readable file format for webmasters to communicate how their content should be utilized by Large Language Models (LLMs). It works similarly to `robots.txt`, enabling websites to specify which content is intended for training or reference by AI models. By implementing `llms.txt`, you can: - **Promote Discovery**: Help LLMs understand the structure and purpose of your site. - **Define Content Use**: Indicate permissions or restrictions on specific content. - **Control Visibility**: Exclude or highlight specific sections of your site. For more information on the `llms.txt` standard, visit the official website: [https://llmstxt.org/](https://llmstxt.org/). ### Key Features - **Generate llms.txt**: Aggregate key content from your site into an easy-to-read format for machine learning models. - **Markdown Support**: Generate Markdown versions of posts, suitable for LLMs or for lightweight sharing. Markdown responses include an `X-Markdown-Tokens` header with the token count. - **Fully Customizable**: Customize which page or posts are included via an intuitive admin settings page. ## Installation 1. Download the plugin ZIP file from the [releases page](https://github.com/WP-Autoplugin/llms-txt-for-wp/releases). 2. Upload it to your WordPress site via the **Plugins** > **Add New** > **Upload Plugin**. 3. Activate the plugin through the **Plugins** menu in WordPress. ## Usage 1. **Configure Plugin Settings**: Navigate to **Settings** > **LLMs.txt Settings**. 2. **Select Content**: Choose which page or post types to include in the `llms.txt` file. 3. **Markdown Support**: Enable Markdown output via settings and append `.md` to post URLs to view Markdown versions. 4. **Access llms.txt**: Open `https://yourdomain.com/llms.txt` to view the file ready for LLM consumption. ### Admin Settings - **Selected Content for llms.txt**: Include specific pages or posts. - **Post Types to Include**: Define which types of content (e.g., posts, pages) appear in `llms.txt`. - **Post Limit**: Set the maximum number of posts to include. - **Markdown Support**: Enable or disable `.md` file extension for post URLs. ## Frequently Asked Questions ### Why use the llms.txt standard? The `llms.txt` standard allows webmasters to provide structured data for Large Language Models, similar to how `robots.txt` serves search engines. This can improve the discoverability and usability of your content by AI tools, while also giving you control over what is included. It's [quickly becoming a standard practice](https://directory.llmstxt.cloud/) for AI-friendly websites. ### How do I access the Markdown versions of posts? Once Markdown support is enabled, you can access Markdown versions in three ways: 1. Append `.md` to any post's URL (e.g., `https://example.com/your-post.md`) 2. Send an `Accept: text/markdown` header in your HTTP request 3. Look for the `<link rel="alternate" type="text/markdown">` tag in the post's HTML `<head>` to discover the Markdown URL Markdown responses also include an `X-Markdown-Tokens` header indicating the approximate token count of the Markdown output, useful for LLM context management. ### Can I control which posts are included in llms.txt? Yes! The plugin can be configured to include specific post types and limit the number of posts included in the `llms.txt` file. You can also choose to include a specific page only. ## Screenshots 1. **Admin Settings Page** - Easily manage content for `llms.txt` and enable Markdown support. ![Admin Settings Page](assets/screenshot-1.png) 2. **Markdown Output** - Example of a blog post converted to Markdown format. ![Markdown Output](assets/screenshot-2.png) ## Demo You can view a demo of the plugin in action on my blog at [WebWizWork.com](https://www.webwizwork.com/llms.txt). ## Changelog ### 1.1.1 - Added X-Markdown-Tokens header for Markdown responses to indicate the number of tokens in the Markdown output. ### 1.1.0 - Markdown versions can now be accessed by sending the "Accept: text/markdown" header. - link rel="alternate" type="text/markdown" added to post headers for better discoverability of Markdown versions. ### 1.0.0 - Initial release of LLMs.txt for WP. - Added functionality to generate `llms.txt`. - Added Markdown support for posts. ## License This plugin is licensed under the GPL v2 or later. For more information, please see the [GNU General Public License](https://www.gnu.org/licenses/gpl-2.0.html). ## Contributing Contributions are welcome! Feel free to fork the repository, submit issues, or create pull requests. --- **Note:** This plugin uses the [league/html-to-markdown](https://github.com/thephpleague/html-to-markdown) library for HTML to Markdown conversion. Stable tag: 1.1.1

WordPress Themes & Plugins LLM Tools & Chat UIs
45 Github Stars